Configure Account Manager users for Salesforce Integration SSO
Objective
To configure your Account Manager user profiles so that your users automatically log into the 8x8 Integrations for Salesforce v3.1 when they log into Salesforce, using only their Salesforce login credentials.
This guide applies specifically to 8x8 Account Manager user accounts.
To configure Salesforce SSO in Admin Console, click here.
Applies To
- Account Manager
- Salesforce
- 8x8 Integrations for Salesforce v3.1 (Maestro)
- Integration Single Sign-On
Procedure
Configuring Account Manager User Profiles for SSO
In Account Manager, you have the option to modify and upload a CSV file containing multiple users' information, or you can configure one user at a time.
Configure Salesforce SSO for multiple users at once
- Log in to Account Manager.
- Go to Accounts > User Profiles.
- Click Edit/Viewable Hidden Fields.
- Towards the bottom of the Edit User Profile Fields window, ensure the box for SFDC ID is checked.
- Click Save.
- To the right and below the User Profiles table, click Download CSV Template.
- Download and open the file in a spreadsheet editor.
- Edit the Salesforce ID field for each Salesforce user, entering their individual Salesforce Username (Salesforce login ID).
- You may also make changes to any other other information that needs updating.
Important: Do not make any changes to the 8x8 Internal ID column of the CSV file template.
- Once you have made your changes, save the file to your computer hard drive.
- On the Account Manager User Profiles page, click Upload CSV Template, then Proceed.
- Click Add, then locate the file you just saved and click Open, then Upload.
- Verify that the new information is correct and then click Submit.
- Proceed to configure Salesforce in the next section below.
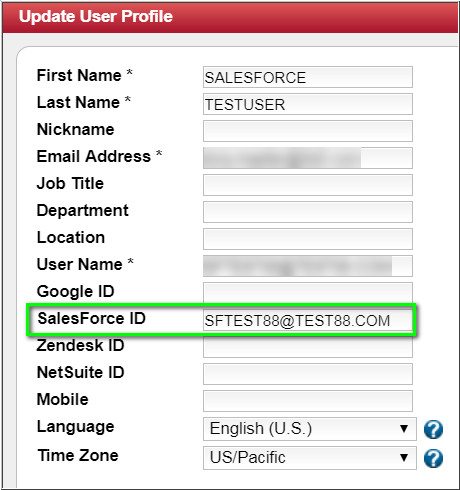
Configure Salesforce SSO for individual users
- In the Account Manager User Profiles page, locate the individual user you wish to configure for SSO access in the table,
- Click Edit from the Actions column.

- In the Update User Profile window, enter the Salesforce ID of the Salesforce user associated with that 8x8 User Profile and phone extension.
- Note: The Salesforce ID and 8x8 User Name are not required to be the same.
- Click Save.
- Repeat this process for each Salesforce integration user to whom you wish to grant SSO access in Salesforce.
- Then proceed to configure Salesforce in the next section below.
- No further configuration is required for the 8x8 Work Integration for Salesforce v3.x (Maestro).
- The 8x8 Contact Center Integration for Salesforce v3.x (Maestro) requires that you also apply the appropriate CTI Adaptor URL in your Salesforce call center. Instructions and a table of URLs for this are located in this article.
That’s it! Users can now log in to Salesforce without needing to separately log in to the 8x8 integration communication panel.