Nomadic 911: 8x8 Voice for Teams Configuration
Overview
The following article contains information regarding the setup of emergency addresses and locations within the Microsoft Teams environment.
With the 8x8 Nomadic 911 service provisioned, this Teams-side configuration is a requirement for all users of 8x8 Voice for Microsoft Teams, who would potentially make emergency service calls through the Microsoft Teams desktop client.
This process is required for ensuring that:
- Emergency calls are properly routed to the appropriate Public Safety Answering Point (PSAP).
- The caller's correct "dispatchable" location information is made available to the emergency services operator.
- Important: This information is provided as a guide to 8x8 Voice for Teams administrators. You may need to tailor these instructions to the configuration of your specific Microsoft Teams tenant. IT administrators who require assistance with configuration of this Teams-side service beyond the documentation below must approach Microsoft support services.
- 8x8 Admin Console: In addition to the Microsoft Teams service configuration, the Emergency Routing Service option must be enabled in Admin Console user profiles for each 8x8 Voice for Microsoft Teams user, even if those Teams users will not be using 8x8 Work phones or applications.
8x8 Voice for Microsoft Teams: Your Voice for Teams service must be configured and fully synced in the 8x8 Voice for Teams admin portal before performing the configuration steps in this article.
- As part of your initial setup sync in the Voice for Teams admin portal, PSTN Usage Records are generated in the Microsoft Teams admin center under Voice > Voice routing policies. These are critical to your Teams users' ability to dial emergency service numbers (911 & 933).
- Please see the Set Up Emergency Call Routing Policy section below for details.
Applies To
- 8x8 Nomadic 911 Service
- 8x8 Voice for Microsoft Teams
- Microsoft Teams
- Microsoft Teams Admin Center
Why do I need to do this?
There are critical differences between calling emergency services from 8x8 Work (an 8x8 desk phone or 8x8 Work for Desktop app) and calling emergency services from Microsoft Teams. This is because 8x8 Work emergency calls route through a different service than Teams clients do.
Because of this, for emergency calls dialed from Microsoft Teams clients or Teams physical phone devices, emergency service location information must be entered into the Microsoft Teams admin center, in Locations > Emergency addresses.
Important: Per Microsoft, "Dynamic emergency calling, including security desk notification, is not supported on the Teams web client."
Planning Your Deployment
Before you begin configuring your Microsoft Teams service environment for Dynamic emergency calling, it's recommended that you gather the following information:
- Public IP addresses
- All public IP addresses that will be presented by the Teams client application when connected to the corporate network (their public NAT IP) must be defined in the Trusted IP list. This includes IPv4 and IPv6 addresses.
- Locations
- Civic Addresses: These are your physical/site locations with unique postal addresses, the primary locations to which emergency responders will be dispatched.
- Places: Places provide more precise dispatchable locations within a civic address, to which an emergency responder can be directed. For example: Building 2, Floor 3, North West corner, etc. Teams user Place locations are are identified by how users are connected to your corporate network, through the following:
- Subnets: Defined by the network ID matching the subnet IP range assigned to clients. For example, the network ID for a client IP/mask of 10.10.10.150/25 is 10.10.10.128.
- Wi-Fi Access Points: For this you would need your wireless access point BSSIDs (a.k.a. MAC addresses).
- Switches: You'll need the Chassis IDs of any switches within your corporate network that your Teams users might be connected to.
- Ports: Location can be further narrowed down on switches. Each port assignment requires the Chassis ID of its switch.
Other Deployment Information to be Aware of
Automatic Address Detection vs Manual Address Entry in Microsoft Teams
Automatic Address Detection
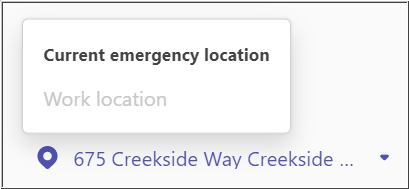
When your Teams environment is properly configured for dynamic location detection within your corporate environment, and Teams user location is automatically detected:
- Teams user calls to 911 emergency services will be routed to a local emergency call center (PSAP), rather than the national response center.
- Teams user calls to the 933 test service will play back the user's detected location for verification.
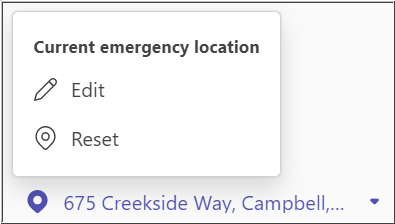
Example: Teams user location has been detected automatically if they have no option to add or edit their emergency location:
Manual Address Entry
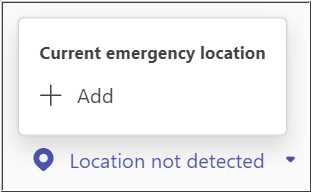
If a Teams user has manually entered their location address instead the location being automatically detected within your corporate environment:
- Teams user calls to 911 emergency services will be routed to a national response center instead of a local call center (PSAP). In this case, the Teams user will be asked to provide their location, and will then be transferred to a PSAP.
- Teams user calls to the 933 test service will not play back the user's configured location, as location detection has failed.
Example: Teams user location detection has failed if the user can Add or Edit their emergency location:
Microsoft Documentation
The following external resources are publicly available from Microsoft, and can prove useful for guidance in performing your service configuration:
- Plan and configure dynamic emergency calling
- Microsoft Teams Dynamic Emergency Calling (Video, 01:13:44)
- Microsoft Teams Emergency Calling Explained (Video, 00:07:48 Introduction)
Regarding Mac Users
Several network elements can be configured for user location detection in the Teams tenant (Subnets, Wi-Fi Access Points, Switches, Ports).
If location place detection is configured for Switches and Ports, installation of the Teams Helper for Mac is required, to provide LLDP support.
The application can be found on Microsoft's web site:
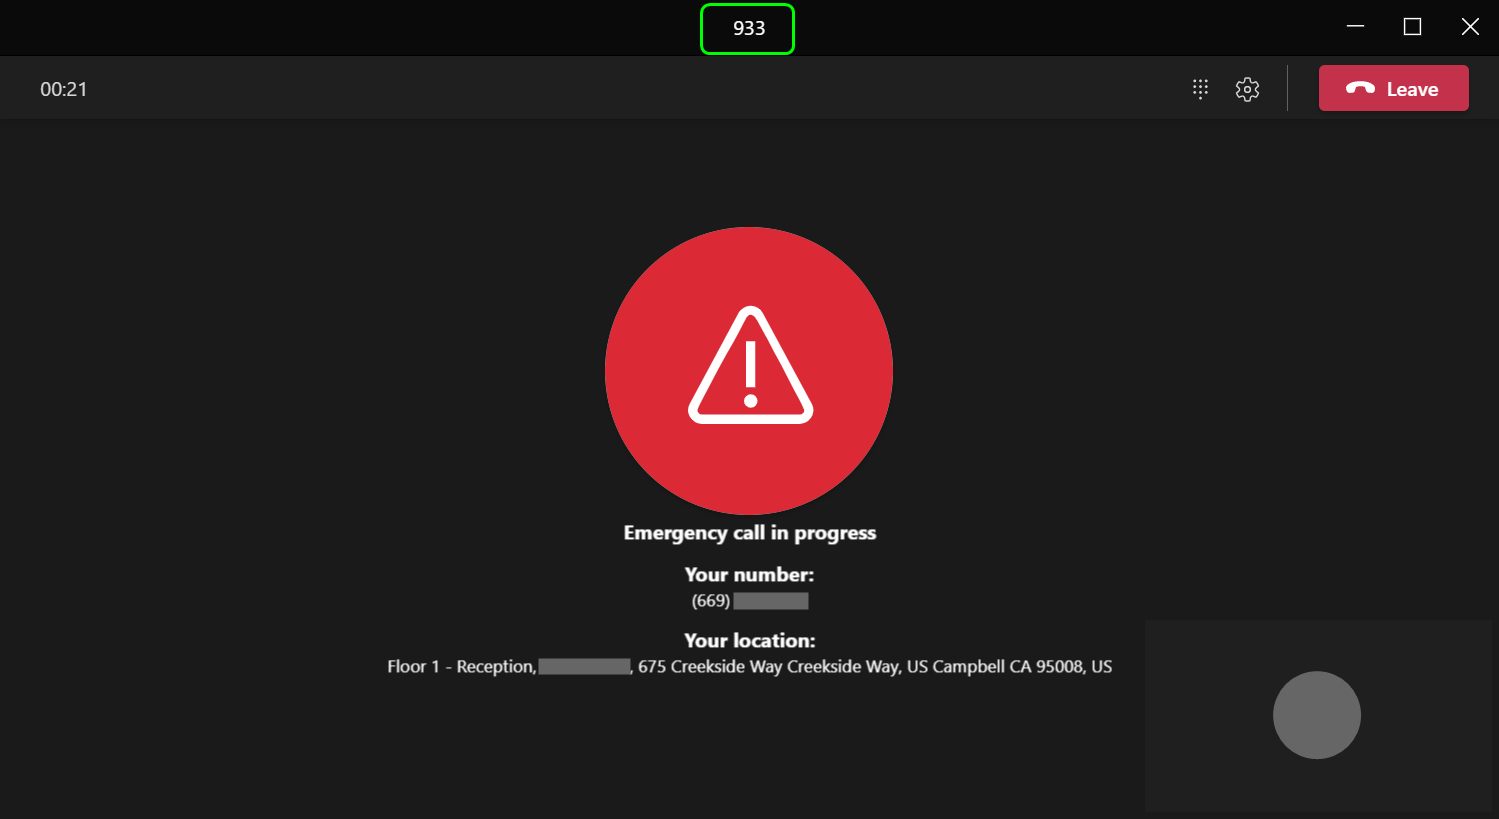
Emergency Service 933 Test Calls
Making test calls to 911 can potentially prevent callers with an actual emergency from reaching an emergency services operator. However, you'll still want to verify that location detection works for your users.
The solution to this is that your Teams users should dial 933 instead of 911, once your Teams tenant has been configured for dynamic emergency calling.
When a Teams user dials 933, the answering test service will receive the same information that is relayed during an actual emergency 911 call. The 933 service will play back the caller's detected phone number and address for verification.
Note: Both 911 and 933 dialing are configured when you set up an Emergency Call Routing Policy.
8x8 Emergency Routing Service Portal
The 8x8 Emergency Routing Service portal is used to configure, store, and supply emergency response location information for 8x8 Work users who must have the Nomadic 911 service enabled.
- Teams Only: Configuration in the 8x8 Emergency Routing Service portal is not required if Microsoft Teams is the only phone endpoint available to your Teams users.
- Teams and 8x8 Work: Configuration of both the Microsoft Teams tenant and the 8x8 Emergency Routing Service portal is required in the following scenarios:
- When there are Teams client users who also use 8x8 Work desk phones and/or the 8x8 Work for Desktop application.
- When your 8x8 Voice for Teams service is a mixed environment which includes both Teams users and 8x8 Work users.
Information regarding 8x8 Work emergency calling configuration is available in the Nomadic 911 Administration and Planning Guides.
Important Clarification:
- Emergency Routing Service portal: This refers to the administrative portal where Nomadic 911 location detection configuration is applied regarding only 8x8 Work extension users.
- This portal is not used in any way for Microsoft Teams application user location detection.
- Emergency Routing Service option: This refers to the Nomadic 911 service enablement option in 8x8 Admin Console user profiles.
- This option is required to be enabled for both 8x8 Voice for Microsoft Teams and 8x8 Work users.
- Please see this section for further information.

Deployment
The instructions below are for general guidance, only. You may need to tailor them to your specific corporate environment.
The following topics are covered:
- Set Up Trusted IP Addresses
- Set Up Emergency Addresses
- Set Up Networks & Locations
- Set Up Emergency Call Routing Policy
- Set Up Emergency Calling Policy
- Set Up Network Sites (Optional)
- Enable Emergency Routing Service for Users in 8x8 Admin Console
Note: 8x8 Support cannot provide assistance with the Microsoft Teams environment configuration. lf you need additional assistance beyond the contents of this article, please contact Microsoft Support.
Set Up Trusted IP Addresses
Trusted IPs are your public, external internet addresses tied to your enterprise network (typically through NAT).
They are used to determine whether or not the Teams user client application is connected through your corporate network. This in turn affects how the Teams client app behaves when a location is detected, or when no location is detected.
Important:
- Entry of Trusted IPs is critical: When the Teams application is determining its location, the Trusted IPs are checked before anything else. If no match is found, the emergency location discovery process will fail.
- All public IP addresses that will be presented by Teams clients when connected to the corporate network (their public NAT IP) must be defined in the Trusted IP list. This includes IPv4 and IPv6 addresses.
Also:
- Changes to Locations > Network Topology in the Microsoft Teams admin center environment (such as Trusted IPs) can take up to two hours to become operationally active due to Microsoft's caching process.
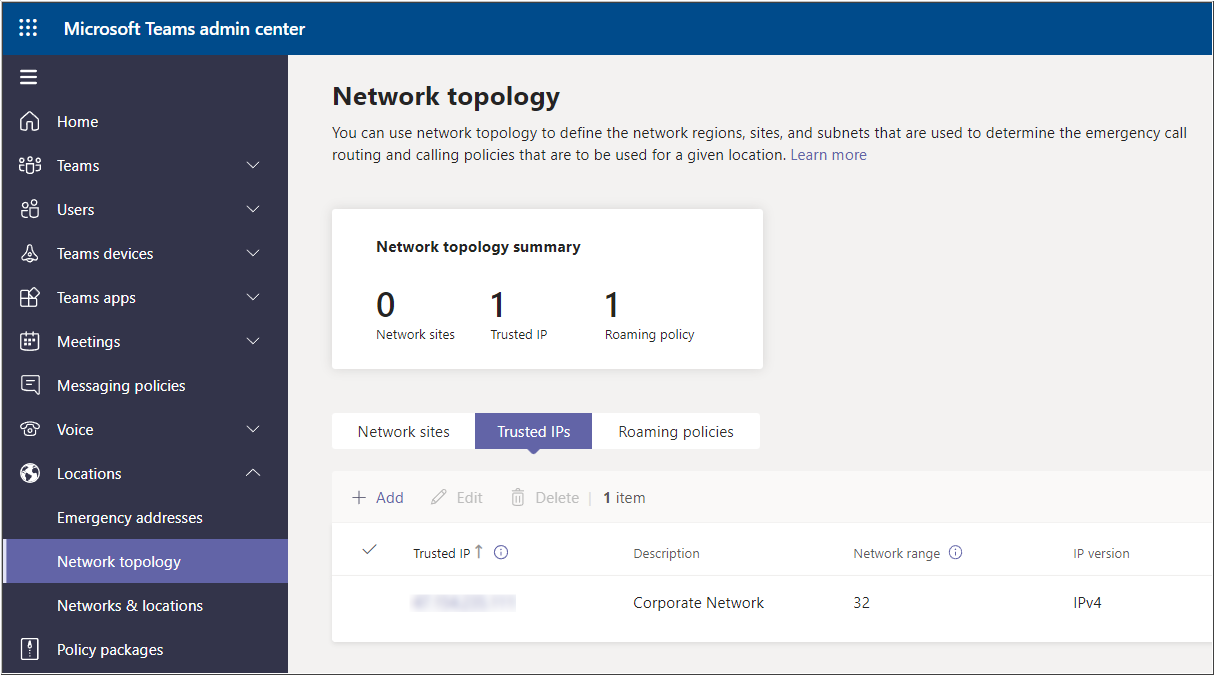
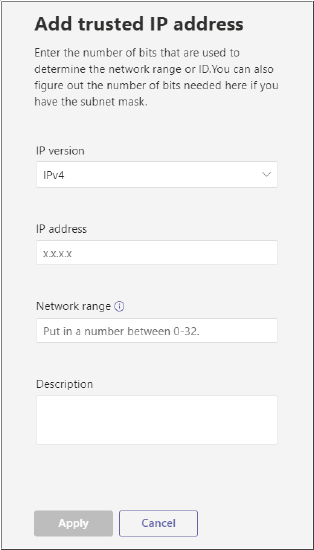
To add a Trusted IP address:
- In the Microsoft Teams admin center, navigate to Locations > Network topology and click on the Trusted IPs tab.
- Click Add.
- In the Edit trusted IP address pane, add the following information:
- IP version: Select IPv4 or IPv6 for the type of address you're adding. Microsoft recommends that you add both to your configuration, when possible (you would need to add a new entry for each).
- IP address: Enter the external public IP address your connectivity provider has assigned to your site internet (WAN) connection.
- Network range: Enter a number between 0 and 32 for IPv4 addresses, or 0 through 128 for IPv6 addresses. This is the Mask Bits number of the subnet that the IP address resides in, and governs the total number of hosts that can exist within that subnet. Typically for an address range of a single host, you would enter 32 for IPv4 and 128 for IPv6.
- Description: In this optional field, you can place identifying information that will appear in the list display of Trusted IPs.
- Click Save.
- Repeat this process for each external IP address that your Teams clients may use when connecting from your corporate locations to the Microsoft Teams platform. If using both IPv4 and IPv6 in your environment, configure both.
Set Up Emergency Addresses
Emergency addresses consist of a physical Civic Address (required) plus any optional Places contained within those civic addresses.
Places represent the more granular dispatchable locations to which an emergency responder can be directed. For example: Building 2, Floor 3, North West corner, etc.
Once a Civic Address has been added, you'll have access to add/change Places and their Subnets, Wi-Fi access points, Switches, and Ports.

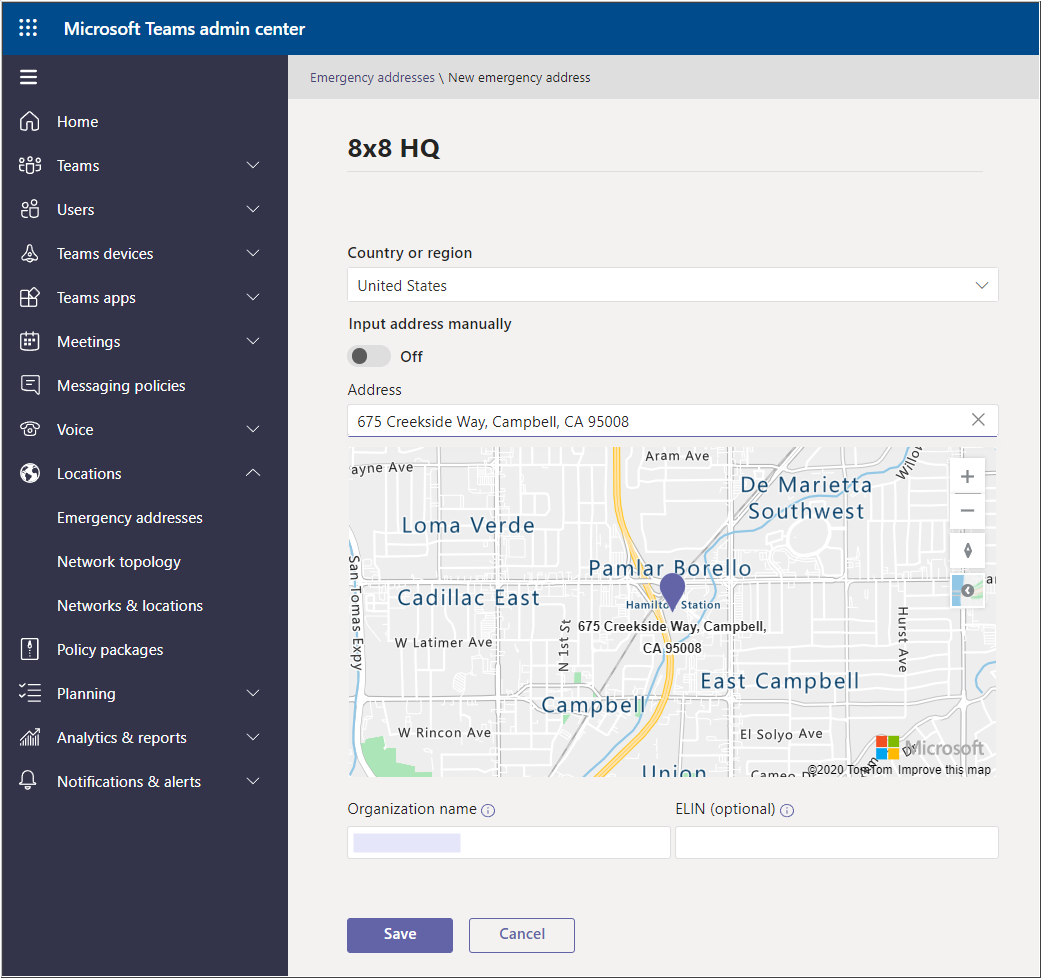
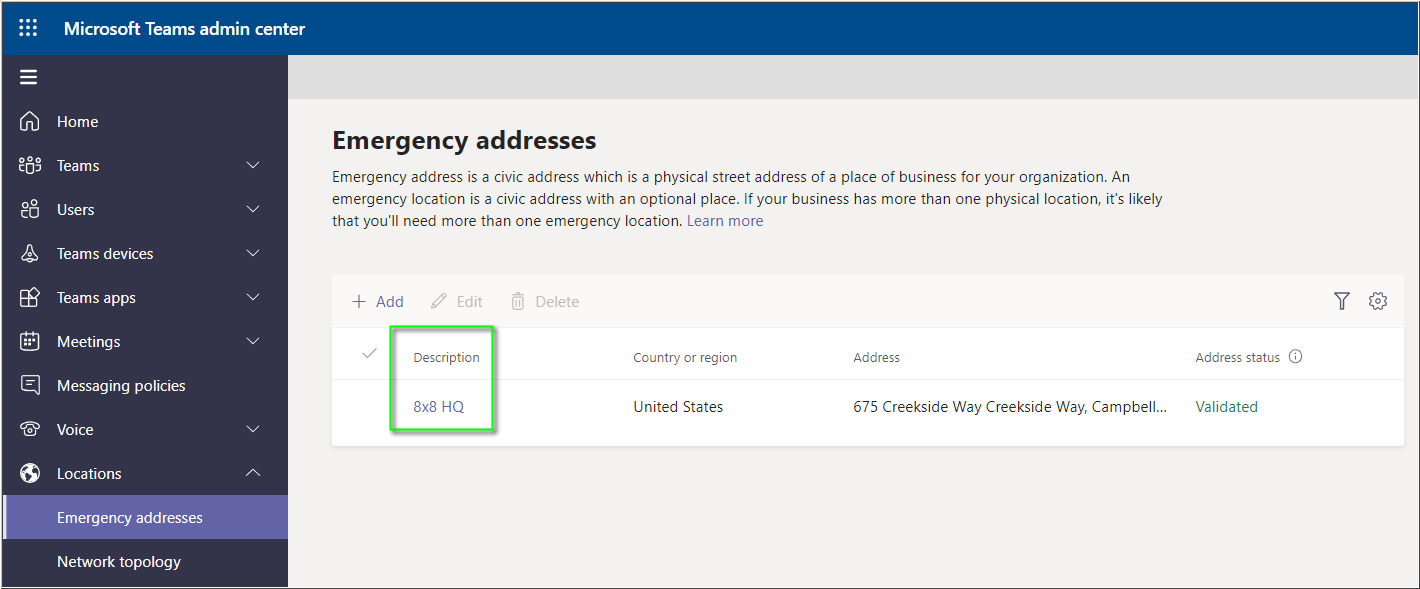
Add Emergency Addresses (a.k.a. Civic Address)
- In the Microsoft Teams admin center, navigate to Locations > Emergency addresses.
- Click + Add.
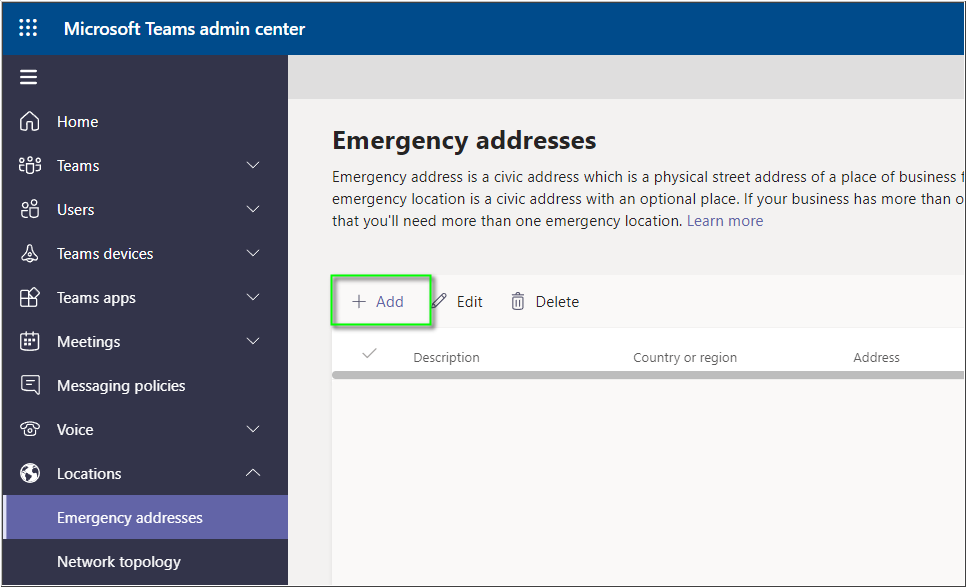
- Enter a name for your emergency address. This name will appear in the Description field as a label for the address entry.
- In County or Region, click the dropdown arrow and select United States or Canada.
- Enter the physical address:
- Set Input address manually to On if you want to manually enter each detail of the physical location information, including GPS Latitude and Longitude info.
- Set Input address manually to Off if you want the service to automatically add the physical location information for you, including GPS Latitude and Longitude.
- Click Save.
- Repeat the process above for each of your Teams user's distinct (corporate) civic address locations, as needed.
Add Place Information to your Emergency Addresses
Once your Emergency Addresses are configured, you can include additional location information (Places) that can narrow down the exact location of a user when they make an emergency call from Teams.
- In the Microsoft Teams admin center, navigate to Locations > Emergency addresses.
- Click on the Description name of the emergency address your are altering.
- On the Places tab, click + Add to begin adding places within your Emergency Address (a.k.a. Civic Address).
Note: You won't enter any information into the Phone numbers tab, as that configuration is not compatible with Microsoft Direct Routing solutions (e.g. 8x8 Voice for Microsoft Teams).
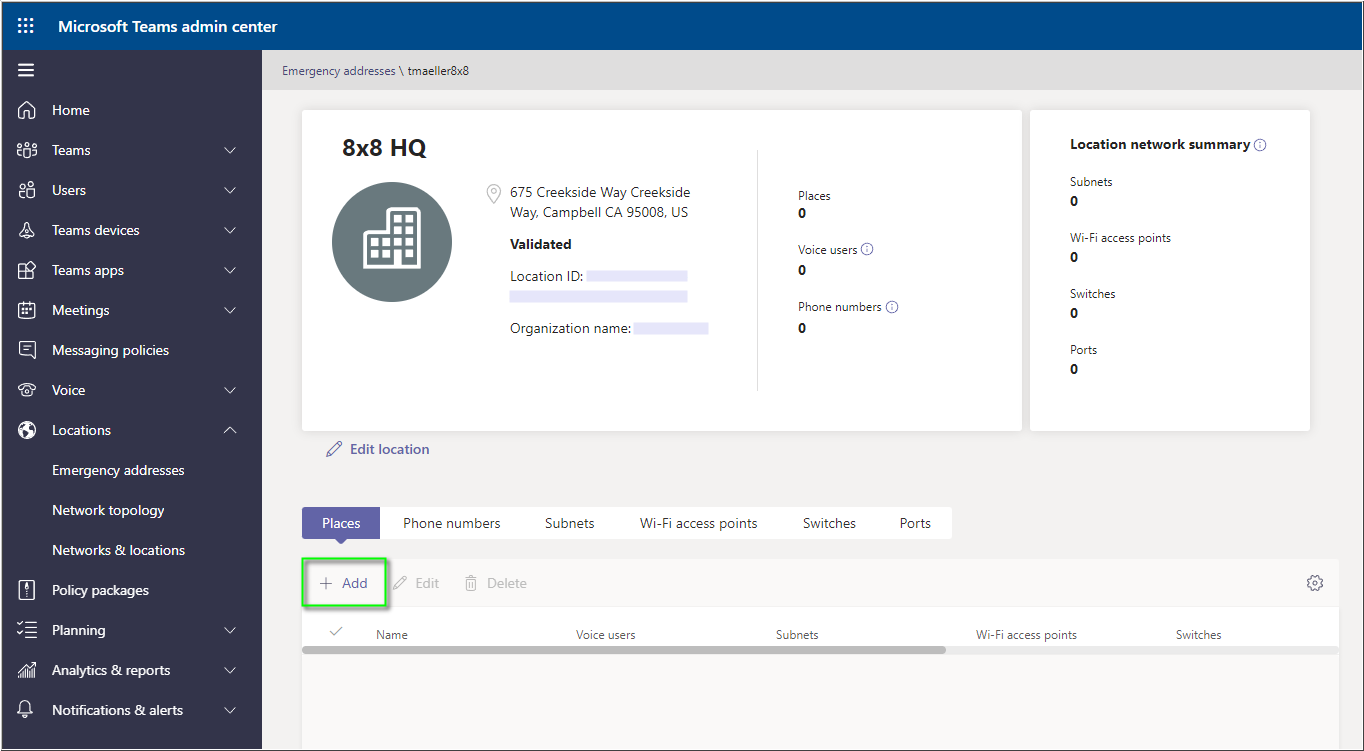
- Enter a unique Name for the place, and click Apply.
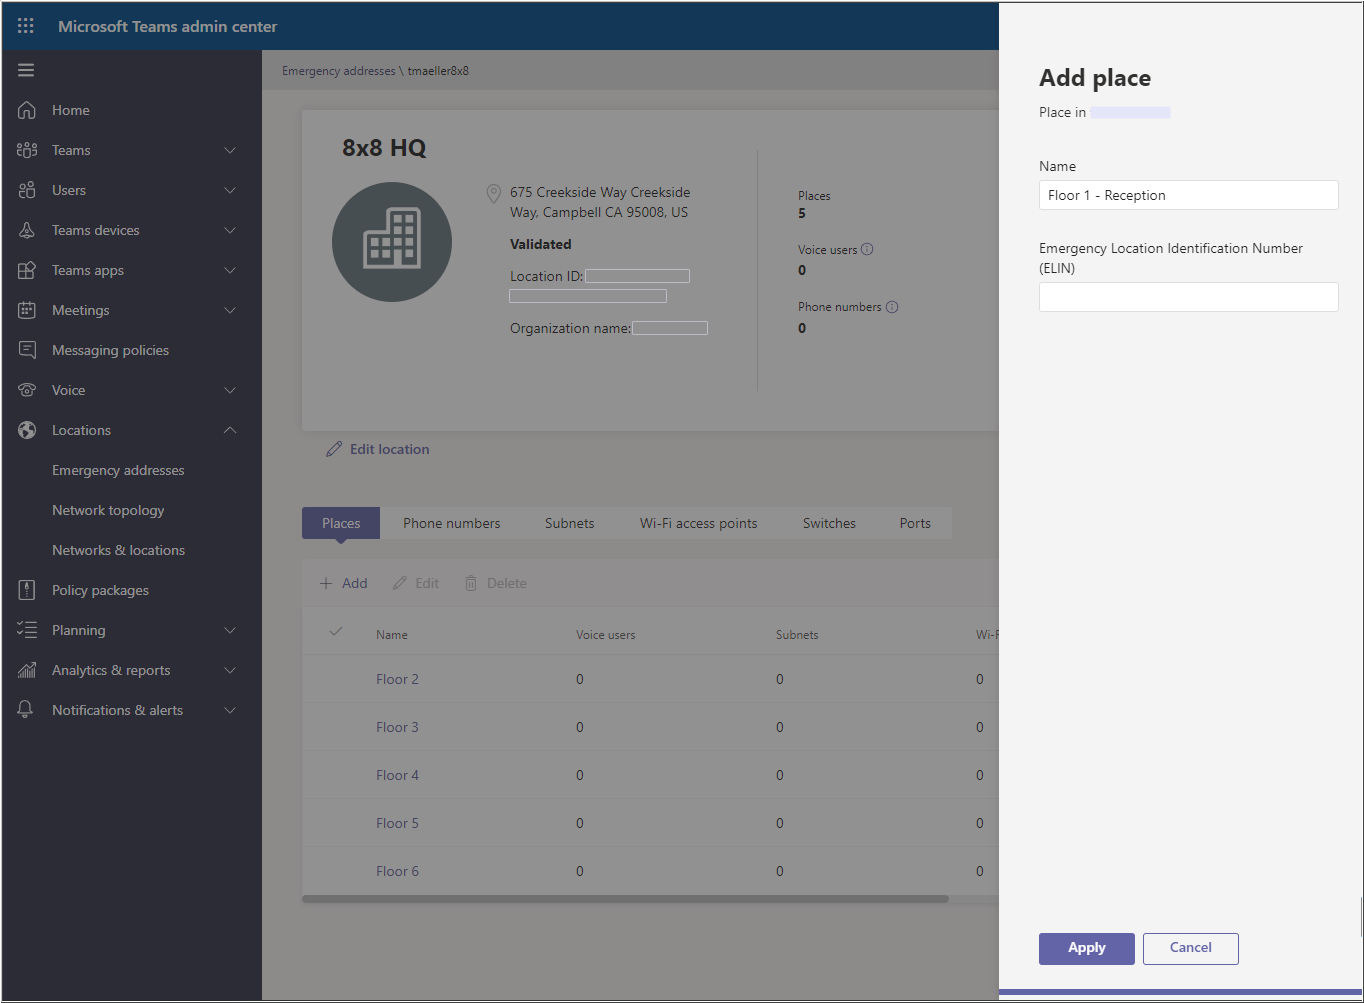
- Create Places for each Location (civic address) that you've added to your configuration, as needed.
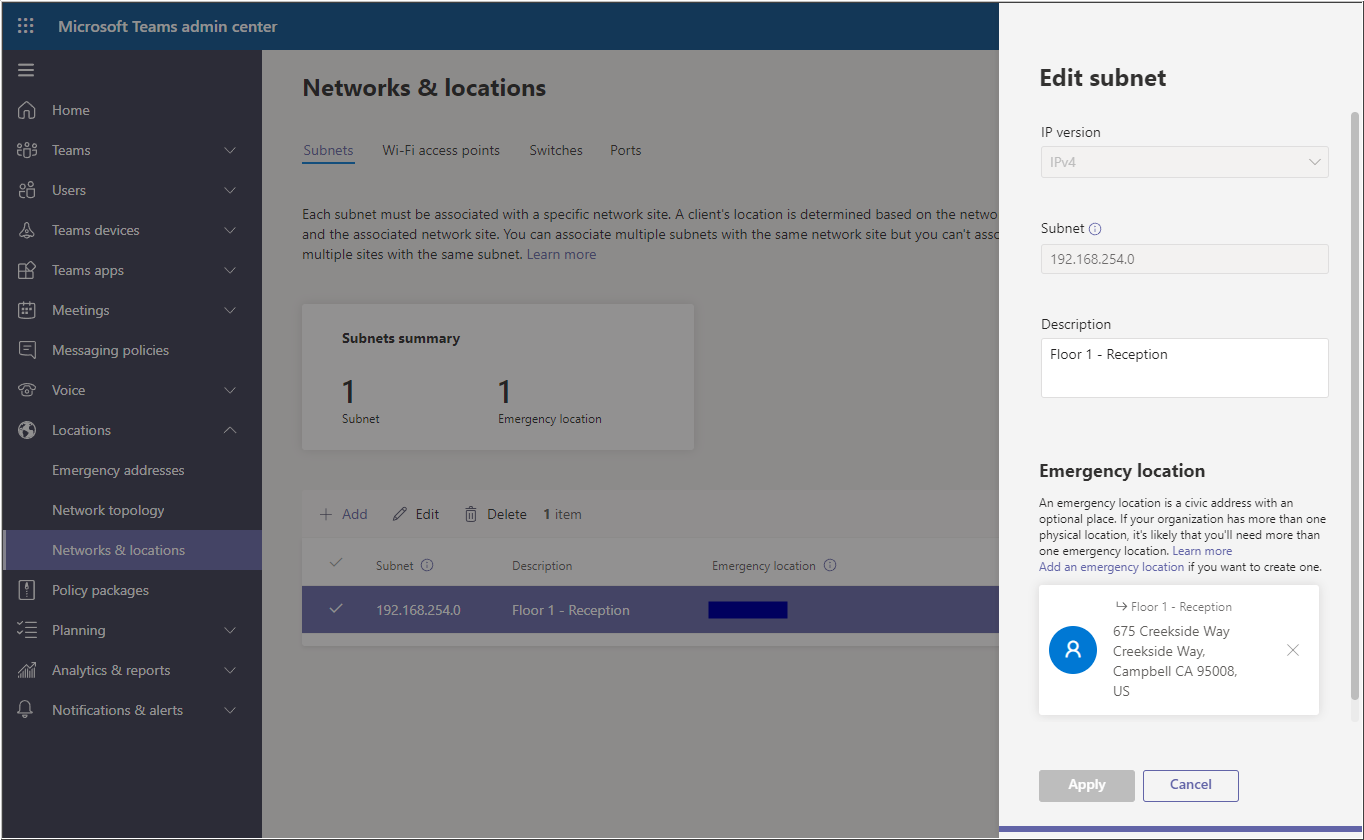
Set Up Networks & Locations
Here you'll provide the network infrastructure information used in the detection of user location, based on the network connection that the Teams client app is currently using.
Important: Changes to Locations > Network Topology in the Microsoft Teams admin center environment (such as Trusted IPs) can take up to two hours to become operationally active due to Microsoft's caching process.
- In the Microsoft Teams admin center, navigate to Locations > Networks & locations. You'll see tab options for each of the following:
- Subnets
- Wi-Fi access points
- Switches
- Ports
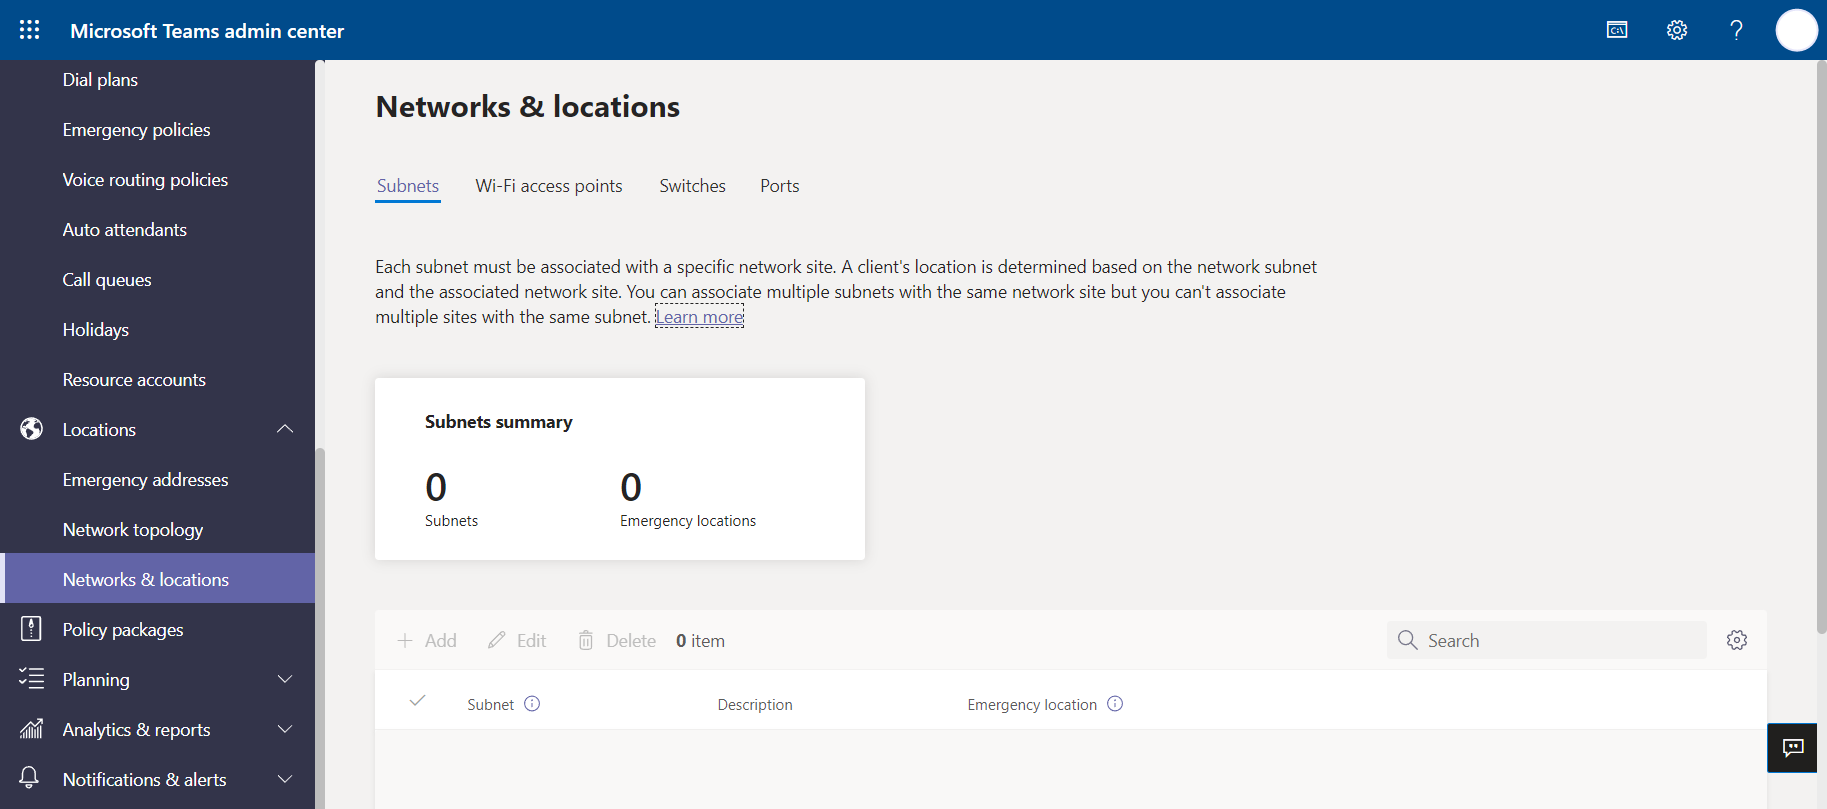
- Click on each location type's individual tab (such as Subnets) and click + Add to begin adding them to your configuration.
- During the process, search for and select the correct civic address, which you will have added in previous steps. This can be narrowed down to specific Places within the civic address, if you've already added them in the steps above.
- Click Apply to save each change.
- Perform the above steps for all locations (civic addresses) and places from which your Teams client users will operate.
Connection matching precedence: The Teams service will check through your configuration in the following order, when trying to determine a user's location and place information:
- Wi-Fi access points
- Ports
- Switches
- Subnets
Set Up Emergency Call Routing Policy
In this section, you'll create or configure an Emergency Call Routing Policy.
Emergency Call Routing Policies are not related to user location discovery. Instead, they are used to set up emergency numbers for Direct Routing (e.g. 8x8 Voice for Microsoft Teams) and then specify how those emergency calls are routed.
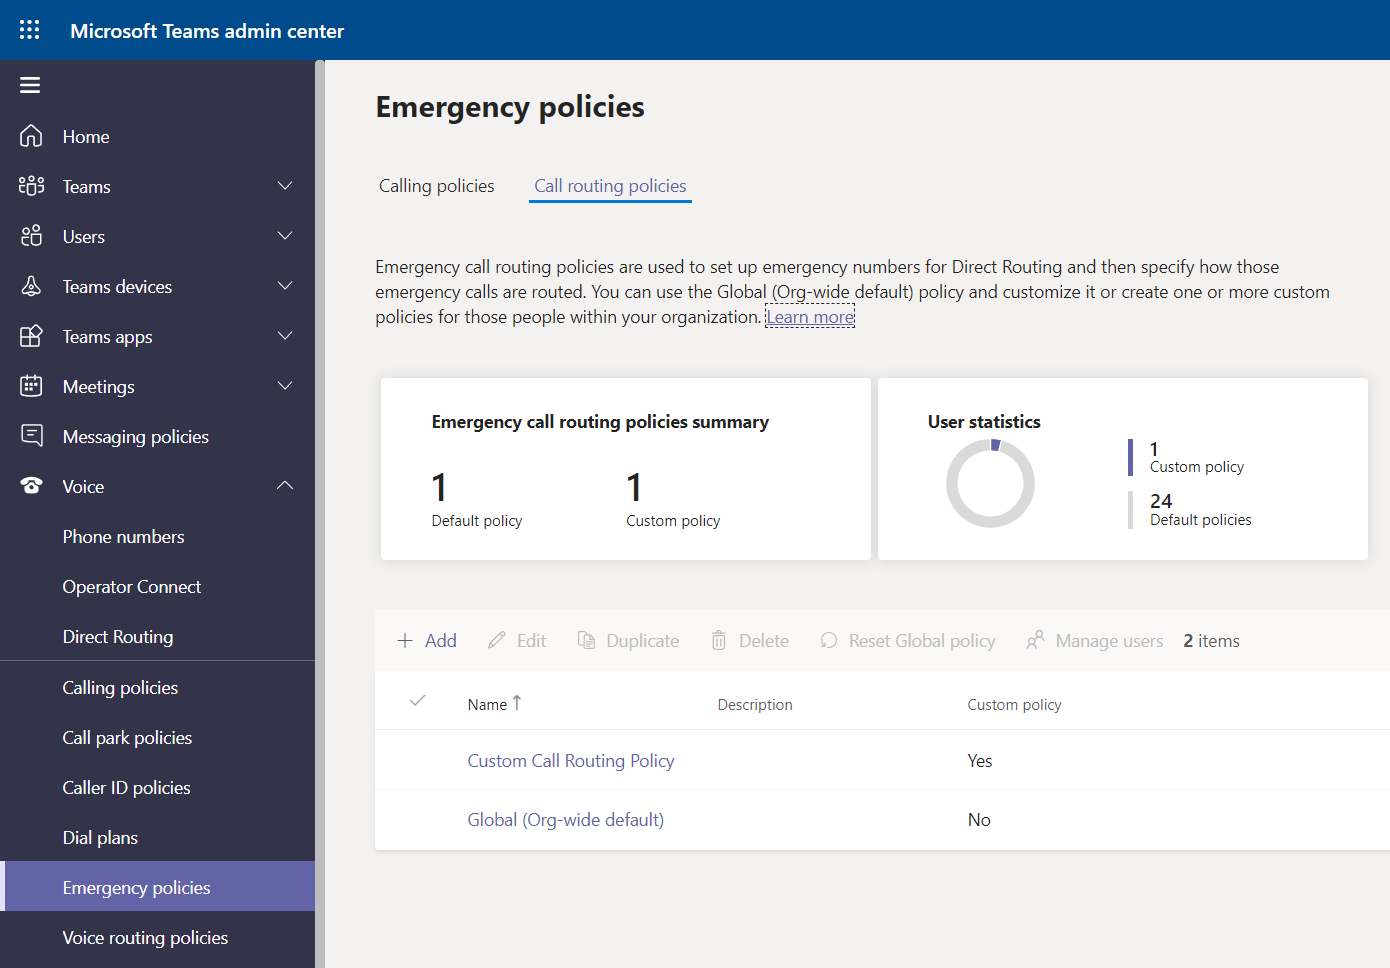
- In the Microsoft Teams admin center, navigate to Voice > Emergency Policies.
- Click on the Call routing policies tab.
Note: We've chosen to create a custom Emergency Call Routing Policy in our example, but you can edit the Global (Org-wide default) policy instead, if desired.
- Click + Add.
- Enter a unique name for your new policy.
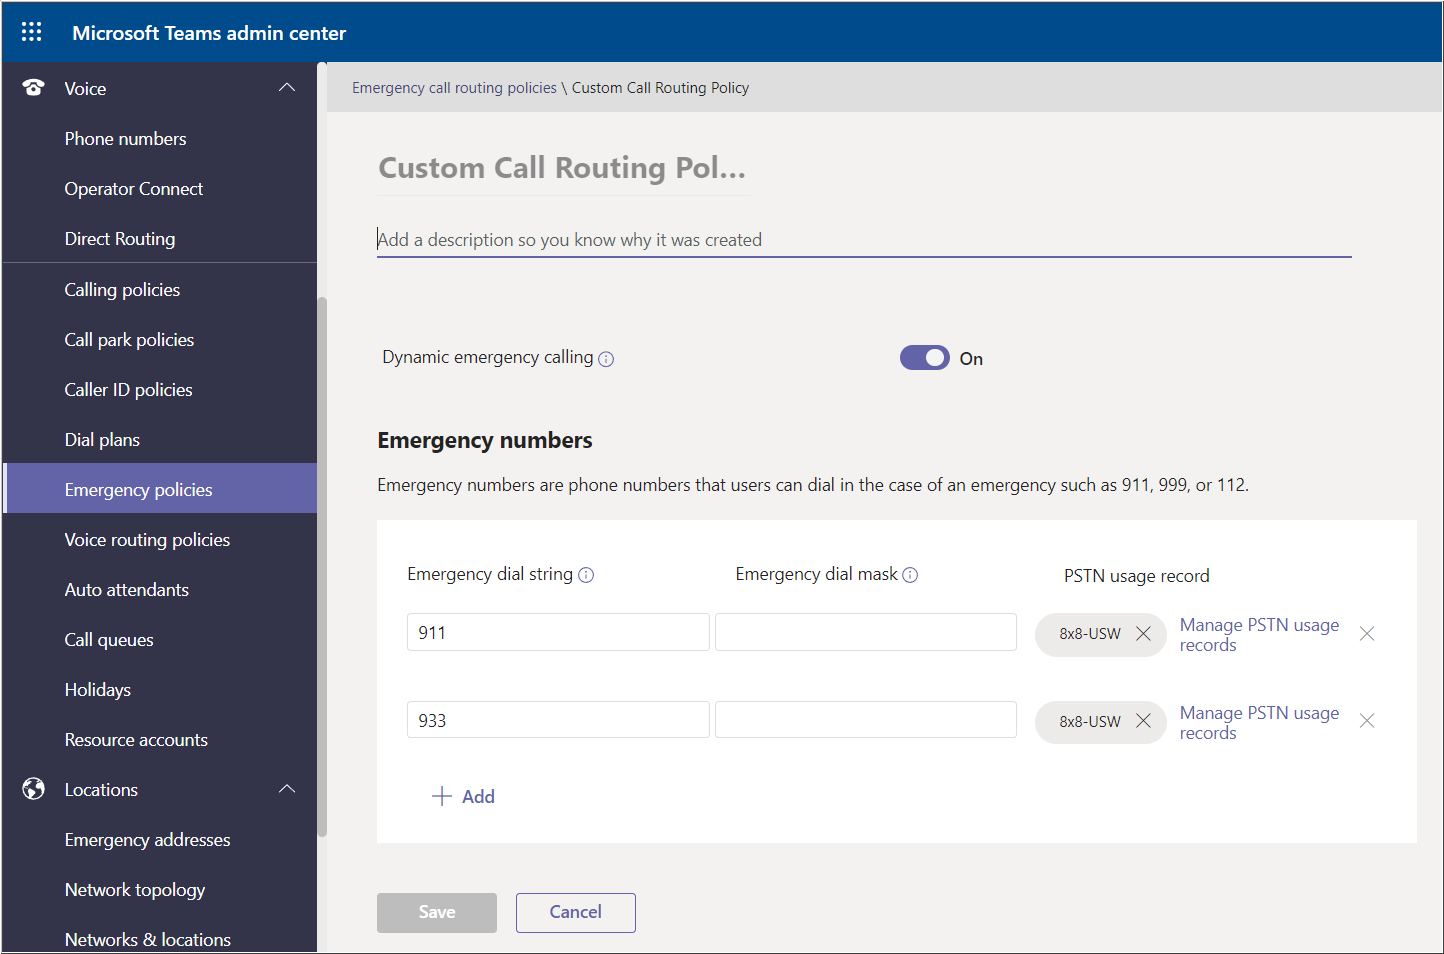
- Enable Dynamic emergency calling by clicking the switch to select On
 .
. - In Emergency numbers:
- Click + Add.
- In Emergency dial string, enter 911.
- In PSTN usage record, search for 8x8 and select either the 8x8-USW or 8x8-USE PSTN usage record.
- Click + Add again.
- In Emergency dial string, enter 933.
- In PSTN usage record, search for 8x8 and select either the 8x8-USW or 8x8-USE PSTN usage record.
- Emergency dial mask is not required.
- When you are finished, click Save at the bottom of the page.
- Your new policy is now ready to assign to your 8x8 Voice for Microsoft Teams users.
When a Teams user dials 911 or 933, Teams should display the detected phone number and location the user is making the call from.
The answering 933 test service receives the same information that is relayed during an actual emergency 911 call. But instead of routing to an emergency services operator, the 933 service will play back the caller's detected phone number and address for verification.
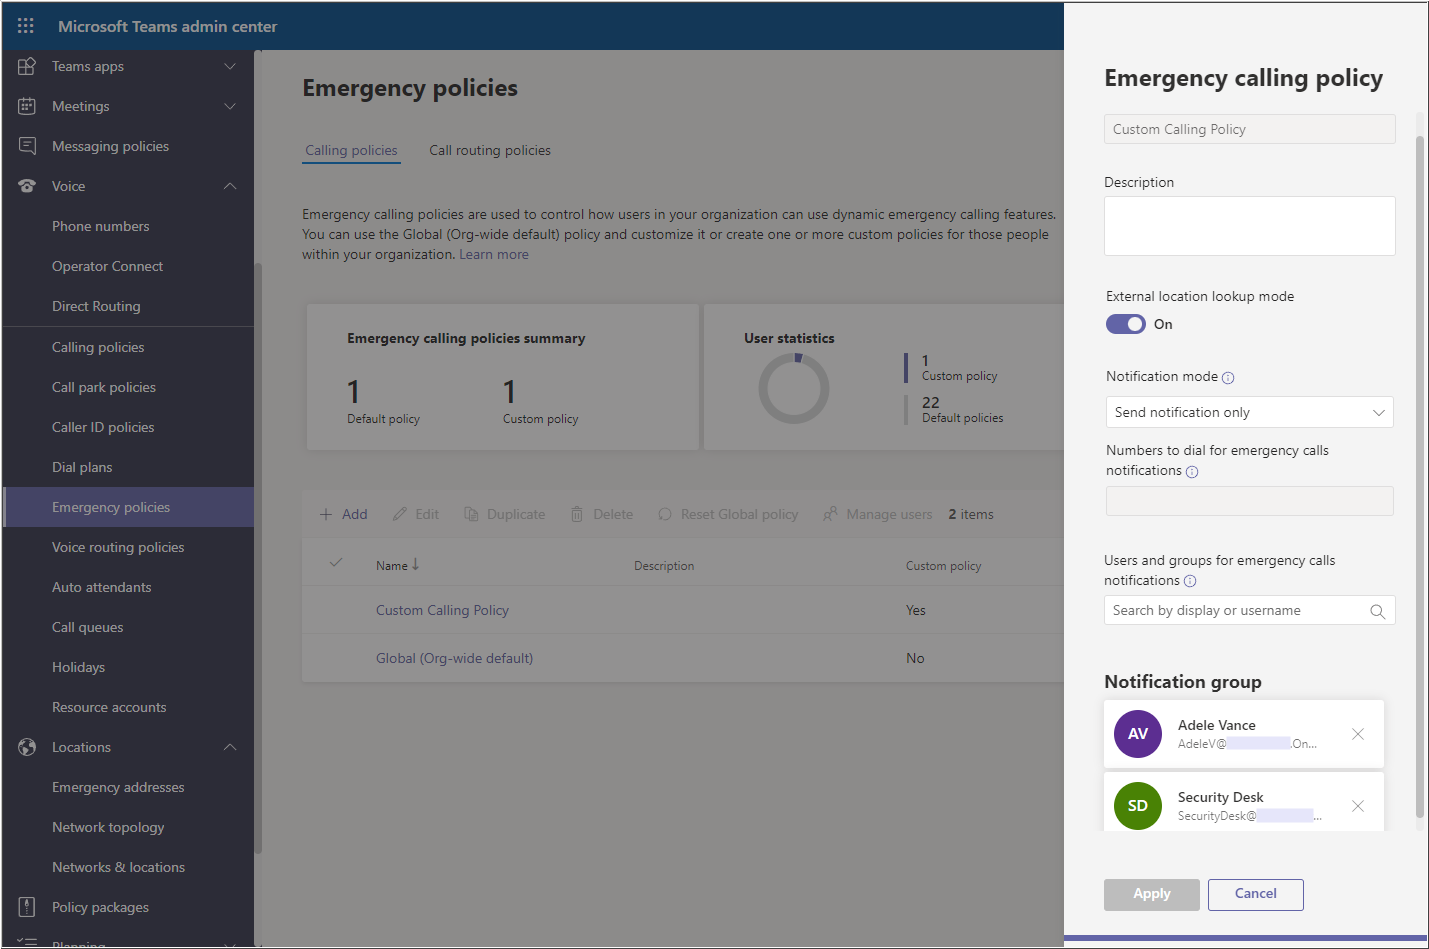
Set Up Emergency Calling Policy
In this section, you'll create or configure an Emergency Calling Policy.
Emergency Calling Policies control how Teams users in your organization can use specific dynamic emergency calling features, and are not related to user location discovery.

- In the Microsoft Teams admin center, navigate to Voice > Emergency Policies.
- Click on the Calling policies tab.
Note: We've chosen to create a custom Emergency Calling Policy in our example, but you can edit the Global (Org-wide default) policy instead, if desired.
- Click + Add.
- In the side panel at the right (see screenshot, below), enter a unique Name for your new policy.
- Set External location lookup mode to On or Off, depending on your requirements:
- If set to On, Teams users will be allowed to set Emergency addresses for remote locations (i.e. when they are outside of their corporate network, so that their public IP address does not match any of your configured trusted IP addresses).
- Regardless of the setting: whenever corporate location detection has failed (or if an address has been entered manually), user emergency calls will be routed to a non-PSAP emergency call center, where an emergency service operator must ask for location details. Additionally, 933 calls in this case will not provide location information.
- In Notification mode, select the type of notification that will be initiated when a user makes an emergency call:
- Send notification only: A Teams chat message is sent to the users and groups that you specify in the Notification group.
- Conferenced in but are muted: Users or groups listed in the Notification group are automatically conferenced into the user's emergency call, and are muted. The conferenced users cannot be unmuted.
- Enter an E.164-formatted phone number (+1xxxyyyzzzz) in Numbers to dial for emergency calls notifications.
- Conferenced in and are unmuted: Users or groups listed in the Notification group are automatically conferenced into the user's emergency call, and are unmuted. The conferenced users cannot be muted.
- Enter an E.164-formatted phone number (+1xxxyyyzzzz) in Numbers to dial for emergency calls notifications.
- In Users and groups for emergency calls notifications, search for and select users and/or groups who will be notified when an emergency call is made.
- Click Apply to save your policy settings.
- You can now assign your custom Emergency Calling Policy to your 8x8 Voice for Microsoft Teams users.
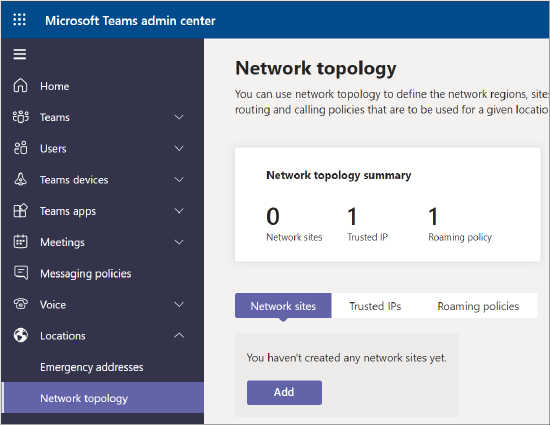
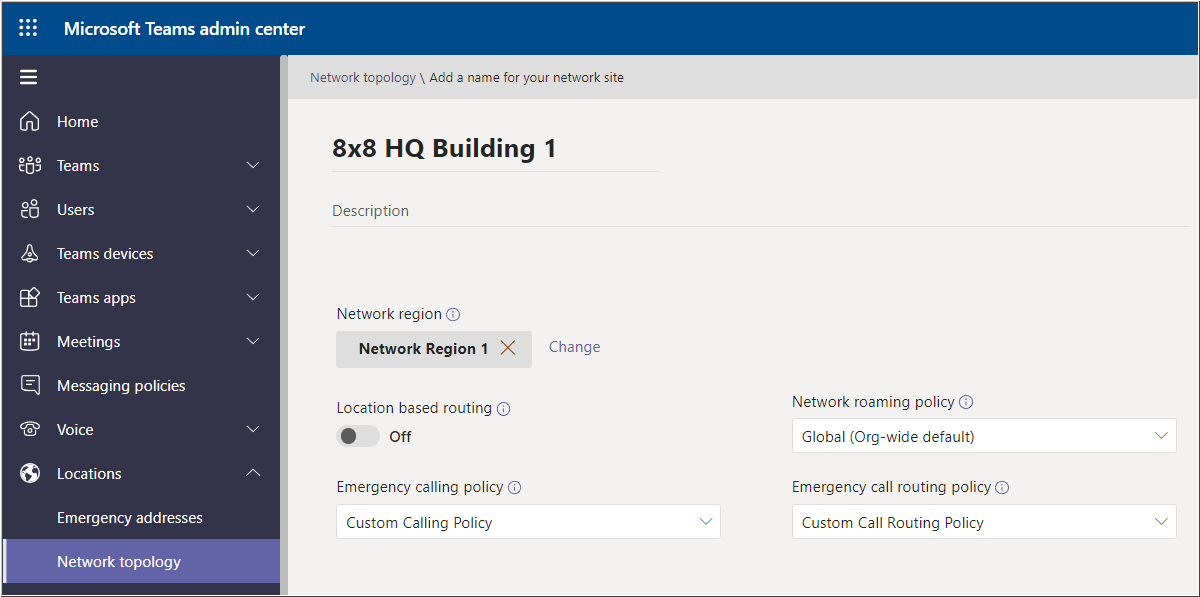
Set Up Network Sites (Optional)
Network Sites configuration (within Locations > Network Topology) is a collection of unique IP subnets used strictly to determine the policies applied to emergency call routing and calling.
- Network sites allow for a user’s default emergency calling and call routing policies to be overridden with site-specific policies if the user is detected as being at that site.
- Site detection is ONLY on private IP addresses, as configured in the Network sites section.
- Site detection is used purely to determine the user’s applied policies, and has no relation to location detection.
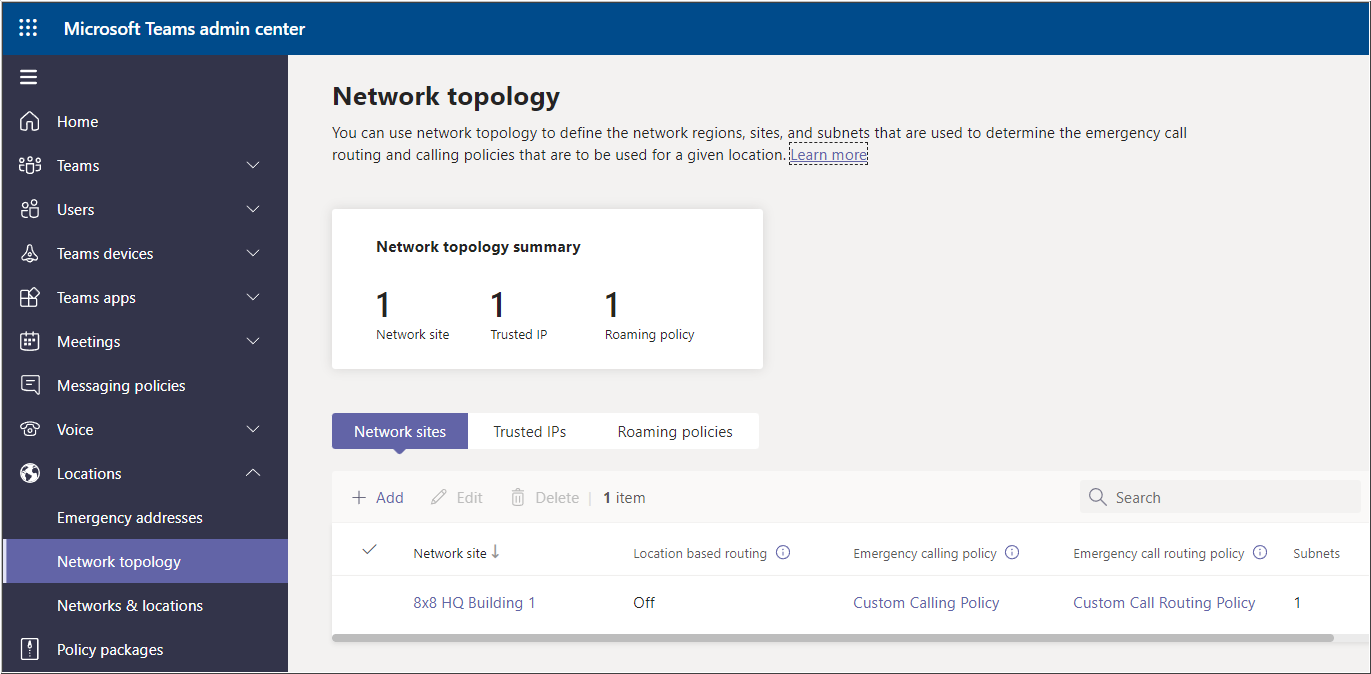
To configure Network Sites:
- In the Microsoft Teams admin center, navigate to Locations > Network topology.
- Click on the Network sites tab if it's not already selected.
- Click Add.
- Add a unique Network Site name and a Description (optional) for the site.
- Click Add network region as needed. Click Add to create a network region (collection of network sites), and then click Link to connect your new site to a network region.
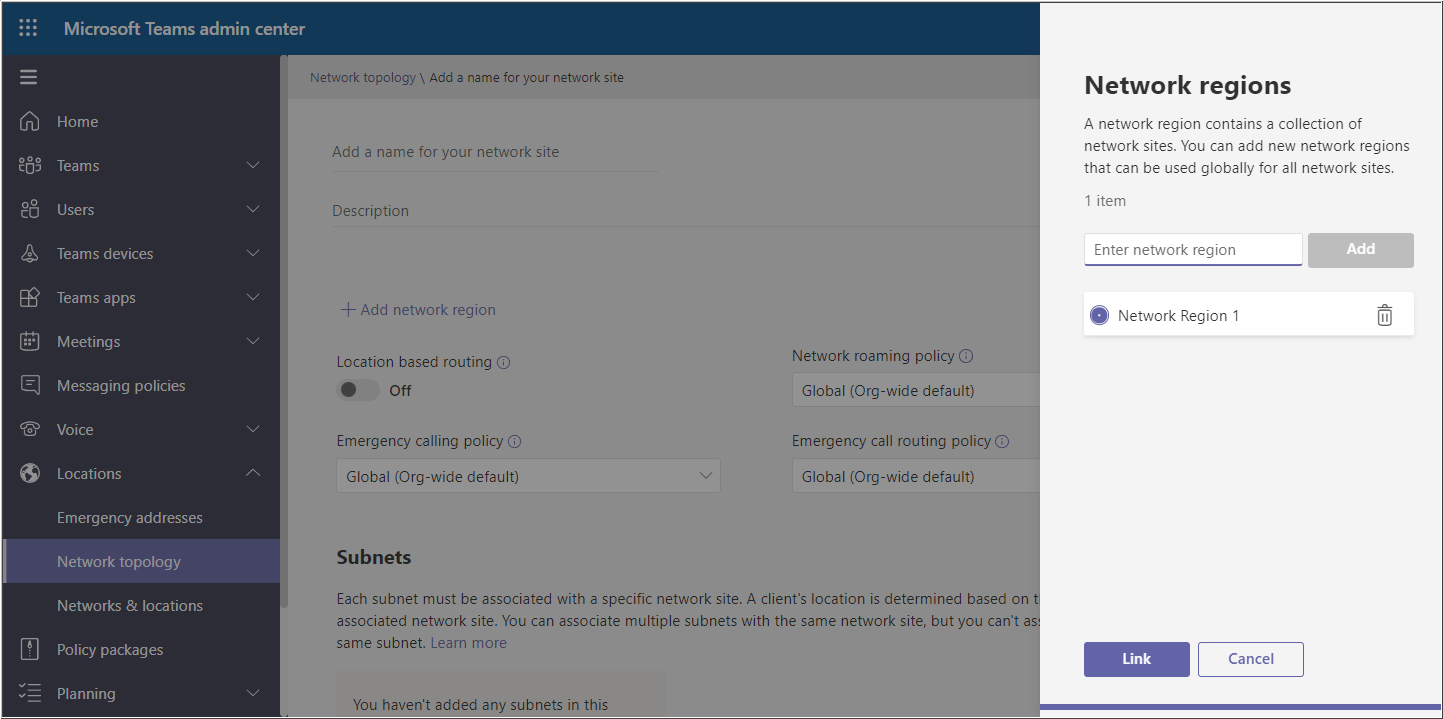
- Enable/disable Location based routing depending on your requirements. You can find more information about that, here.
- Set the Emergency calling policy and Emergency call routing policy that should apply to users in this network site.
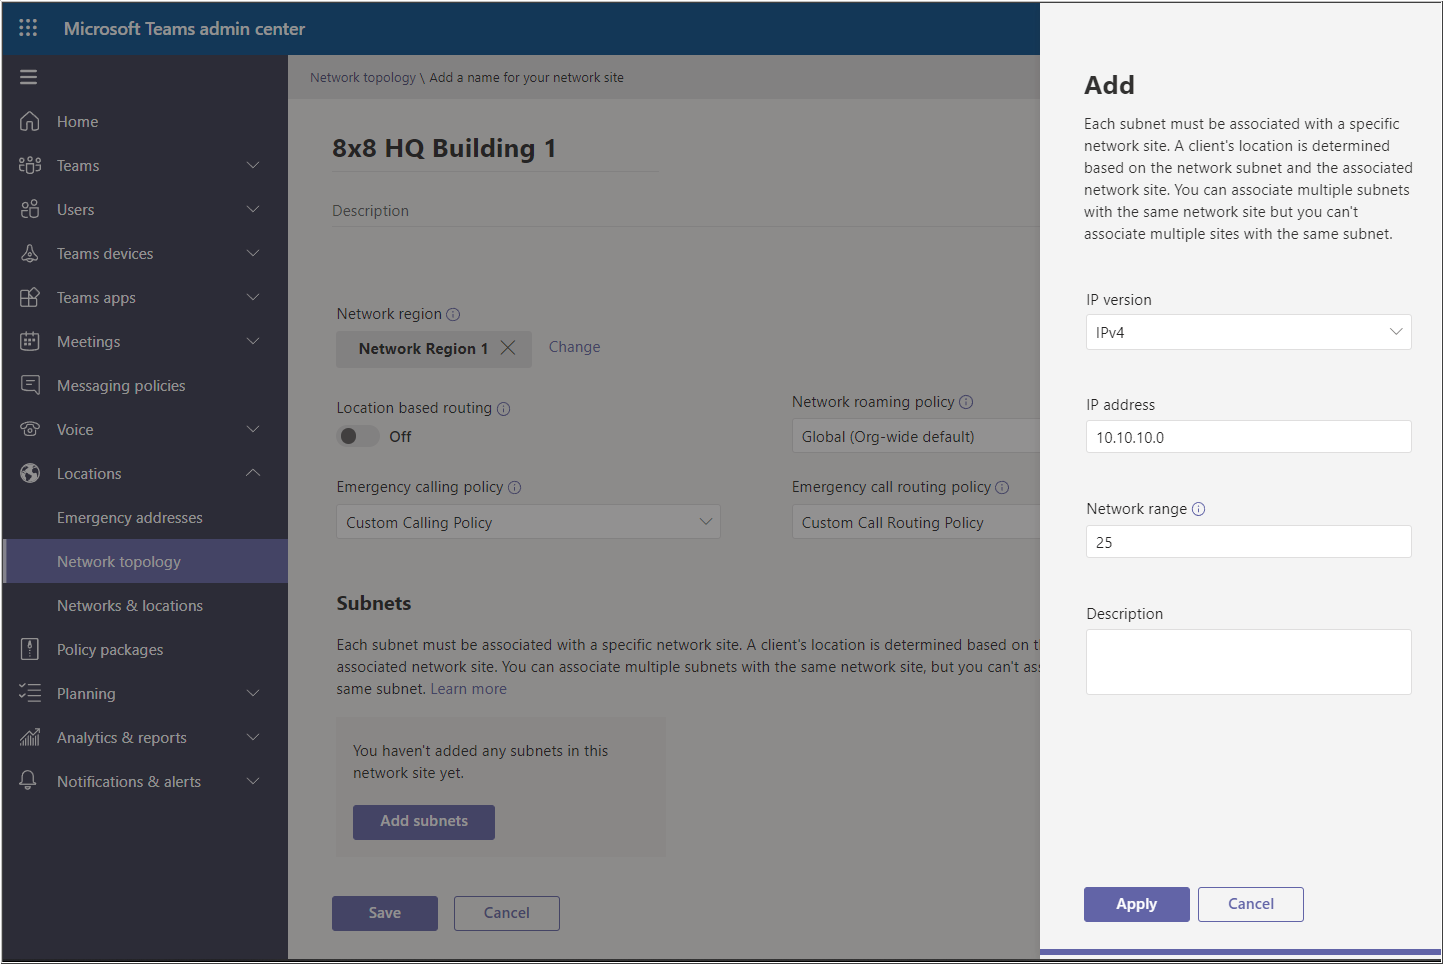
- Click Add subnets. Per Microsoft:
- "Each subnet must be associated with a specific network site. A client's location is determined based on the network subnet and the associated network site. You can associate multiple subnets with the same network site, but you can't associate multiple sites with the same subnet. Learn more"
- Select the IP version to be used:
- IPv4
- IPv6
- In IP address, enter the subnet ID. For example, 10.10.10.0.
- In Network range, enter the mask bits of the subnet, ranging from 0-32 (IPv4) or 0-128 (IPv6).
- Example. If your 10.10.10.0 IPv4 subnet has a total range of 10.10.10.0-10.10.10.127, allowing for host IPs from 10.10.10.1-10.10.10.126, the network range would be 25.
- Enter a Description of the Subnet, as needed.
- Click Apply.
- Click Save to complete the configuration of your network site.

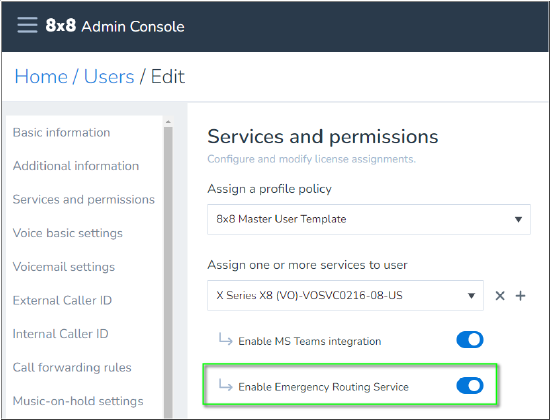
Enable Emergency Routing Service for Users in 8x8 Admin Console
In addition to configuration of your Microsoft Teams tenant, you must enable the Emergency Routing Service option in the 8x8 Admin Console for each 8x8 Voice for Microsoft Teams user.
Enabling this option is required for the background provisioning of the 8x8 Voice for Microsoft Teams user's phone number (not location information) with Broadband, who handles emergency call services for Microsoft Teams users in general.
Enabling Individual Users
To enable a single user:
- Log in to the 8x8 Admin Console as an administrator.
- Navigate to Home > Users.
- Click on the pencil icon
 at the far right of a user to begin editing their user profile.

- Scroll down to Services and permissions.
- Click on the Enable Emergency Routing Service slider switch
 to enable it.
 - Click Save at the bottom of the page to complete the change.
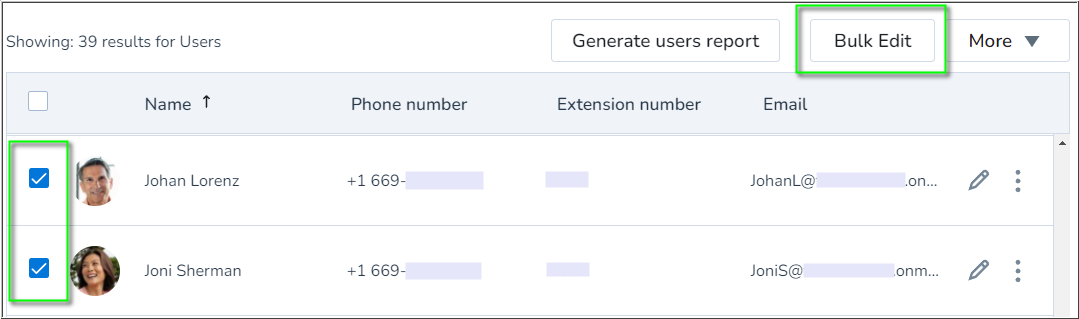
Enabling Multiple Users
Currently, CSV file bulk upload to enable the Enable Emergency Routing Service option is not available, but will be available in a future release of 8x8 Admin Console.
The guide below will show you how to select and enable this option for multiple users directly in Admin Console.
To enable more than one user at a time:
- Log in to the 8x8 Admin Console as an administrator.
- Navigate to Home > Users.
- Click the check box next to each user of 8x8 Voice for Teams to select them.
- Click Bulk Edit at the top-right.
- This option will only appear after you've selected at least one user to edit.
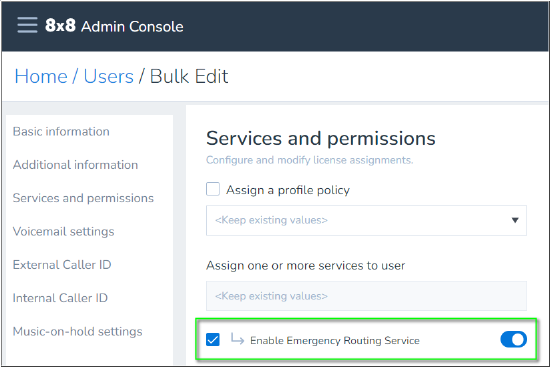
- In Home / Users / Bulk Edit, scroll down to Services and permissions.
- Click on the Enable Emergency Routing Service slider switch to select the option and enable it.
- Click Continue at the bottom of the page.
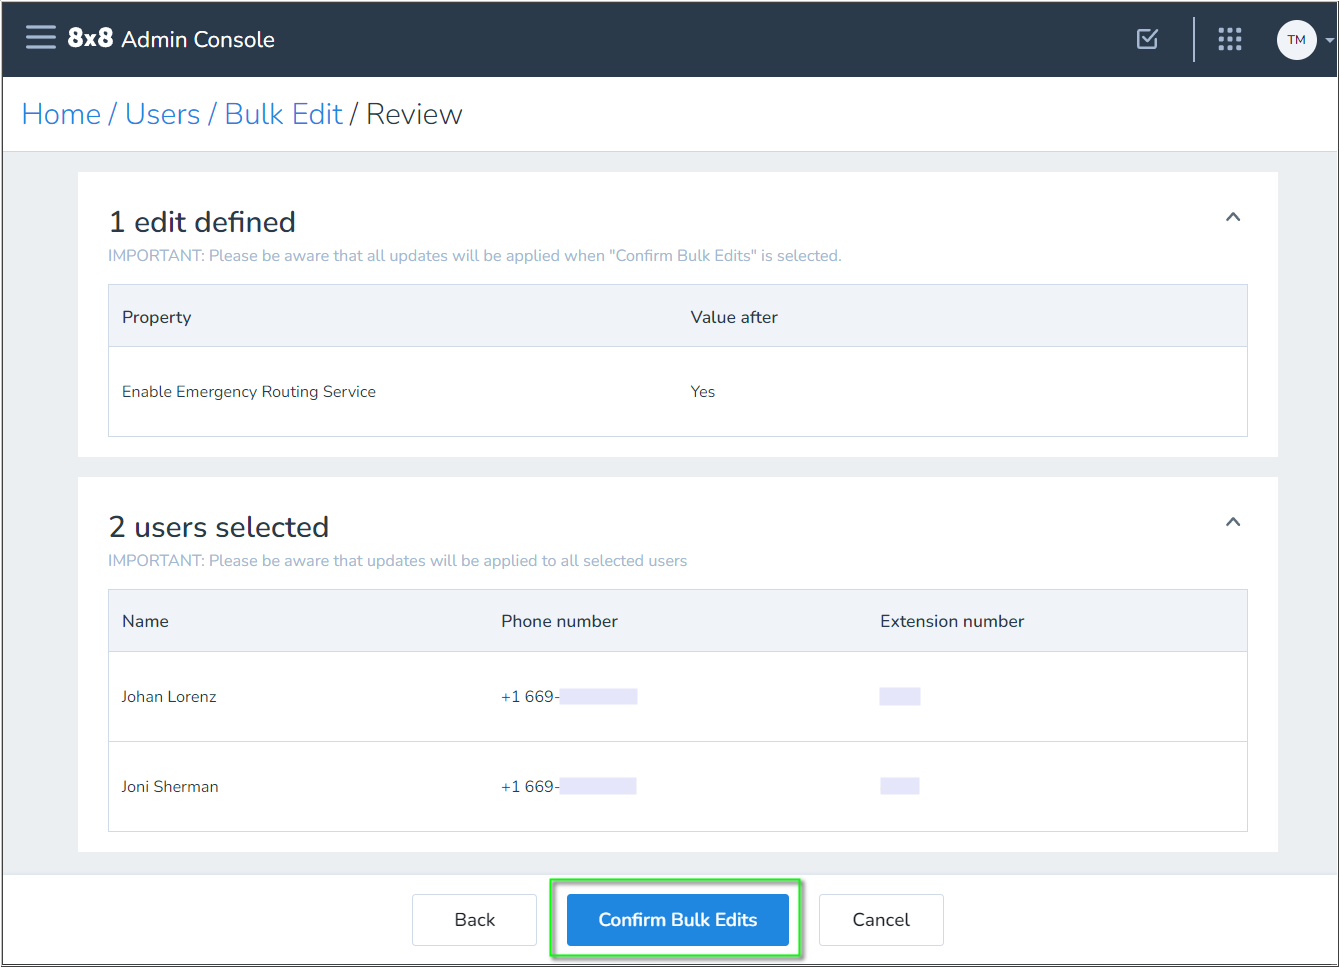
- In the Review window, verify the change that you are making to multiple users.
- Finally, click Confirm Bulk Edits at the bottom of the page to complete the change.
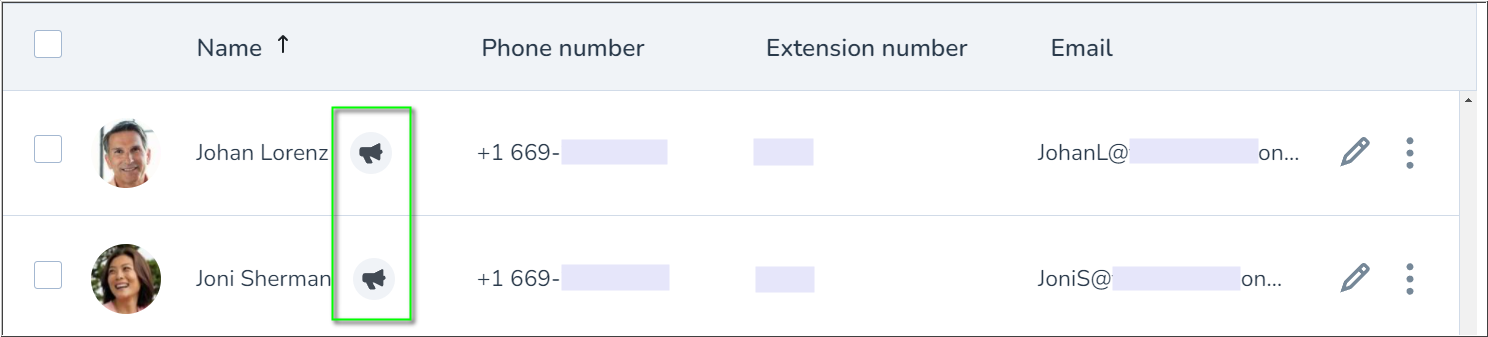
After a few moments you'll receive a completion notice at the top of the Admin Console screen. Your selected users will display a loudspeaker icon to indicate that they have been properly tied to emergency calling services for both 8x8 Work and Voice for Teams.
Available Resources
The following external resources are publicly available:
Microsoft:
- Plan and configure dynamic emergency calling
- Microsoft Teams Dynamic Emergency Calling (Video, 01:13:44)
- Microsoft Teams Emergency Calling Explained (Video, 00:07:48 Introduction)