How to Set Up Call Forwarding in 8x8 Admin Console
Objective
Set up call forwarding for extensions, Ring Groups, and Auto Attendants in 8x8 Admin Console.
Every extension, Ring Group, and Auto Attendant can be set up with its own forwarding rules. End users can change their own forwarding settings, but administrative access is required to change Ring Group and Auto Attendant settings.
Applies To
- 8x8 Admin Console
- Call Forwarding
Procedure
Tip: If your contact directory scope is set to Site, you will not see the option to forward calls back to the Auto Attendant. You must set your contact directory scope to Company in order to see the Auto Attendant as a call forwarding option.

If forwarding to an external number, ensure the country code is included in the field.
Forwarding Calls for a Single Extension
Click here for a live, step-by-step walkthrough of this process!

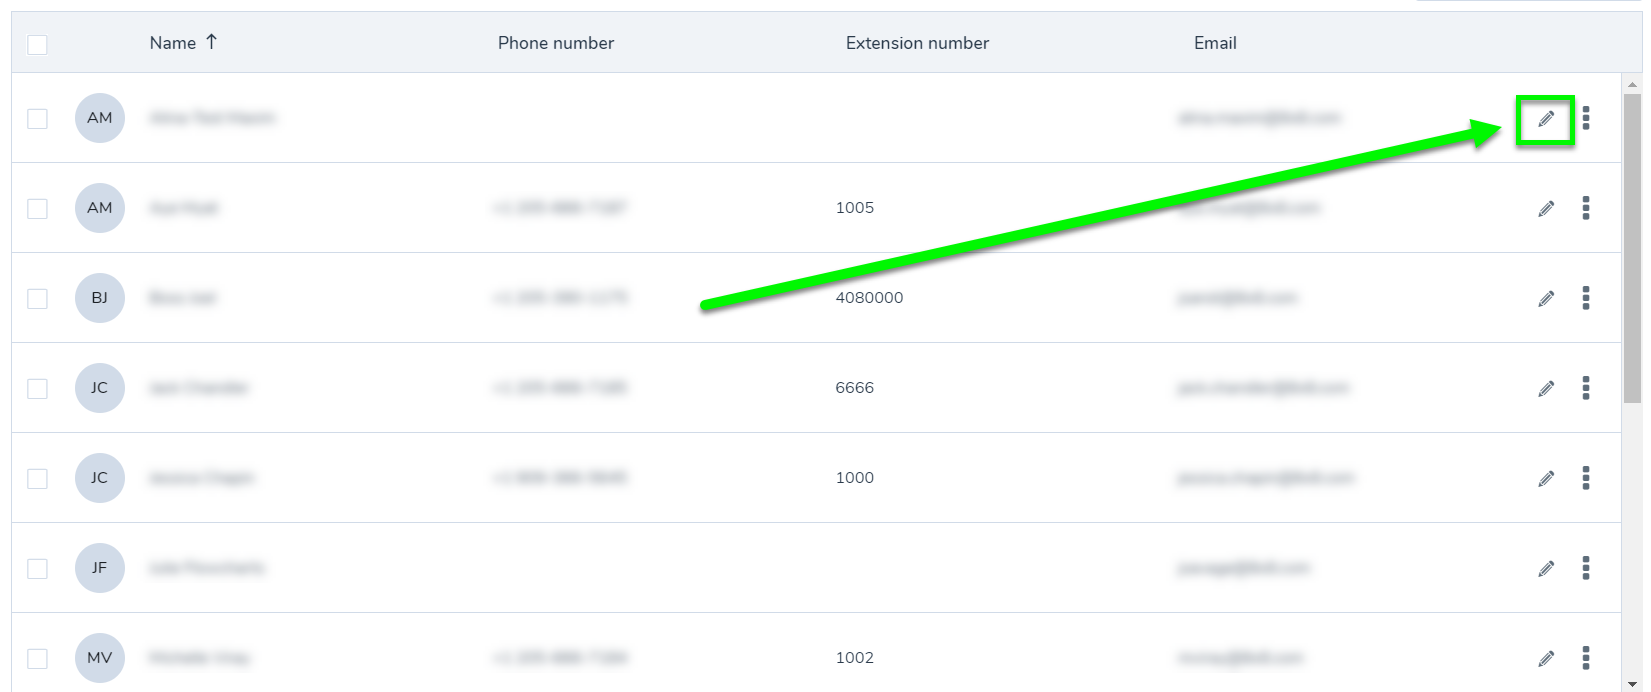
- Log in to 8x8 Admin Console.
- Click Users.
- Click Edit (pencil icon) to the right of the extension that you wish to edit.
- Select Call forwarding rules. Click Edit (pencil icon) to enable call forwarding for the scenarios below.
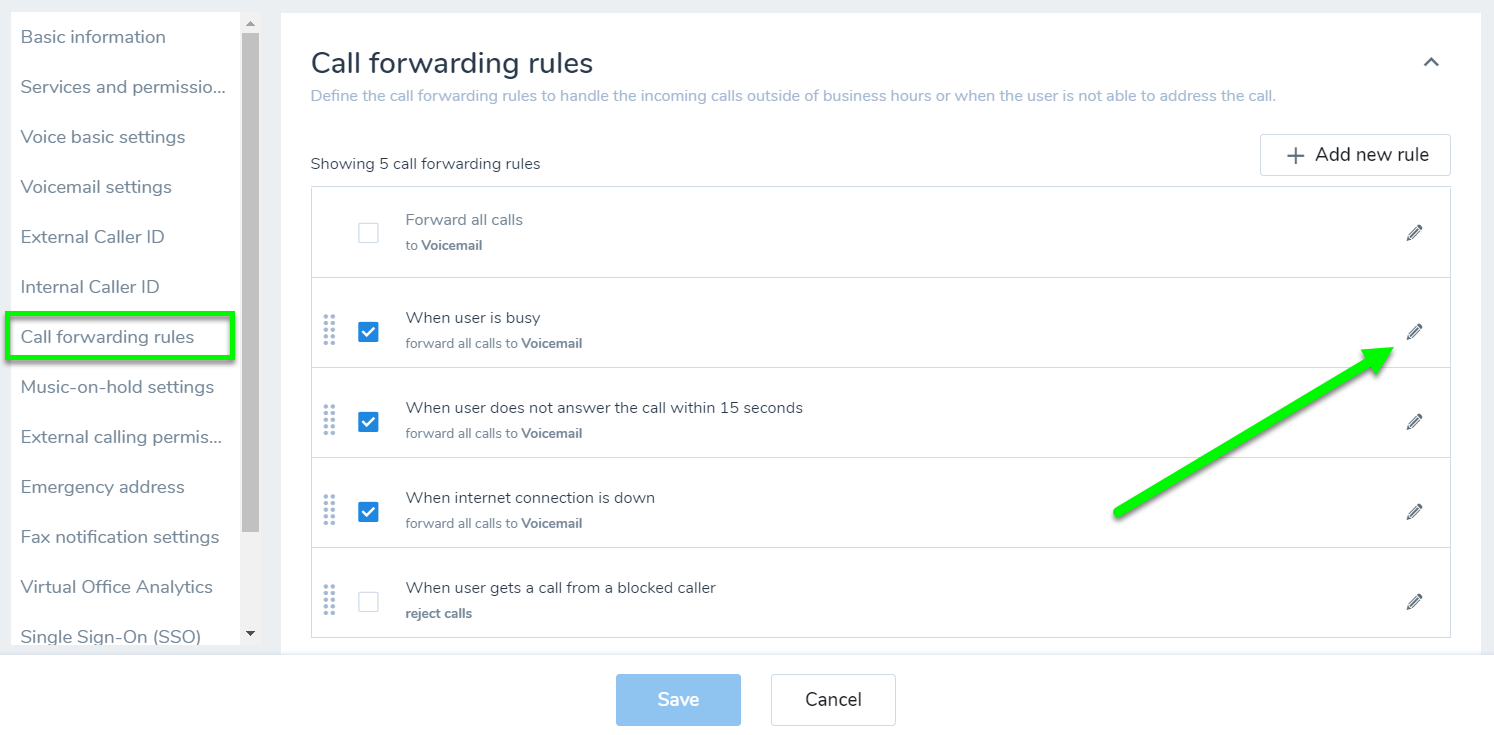
- Select one of the submenu options to choose which action will be taken in each case:
- Forward all Calls
- Voicemail
- Selected User or Service: Type in the name or number associated with an extension or enter an external number.
- When Internet Connection is Down
- Voicemail
- No One and Play Busy
- Selected Users or External Numbers: Type in the name or number associated with an extension or enter an external number.
- Forward Directly To: Type in the name or number associated with an extension or enter an external number.
- When User is Busy
- Voicemail
- No One and Play Busy
- Selected Users or External Numbers: Type in the name or number associated with an extension or enter an external number.
- Forward Directly To: Type in the name or number associated with an extension or enter an external number.
- When User does not Answer the Call: Enter the amount of time the call will ring before going to one of the forwarding options below.
- Voicemail
- No One and Play Busy
- Selected Users or External Numbers: Type in the name or number associated with an extension or enter an external number.
- Forward Directly To: Type in the name or number associated with an extension or enter an external number.
- When User Gets a Call from a Blocked Caller: See the next section for more details.
- Forward all Calls
- Click Save.
- Save the user profile.
Adding Forwarding Rules for Blocked Callers
- Enter internal or external numbers that you would like to block.
- Click Add to the List.
- Select your preferred forwarding destination for the blocked number.
- Voicemail
- No One and Play Busy
- Selected Users or External Numbers: Type in the name or number associated with an extension or enter an external number.
- Forward Directly To: Type in the name or number associated with an extension or enter an external number.
- Click Save.
- Save the user.
Adding a New Call Forwarding Rule (Admins Only)
- Click Add New Rule.
- Set the rule Name to something that describes the purpose of the rule (e.g., One Number Access).
- Under When to Apply this Rule, select the type of callers that you would like to be affected by this rule from the following:
- Anyone
- Anonymous Callers
- Selected Callers
- Select the time during which you would like to apply this rule:
- Anytime
- Specified Date/Time Period: Enter the Starting and Ending Date/Time.
- Recurring Schedule: Select the day and time range when the rule will be active.
- Under Forward the Calls to, select the desired forwarding option.
- Voicemail
- No One and Play Busy
- Selected Users or External Numbers: Type in the name or number associated with an extension or enter an external number.
- Forward Directly To: Type in the name or number associated with an extension or enter an external number.
- If you choose Selected Users or External Numbers, enter the names or numbers of the users or the external numbers that you want to add to this forwarding rule.
- Click Add to the List.
- Enter the number of seconds that the call should ring for before going to another forwarding option.
- Select whether to ring these numbers Sequentially or Simultaneously.
- Select one of the following forwarding options to take place after trying all the above numbers.
- Forward to Voicemail
- Don't Forward and Play Busy
- Forward to a User or Service: Type in the name or number associated with an extension or enter an external number.
- Click Save.
- Save the user profile.
Forwarding Calls for a Ring Group
- Log in to 8x8 Admin Console.
- Click Ring Groups.
- Click Edit (pencil icon) to the right of your Ring Group.
- Go to Call Forwarding Rules and click Edit (pencil icon) to enable call forwarding for the scenarios below. Then select one of the submenu options to choose which action will be taken in each case:

- Forward all calls
- Voicemail
- Selected User or Service: Type in the name of the user or service or enter the extension number.
- When internet connection is down
- Voicemail
- Selected User or Service: Type in the name or number associated with an extension or enter an external number.
- When all members are busy
- Voicemail
- Selected User or Service: Type in the name or number associated with an extension or enter an external number.
- When no one in ring group answers
- Voicemail
- Selected User or Service: Type in the name or number associated with an extension or enter an external number.
- Forward all calls
- Click Save.
- Save your Ring Group.
Forwarding Calls through an Auto Attendant
When you edit or create your Auto Attendant, you can set up forwarding options in your Auto Attendant menu.
- Log in to 8x8 Admin Console.
- Click Auto Attendants.
- Click Edit (pencil icon) to the right of your Auto Attendant.
- Under Call Handling Menus, select either Weekday, Holiday, or Alternate tabs.
- Click Add Key.
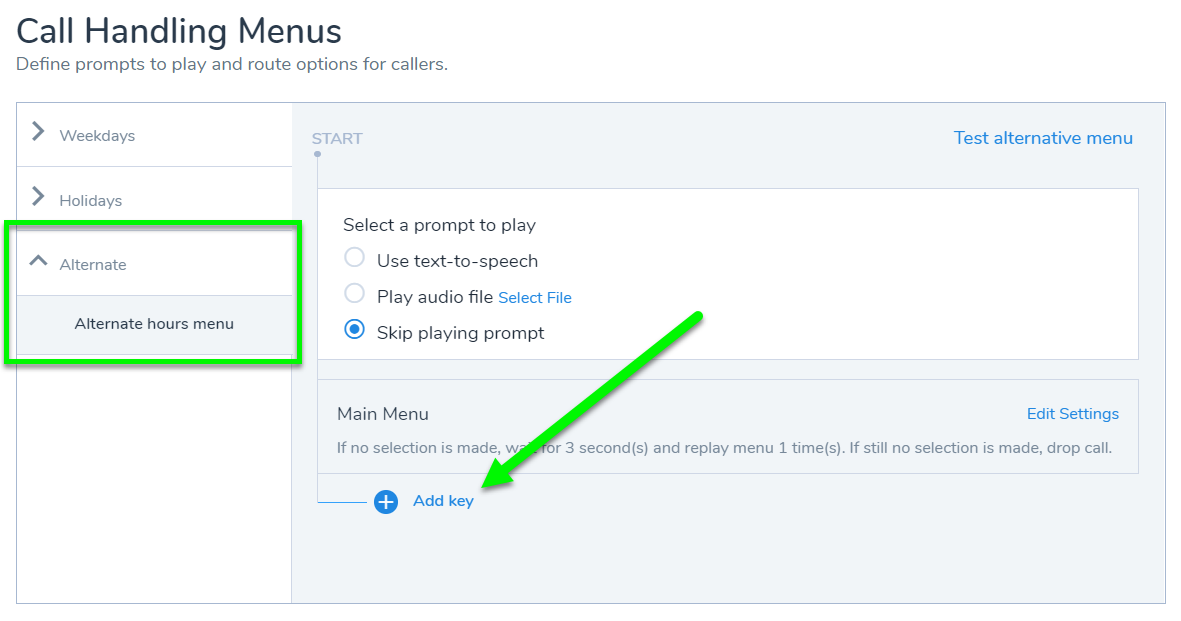
- In the Key manager window, select the desired key from the menu.
- In the Please Select menu, go to Transfer to and select User, service or external number

- Select the user from the drop-down menu or add the external number in the Target field.
- Click Save.