Contact Center Embedded Chat API
Overview
The 8x8 Embedded Chat API is composed of a set of topics that can be subscribed to or published to a message bus. The tenant can use these topics to send commands to the embedded chat, as well as listen to events triggered by it.
How to access the Message Bus
In order to communicate with the embedded chat, the tenant must have a reference to the message bus object that is used to publish messages and subscribe to chat events. This reference can only be accessed inside the onInit callback function, as its first parameter.
The onInit callback function must be defined and assigned to the configuration object present in the embedded chat code snippet. This function (if defined) is automatically called once the chat has been initialized and is ready to publish and subscribe to events in the message bus:
  /**
       * Callback function called after the chat has been initialized.
       *
       * @param bus The message bus used to publish and subscribe to topics
       */
       onInit: function(bus) {
          // Message bus created and ready to be used,
                                window.bus = bus;
                     }
       };
How to publish to a topic
As soon as the tenant has access to the message bus, they can control some embedded chat behaviors by publishing messages to it. The messages are sent through this bus using the publish method, which requires a topic and an optional data object, passed to subscribers to that same topic.
Example:
  // Publish to other-topic, sending some data
  bus.publish("other-topic", {
      message: "Hello world!"
  });
How to subscribe to a topic
The tenant can also subscribe to topics using the subscribe method in order to listen to messages published by the embedded chat. This method requires a topic to subscribe to and a handler function that will be called when a message is published to the message bus using such topic. The handler function gets passed some data as its first parameter (which can be null if the sender did not publish any data).
Example:
  // Subscribe to some-topic, and log the event data
  var subscription = bus.subscribe("some-topic", function(data) {
      console.log(data);
  });
How to unsubscribe from a topic
The subscribe method also returns a subscription object with a single remove method, which can be used to unsubscribe from that topic.
Example:
  // Unsubscribe from a previously created subscription
  subscription.remove();
How to set a variable in a script
To set a variable for use in the Chat script. See here for more information on Chat Variables
// set the _options variable to "DEF"
bus.publish("chat:set-variables", {"_options":"DEF"});
Customer Information
Introduction
A tenant may have relevant information about a customer currently using the embedded chat. For example, if a customer is using the embedded chat while viewing a product inside an ecommerce website, the tenant could, in principle, already know the customer name, age and other personal details, as well as which product is being viewed by the customer.
If the tenant could send this information to the agent, through the embedded chat, the customer wouldn't need to enter the same information to the agent. To solve this problem, the API allows the tenant to set and reset the customer information at any time after the embedded chat has been initialized. The passed data is submitted to the server when the customer is assigned to a queue or sends an offline form, and the tenant can choose to be notified about the customer information submission event.
Usage
The following messages are used to set and reset the customer information:
- customer:set-info: Sets the customer information, passing an object containing the desired properties. These properties are merged to any previously set customer information, overwriting properties with the same name.
Example:
  bus.publish("customer:set-info", {
      "First name": "John",
      "Last name":  "Doe",
      "Age":        25,
      "Premium":    true
  });
- customer:reset-info: Resets the customer information, erasing any properties previously set.
Example:
bus.publish("customer:reset-info");
The embedded chat publishes the following messages related to the customer information:
- customer:info-sent: Published as soon as the customer information is sent to the server, passing the information just submitted as well as the current chat phase.
Example:
  bus.subscribe("customer:info-sent", function(data) {
      // data.info contains the customer information just sent
      // to the server, and data.phase the current chat phase
  });
Implementation Example
The following code exemplifies the complete implementation of an onInit callback function body, and the results when the customer information is successfully submitted to the server after being added to a chat queue:
// Set the customer info
bus.publish("customer:set-info", {
"First name": "John",
"Last name": "Doe",
"Age": 25,
"Premium": true
});
// Remove the customer's first name, keeping all other
// previously set values
bus.publish("customer:set-info", {
"First name": null
});
// Listen to the customer info sent event, triggered when
// the customer info has been sent to the server
bus.subscribe("customer:info-sent", function(data) {
console.log(data);
// -> {
// info: {"Last name": "Doe", "Age": 25, "Premium": true}
// phase: "chatWindow"
// }
});
Screenshots
The customer information is available in the following locations, depending on how it was submitted:
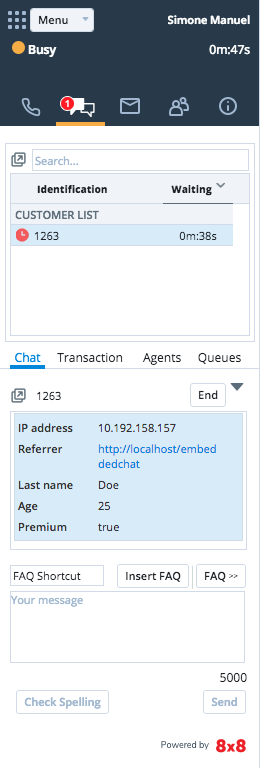
- Customer information in agent transcript.
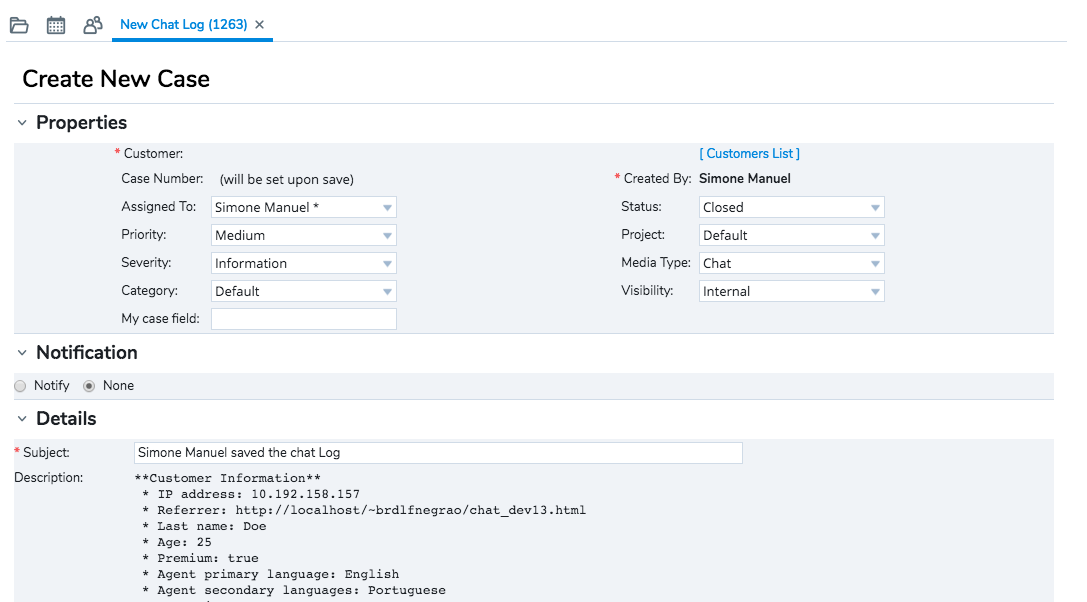
- Customer information in case details.
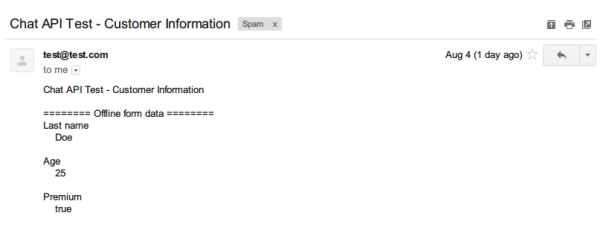
- Customer information in offline form email.
Important Notes
- The customer information can be set and/or reset at any time using the message bus and the respective customer:set-info and customer:reset-info topics, but it will only be actually sent to the server when the customer is added to a queue and/or has submitted an offline form.
- Whenever the customer information is submitted to the server, a message containing the data that was just sent will be immediately published to the message bus using the customer:info-senttopic. The tenant has no control over when the data is submitted to the server.
- Only primitive data types (strings, numbers and booleans) are allowed as values. Trying to set the customer information with non-primitive data types (e.g., objects, arrays and functions) will result in console warnings, and their values will be discarded.
- Setting a customer information already previously set will overwrite that information, unless the new value is undefined. If the new value is null, that information will be removed from the customer information and will not be sent to the server from that moment on, unless it is set again with a non-null, defined value.
- The customer information key:value pair is limited in 100 characters for the key and 500 character for the value. Any key:pair bigger than the specified value will be ignored.
Troubleshooting
- Make sure that, when trying to remove properties from the customer information without resetting all its properties (i.e., by using the customer:set-info topic), the passed properties have null values (and not undefined), as setting undefined values to properties do not have any effect on the final customer information.
- If the message Customer info <info> is not of a primitive type and will be discarded is shown in the browser console when trying to set the customer information, it means that the logged property value is of a data type unsupported by the embedded chat. Only primitive data types (strings, numbers and booleans) are currently allowed.
-
If the message Customer info <info> key is too big and will be discarded is shown in the browser console when trying to set the customer information, it means that the key string length is too big. Only strings with length less than 100 characters are allowed.
- If the message Customer info <info> value is too big and will be discarded is shown in the browser console when trying to set the customer information, it means that the value string length is too big. Only strings with length less than 500 characters are allowed.
Chat Language
Introduction
A tenant may want to set the chat language manually instead of using a question in the Pre-Chat. For example, the tenant may already have this information and may not want to ask the customer again.
The API allows the tenant to set the chat language by sending a message through the bus with the language code.
The list of supported languages are:
- English: en
- Russian: ru
- German: de
- Japanese: ja
- Spanish: es
- French: fr
- Portuguese: pt
- Italian: it
- Polish: pl
- Croatian: hr
- Hindi: hi
- Dutch: nl
- Arabic: ar
- Danish: da
- Korean: ko
- Norwegian: no
- Swedish: sv
- Vietnamese: vi
- Welsh: cy
- Thai: th
- Simplified Chinese: zh-CN
- Traditional Chinese: zh-TW
Usage
The following messages is used to set the chat language:
- chat:set-language: Set the chat language.
Example:
bus.publish("chat:set-language", "pt");
Important Notes
- The chat language can be set on any time before starting a chat (customer enter a queue) and you can change it as many time as you want, only the last value will be considered.
- Only system messages and the chat transcription will be localized to the configured language.
- This event should be published in the same bus as when setting the customer information.
- If there is a chat form with language question, the selected language has priority over language configured in chat-api.
- If there is a chat form with language question, the "set-language" sets the default language on the drop-down.
- The set-language (default language) on the drop-down has priority over the browser language and the default language configured in the chat form.
Troubleshooting
- If the message "Chat language <language> is not valid and will be discarded" is shown in the browser console when trying to set the chat language, it means that the language code is not valid. Only language codes specified in the list of available languages above are valid.
End Chat Trigger
Introduction
A tenant may want to trigger the end chat from a different element instead of the default close chat button.
The API allows the tenant to configure the page to send a message through the bus indicating when to trigger the End chat.
Usage
The following messages is used to trigger the end chat:
- Chat: end: Trigger the chat end.
Example:
bus.publish("chat:end");
Important Notes
- The API call to end the chat closes the chat window if an agent is not connected.
- The API call to end the chat triggers the confirmation to close if an agent is connected.
- The API call to end chat must be called on the same bus as the customer information.
Invitation Window Trigger
Introduction
A tenant may want to trigger the Invitation window manually instead of waiting for a fixed time. For example, the tenant may have additional information from the customer and may want to trigger the Invitation window after a specific customer action.
The API allows the tenant to configure the page to send a message through the bus indicating when to trigger the Invitation window.
Usage
The following messages is used to trigger the Invitation window:
- chat:trigger-invitation: Trigger the Invitation window.
Example:
bus.publish("chat:trigger-invitation");
Important Notes
- When triggering the Invitation, it will only be open if the customer is not in a Pre-chat, Chat window or Offline form. So, it will show the Invitation window if the chat is closed or if it is displaying another Invitation. In this last case, the Invitation will be replaced by the new one.
- Calling this message will trigger the Invitation window, which is displayed only if an Invitation window is available for display in the Chat Script.
- If you don’t want your Invitation window to be automatically displayed (only by calling chat:trigger-invitation), set all your Invitations nodes in the Chat Script as Invitation to chat pops up after (seconds): Custom.
- This message must be called in the same bus as the Customer Information.
- When triggering the Invitation, a flag will be displayed on both Transaction Information Panel and Chat Log to identify the interaction was started by Chat API.
Troubleshooting
- Triggering the Invitation window is not a guarantee that a Invitation will be shown. The request will be sent to the server in order to check for an Invitation window in the Chat Script. So, if there isn’t any Invitation window available, none will be displayed.
- If the message Missing next step from step initInvitation [invitation] is shown in the browser console when trying to trigger the Invitation, it means that the Invitation is not available given the Chat Script conditions.
Pre-Chat window trigger
Introduction
A tenant may want to trigger the Pre-Chat window manually. For example, the tenant may have additional information from the customer and may want to trigger the Pre-Chat window after a specific customer action.
The API allows the tenant to configure the page to send a message through the bus indicating when to trigger the Pre-Chat window.
Usage
The following message is used to trigger the Pre-Chat window:
- chat:trigger-pre-chat
Trigger the Pre-Chat window.
Example:
bus.publish("chat:trigger-pre-chat");
Important Notes
- When triggering the Pre-Chat, it will only be open if the customer is not in a Pre-chat, Chat window or Offline form. So, it will show the Pre-Chat window if the chat is closed or if it is displaying an Invitation window.
- Calling this message will trigger the Pre-Chat window to be displayed only if a Pre-Chat window is available to be displayed in the Chat Script.
- This message must be called in the same bus as the Customer Information.
- When triggering the Pre-Chat, a flag will be displayed on both Transaction Information Panel and Chat Log to identify the interaction was started by Chat API.
- In case the Chat is configured to open as a popup in Chat Script, make sure the API is called as a result of a user's action, otherwise the Browser can block the popup window.
- In case the Chat is configured to open as a popup in Chat Script, the Pre-Chat window will be displayed only if no popup window is already opened.
Troubleshooting
- Triggering the Pre-Chat window is not a guarantee that a Pre-Chat will be shown. The request will be sent to the server in order to check for a Pre-Chat window in the Chat Script. So, if in that moment there isn't any Pre-Chat window available, none will be displayed.
- If the message Missing next step from step initPreChat [preChat] is shown in the browser console when trying to trigger the Pre-chat, it means that the Pre-Chat is not available given the Chat Script conditions.
Chat window trigger
Introduction
A tenant may want to trigger the Chat window manually. For example, the tenant may have additional information from the customer and may want to trigger the Chat window after a specific customer action.
The API allows the tenant to configure the page to send a message through the bus indicating when to trigger the Chat window.
Usage
The following message is used to trigger the Chat window:
- chat:trigger-chat-window
Trigger the Chat window.
Example:
bus.publish("chat:trigger-chat-window");
Important Notes
- When triggering the Chat, it will only be open if the customer is not in a Chat window. So, it will show the Chat window if the chat is closed or if it is displaying an Invitation or Pre-Chat window.
- Calling this message will trigger the Chat window to be displayed only if a Chat window is available to be displayed in the Chat Script.
- This message must be called in the same bus as the Customer Information.
- When triggering the Chat, a flag will be displayed on both Transaction Information Panel and Chat Log to identify the interaction was started by Chat API.
- In case the Chat is configured to open as a popup in Chat Script, make sure the API is called as a result of a user's action, otherwise the Browser can block the popup window.
- In case the Chat is configured to open as a popup in Chat Script, the Chat window will be displayed only if no popup window is already opened.
Troubleshooting
- Triggering the Chat window is not a guarantee that a Chat will be shown. The request will be sent to the server in order to check for a Chat window in the Chat Script. So, if in that moment there isn't any Chat window available, none will be displayed.
- If the message Missing next step from step initChatWindow [chatWindow] is shown in the browser console when trying to trigger the Chat, it means that the Chat is not available given the Chat Script conditions.
System Message Localization
Introduction
A tenant may want to localize or customize some/all chat system messages. For example, s/he can customize the message that is shown when the chat session is established.
Configuration
The __8x8Chat configuration should be like this:
Note that the configuration is the same as when using the Message Manipulation, so you don’t need to configure it again if you already have an external bus handler script configured. You just need to implement the System Message Localization in the external script.
<script type="text/javascript">
var __8x8Chat = {
// Other chat parameters (uuid, tenant, channel, domain...)
/**
* Property with the translation map
*
*/
customSystemMessages: {
endChatButton: "End chat",
closeChatButton: "Close",
(...)
}
};
</script>
Available System Messages that can be Customized
- endChatButton: “End chat”
- closeChatButton: “Close”
- errorServerUnavailable: “Server is unavailable. Please, try again later.”
- chatEstablished: “Your chat session has been established.”
- chatEstablishedName: "You are now chatting with {<agent>}."
- chatEstablishedAgent: "You are now chatting with an agent."
- chatEstablishedAgentNew: "You are now chatting with a new agent."
- chatQueued: “We will be with you shortly.”
- chatForwarded: “Your chat is being forwarded. Please wait.”
- chatMsgTooLong: “Your last message was shortened because it exceeded maximum length.”
- chatDisconnected: “You have been disconnected from your chat session. Please check your network connection and try again.”
- chatEnded: “You have ended your chat session.”
- agent: "Agent"
- agentTyping: “Agent is typing…”
- agentTypingName: "{<agent>} is typing..."
- agentDisconnected: “The agent has disconnected from this chat session.”
- errorInvalidLogin: “We have encountered an error trying to start a new chat. Please try again later.”
- endChatNotification: “Chat session has been ended.”
- endChatConfirmation: “Are you sure you want to end this chat session?”
- chatLogTitle: “Chat Log”
- chatLogDescription: “Below is a complete log of the chat session.”
- yesButton: “Yes”
- noButton: “No”
- coBrowsingStartButton: "Start co-browsing session"
- coBrowsingEndButton: "End co-browsing session"
- saveButton: “Save”
- clearButton: “Clear”
- pullDownInfo: “Swipe to see more options”
- errorGenericMessage: “Sorry, something went wrong. Please try again later.”
- errorRequiredMessage: “Please verify the mandatory fields”
- errorCrmFieldInvalidMessage: “Sorry, we couldn’t find your information using the value you provided.”
- errorInvalidNumber: “The field is a numeric field.”
- errorInvalidEmail: “The field only accept the valid e-mail format.”
- preChatFormData: “Pre-Chat form data”
- offChatFormData: “Offline form data”
- skipQueueFormData: “Skip Queue form data”
- chatTranslationOn: “Automatic chat translation has been turned on.”
- chatTranslationOff: “Automatic chat translation has been turned off.”
- chatTranslationServiceError: “Translation service error.”
- coBrowsingInvitePrompt: "Allow agent to see your browser window?"
- coBrowsingInviteAccept: "Yes, start sharing"
- coBrowsingInviteReject: "No"
- coBrowsingInviteAccepted: "You accepted the request."
- coBrowsingInviteRejected: "You rejected the request."
- coBrowsingSessionStarted: "Co-browsing session started."
- coBrowsingSessionEnded: "Co-browsing session ended."
- coBrowsingSessionRestored: "Co-browsing session restored."
- sessionDisconnected: “Your chat session has ended.”
- emptySubject: "[ Customer message ] No subject"
Implementation Example
The following code exemplifies the complete implementation of an onInit callback function body, appending “(modified)” to every system message:
customSystemMessages: {
endChatButton: "(modified) End chat",
closeChatButton: "(modified) Close",
errorServerUnavailable: "(modified) Server is unavailable. Please, try again later.",
chatEstablished: "(modified) Your chat session has been established.",
chatEstablishedName: "(modified) You are now chatting with {<agent>}.",
chatEstablishedAgent: "(modified) You are now chatting with an agent.",
chatEstablishedAgentNew: "(modified) You are now chatting with a new agent.",
chatQueued: "(modified) We will be with you shortly.",
chatForwarded: "(modified) Your chat is being forwarded. Please wait.",
chatMsgTooLong: "(modified) Your last message was shortened because it exceeded maximum length.",
chatDisconnected: "(modified) You have been disconnected from your chat session. Please check your network network connection and try again.",
chatEnded: "(modified) You have ended your chat session.",
agent: "(modified) Agent",
agentTyping: "(modified) Agent is typing...",
agentTypingName: "(modified) {<agent>} is typing...",
agentDisconnected: "(modified) The agent has disconnected from this chat session.",
errorInvalidLogin: "(modified) We have encountered an error trying to start a new chat. Please try again later.",
endChatNotification: "(modified) Chat session has been ended.",
endChatConfirmation: "(modified) Are you sure you want to end this chat session?",
chatLogTitle: "(modified) Chat Log",
chatLogDescription: "(modified) Below is a complete log of the chat session.",
yesButton: "(modified) Yes",
noButton: "(modified) No",
coBrowsingStartButton: "(modified) Start co-browsing session",
coBrowsingEndButton: "(modified) End co-browsing session",
saveButton: "(modified) Save",
clearButton: "(modified) Clear",
pullDownInfo: "(modified) Swipe to see more options",
errorGenericMessage: "(modified) Sorry, something went wrong. Please try again later.",
errorRequiredMessage: "(modified) Please verify the mandatory fields",
errorCrmFieldInvalidMessage: "(modified) Sorry, we couldn't find your information using the value you provided.",
errorInvalidNumber: "(modified) The field is a numeric field.",
errorInvalidEmail: "(modified) The field only accept the valid e-mail format.",
preChatFormData: "(modified) Pre-Chat form data",
offChatFormData: "(modified) Offline form data",
skipQueueFormData: "(modified) Skip Queue form data"
chatTranslationOn: "(modified) Automatic chat translation has been turned on.",
chatTranslationOff: "(modified) Automatic chat translation has been turned off.",
chatTranslationServiceError: "(modified) Translation service error.",
coBrowsingInvitePrompt: "(modified) Allow agent to see your browser window?",
coBrowsingInviteAccept: "(modified) Yes, start sharing",
coBrowsingInviteReject: "(modified) No",
coBrowsingInviteAccepted: "(modified) You accepted the request.",
coBrowsingInviteRejected: "(modified) You rejected the request.",
coBrowsingSessionStarted: "(modified) Co-browsing session started.",
coBrowsingSessionEnded: "(modified) Co-browsing session ended.",
coBrowsingSessionRestored: "(modified) Co-browsing session restored.",
sessionDisconnected: "(modified) Your chat session has ended.",
emptySubject: "(modified) [ Customer message ] No subject"
};
Important Notes
Some messages (e.g. chatEstablishedName) contain placeholders that are replaced by real values when applied. These placeholders are wrapped in double curly braces and, if present, will be replaced on customized messages as well.
Custom Stylesheet
Introduction
A tenant may want to customize embedded chat elements that are currently not available in the Chat Design page. For this reason it is possible to set a custom CSS file to be loaded before the chat is started, letting the tenant change the chat look and feel to a more fitting style.
Configuration
The __8x8Chat configuration should be like this:
<script type="text/javascript">
var __8x8Chat = {
// Other chat parameters (uuid, tenant, channel, domain...)
stylesheetURL: "https://path.to/external-stylesheet.css"
};
</script>
Notice the stylesheetURL configuration parameter. This should indicate the path to the CSS file that should be loaded by the chat window to apply the desired custom styles.
- Embedded chat using a custom stylesheet:

An example style sheet
You can use this text to help getting started authoring a new chat theme. The results of this stylesheet can be seen above.
{\rtf1\ansi\ansicpg1252\cocoartf1344\cocoasubrtf720
{\fonttbl\f0\fswiss\fcharset0 Helvetica;}
{\colortbl;\red255\green255\blue255;}
\margl1440\margr1440\vieww10800\viewh8400\viewkind0
\pard\tx720\tx1440\tx2160\tx2880\tx3600\tx4320\tx5040\tx5760\tx6480\tx7200\tx7920\tx8640\pardirnatural
\f0\fs24 \cf0 /*****************************************************************************\
* General\
*****************************************************************************/\
body, input[type="text"], textarea, button, select \{\
font-family: "Segoe UI", "Myriad Pro", Frutiger, "Frutiger Linotype", "Dejavu Sans", "Helvetica Neue", Arial, sans-serif;\
\}\
\
/*****************************************************************************\
* Container\
*****************************************************************************/\
.container, .inner-container, button \{\
border-radius: 0;\
\}\
\
.inner-container \{\
-ms-filter: "none";\
background: none;\
padding: 0;\
\}\
\
/*****************************************************************************\
* Controls\
*****************************************************************************/\
.control \{\
background: none !important;\
border: 0 !important;\
line-height: 1.1;\
text-decoration: none !important;\
opacity: 0.8 !important;\
\}\
\
.control:hover \{\
opacity: 1 !important;\
\}\
\
.control.close:before, .control.end:before \{\
color: #fff;\
content: "\\00D7";\
\}\
\
/*****************************************************************************\
* Header\
*****************************************************************************/\
.header .logo \{\
display: none !important;\
\}\
\
.header .title \{\
background: rgba(0, 0, 0, 0.6);\
font-size: 14px;\
color: #fff;\
padding: 5px 8px;\
\}\
\
/*****************************************************************************\
* Form\
*****************************************************************************/\
input[type="text"], textarea, .message-history, select \{\
box-shadow: none;\
\}\
\
button, button:active \{\
-ms-filter: "none";\
background-image: none;\
box-shadow: none;\
\}\
\
/*****************************************************************************\
* Introduction\
*****************************************************************************/\
.intro \{\
padding: 0 20px;\
\}\
\
/*****************************************************************************\
* Window\
*****************************************************************************/\
.translation-header \{\
border-left: 0;\
border-right: 0;\
\}\
\
/*****************************************************************************\
* Message\
*****************************************************************************/\
#message-field \{\
border: 0 !important;\
\}\
\
.message-history \{\
border-left: 0;\
border-right: 0;\
\}\
\
.message-actions \{\
z-index: 1;\
\}\
\
.message-wrapper \{\
padding: 15px;\
\}\
\
.message-content \{\
display: inline-block;\
width: 100%;\
\}\
\
.chat-outgoing-msg, .chat-incoming-msg \{\
background: #fafafa;\
border: 1px solid #ddd;\
color: #333;\
position: relative;\
\}\
\
.chat-outgoing-msg:before, .chat-incoming-msg:before,\
.chat-outgoing-msg:after, .chat-incoming-msg:after \{\
content: "";\
position:absolute;\
border-style: solid;\
display: block;\
width: 0;\
\}\
\
.chat-outgoing-msg:before, .chat-incoming-msg:before \{\
top: auto;\
bottom: 8px;\
right: -6px;\
border-width: 6px 0 6px 6px;\
border-color: transparent #ddd;\
\}\
\
.chat-outgoing-msg:after, .chat-incoming-msg:after \{\
top: auto;\
bottom: 10px;\
right: -4px;\
border-width: 4px 0 4px 4px;\
border-color: transparent #fff;\
clear: both;\
\}\
\
.chat-incoming-msg:before \{\
top: 8px;\
bottom: auto;\
left: -6px;\
border-width: 6px 6px 6px 0;\
\}\
\
.chat-incoming-msg:after \{\
top: 10px;\
bottom: auto;\
left: -4px;\
border-width: 4px 4px 4px 0;\
\}\
\
.chat-outgoing-msg \{\
margin-left: 20%;\
text-align: left;\
\}\
\
.chat-incoming-msg \{\
margin-right: 20%;\
\}\
\
.chat-log-msg, .chat-info-msg, .chat-error-msg, .chat-link-msg \{\
text-align: center;\
\}\
\
/*****************************************************************************\
* Acknowledge/Close messages\
*****************************************************************************/\
.acknowledge-text, .confirm-close \{\
padding: 0;\
\}}
The stylesheetURL parameter MUST be a CSS file served over SSL (HTTPS protocol).
Important Notes
- A functional stylesheet should be written by inspecting the current chat window HTML structure. This can be done using a web inspector, a tool shipped with most web browsers today.
- As the chat window HTML structure may change between versions, the tenant should test their customizations when upgrading to make sure they are working as expected.