How to Set Up or Change Auto Attendant Forwarding Rules in 8x8 Admin Console
Objective
Set up or change your Auto Attendant forwarding rules in 8x8 Admin Console.
Your Auto Attendant can forward callers to a number of destinations while your recorded message can inform callers of your business hours, or any other information they need to know.
Applies To
- 8x8 Admin Console
- Auto Attendant
Procedure
- Log in to 8x8 Admin Console.
- Click Auto Attendants.
- Create an auto attendant or click Edit (pencil icon) to the right of the Auto Attendant you wish to edit.
- Ensure that you have the proper Schedule selected. You can also create a new schedule for holidays or other occasions in the future where you will have reduced hours.
- Go to Call Handling Menus and select Open or Closed to set up specific rules for calls that come in during and outside of business hours. To set up a menu with separate actions, select Alternate Menu. Note: You need to select a Site for your Auto Attendant before you can view the Call Handling Menus.
- Click Add Key to create scheduling rules for specific keys.
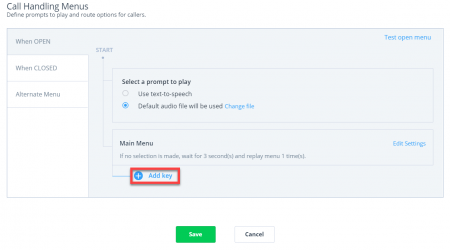
- Select the Key users will press to complete an action from the menu.
- Select any of the actions below. Callers can complete these actions by pressing the key associated with them.
.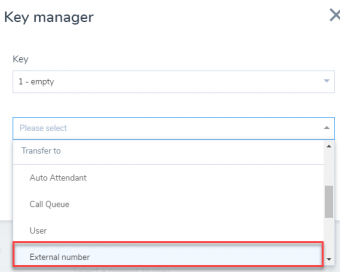
- Transfer To
- Auto Attendant: You must have two Auto Attendants to use this option.
- Call Queue
- User
- External Number: This can be used for any third-party services, such as contact centers. Note: A phone number is required if using External Forwarding on an Auto Attendant and if the Site does not have a Main Number.
- Ring Group
- Transfer To
- Click Save in the Key Manager window.
- Save your Auto Attendant profile.