Cordless DECT Paging
Objective
Enable sending and receiving of Poly Group pages over a DECT handset.
Applies To
- Poly Rove
- Poly VVX D230
- Yealink W56H and W59R
Procedure
To enable paging for the DECT Solutions below the customer will need to log into the base station(s) and manually either upload the configuration file or enable it in the web interface. This cannot be done by the 8x8 Professional Services team.
Poly Rove
Paging is currently not supported by the Poly Rove solution. It is on the Poly road map, but no eta is available.
Yealink (W56H and W59R)
For Yealink DECT Handsets W56H and W59R that are connected to a W60B base station, the customer must create a text file to upload the following configuration to the W60B base station. The below will enable the 3 default paging zones (1,24 and 25) like the Poly Desk Sets.
#!version:1.0.0.1
multicast.paging_address.1.channel = 1
multicast.paging_address.1.ip_address = 224.0.1.116:5001
multicast.paging_address.1.label = Default
multicast.paging_address.24.channel = 24
multicast.paging_address.24.ip_address = 224.0.1.116:5001
multicast.paging_address.24.label = Priority
multicast.paging_address.25.channel = 25
multicast.paging_address.25.ip_address = 224.0.1.116:5001
multicast.paging_address.25.label = Emergency
multicast.listen_address.1.channel = 1
multicast.listen_address.1.ip_address = 224.0.1.116:5001
multicast.listen_address.1.label = Default
multicast.listen_address.24.channel = 24
multicast.listen_address.24.ip_address = 224.0.1.116:5001
multicast.listen_address.24.label = Priority
multicast.listen_address.25.channel = 25
multicast.listen_address.25.ip_address = 224.0.1.116:5001
multicast.listen_address.25.label = Emergency
Sending a Page
- Press the "ok" button
- Select Call Feature | Paging
- Use the arrow keys to select the page group
- Press the paging soft key (or ok) to start the page, when done press the end soft key
Poly VVX D230
The Poly VVX D230 paging is set up via the web interface, follow the below steps.
Enable Group Paging:
- In the system web interface, go to Voice Services > Page Groups.
- In the Default column, clear the check boxes for the Polycast and PolycastGroup parameters.
- In the Value column for Polycast, select the check box.
- In the Value column for PolycastGroup, select the UCS page group you want to join.
- Select Submit.
Assign a handset to a Page Group
- In the system web interface, go to DECT Wireless > HandsetN .
- Under Calling Features, clear the check boxes for JoinPageGroupN in the Default column.
- In the Value column, select the page groups you want to make available on the handset.
- Select Submit.
Assign Page Group Names
- In the system web interface, go to Voice Services > Page Groups.
- In the Default column, clear the check boxes for each GroupName.
- In the Value column, enter a name for the page group.
- Select Submit.
- Reboot your system when you complete your changes.
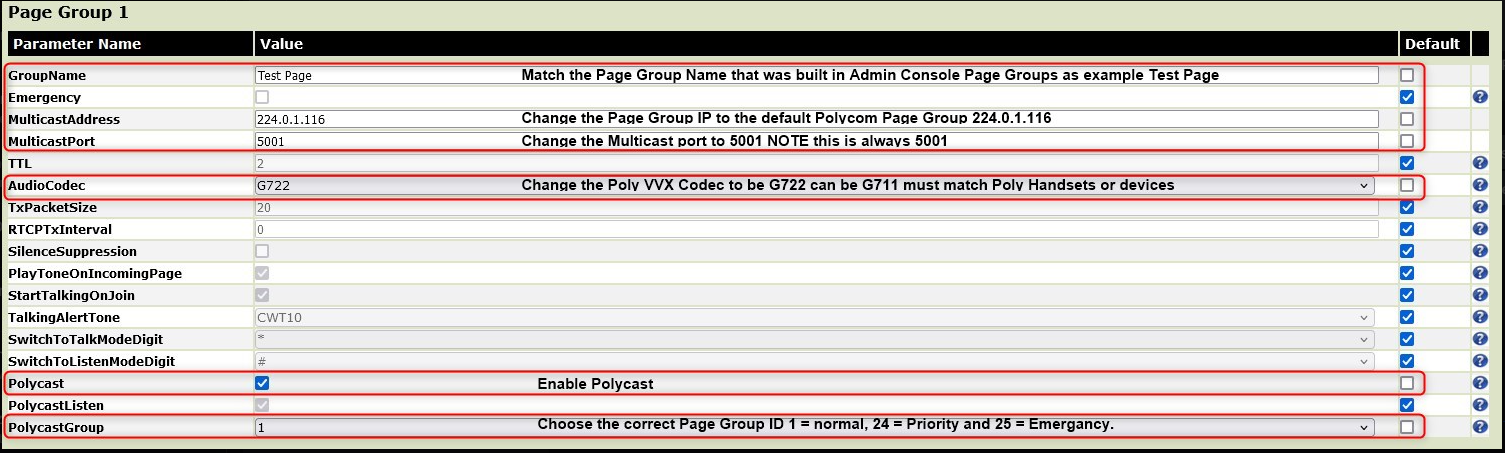
Setup Page Groups
Clear the "default" checkboxes for the following items and set their values as indicated below.
- MulticastAddress: 224.0.1.116, always 224.0.1.116
- MulticastPort: 5001, always 5001
- AudioCodec: G722 or G711. It must match all other devices in the paging group
- Polycast: Checked
- PolycastListen: Checked
- PolycastGroup: Group ID, recommend setting three groups 1, 24, and 25 to match the defaults for Poly Desk sets
Sending a Page
- On the wireless handset, go to Menu > Paging.
- Select a paging group.
The phone dials into the paging group.
- Speak your message into the handset’s microphone, then press End when your message is done.
Additional Information
If you add additional paging groups in 8x8 Admin Console, you will need to add them to the DECT Solution as well.