IOGear Setup
Objective
Install and connect the IOGear GWU 627.
Applies To
- GWU 627
Procedure
Before You Begin
The IOGear GWU627 is on a static IP address of 192.168.1.252, subnet of 255.255.255.0. These devices are not guaranteed to work on any other IP range or subnet. Due to the restriction on the IP assignment, there should be no more than 1 IOGear per LAN.
Set Up Using Windows
- Turn off your computer’s wireless connection and disconnect the Ethernet cable currently connect to your computer, if applicable.
- Use both the included RJ-45 Ethernet cable and the USB cable to connect the WiFi adapter with your computer.
- Set your computer with a static IP address.
- Click the start button, the click on Control Panel.
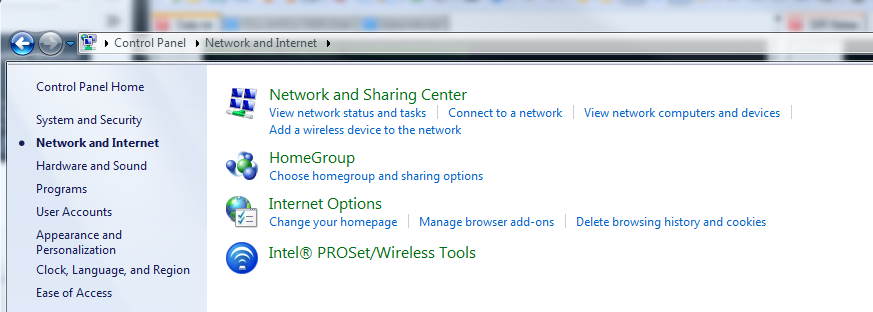
- Click Network and Internet.

- Click Network and Sharing.
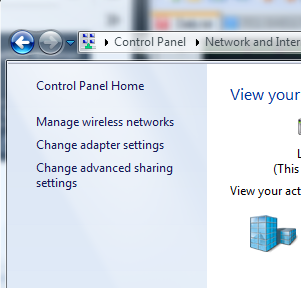
- Click Change adapter settings.
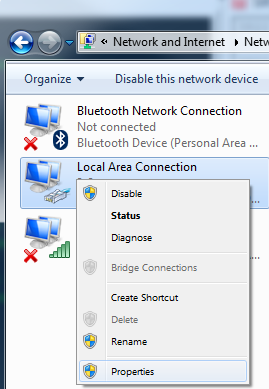
- Right-click on Local Area Connection and click properties.
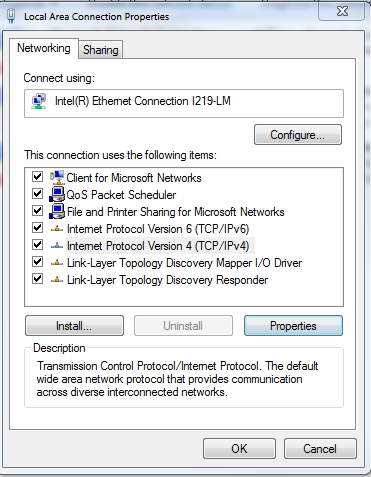
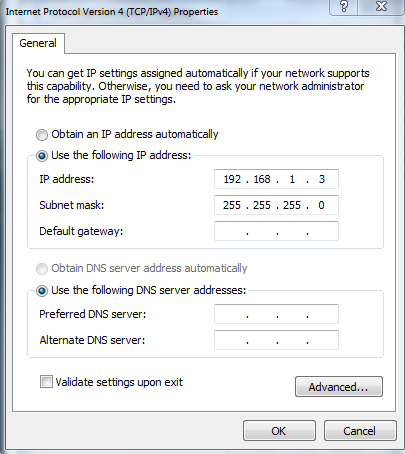
- Select Internet Protocol Version 4 (TCP/IPv4) and click Properties.
- Select Use the following IP address and enter 192.168.1.3 in the IP address section. Next enter 255.255.255.0 in the Subnet Mask. Click OK.
- Open your web browser and enter 192.168.1.252. This will bring up the configuration utility. Click Site Survey to scan for your wireless network.
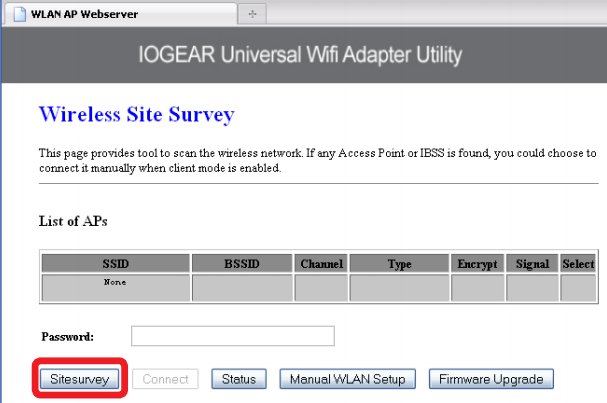
- Select the AP you want to connect and enter the password if the network is secured. Click Connect button to establish the connection.
- Close your browser and change the network settings on your computer back to DHCP (Obtain an IP address Automatically & Obtain DNS server address automatically). Refer to steps 3a through 3d. Also do not forget to enable your wireless connection if you disabled it.
- Disconnect the Ethernet and USB cables from your computer.
- Use the included RJ-45 Ethernet cable to connect the WiFi adapter to your phone.
Set Up Using Mac
- Turn off your computer’s wireless connection (if applicable) and disconnect the Ethernet cable connected to your computer (if applicable).
- Use both the included RJ-45 Ethernet cable and the USB cable to connect the WiFi adapter with your computer.
- Set your computer with a static IP address.
- Open system preferences and select Network.
- Select your Ethernet connection in the left pane. Next change configure to Manual and enter IP address 192.168.1.100 and Subnet Mask 255.255.255.0. Remove any entries in the Router and DNS boxes then click Apply.
- Open your web browser and enter 192.168.1.252. This will bring up the configuration utility. Click Site Survey to scan for your wireless network.
- Select the AP you want to connect to and enter the password if the network is secured. Click the Connect button to establish the connection.
- Close your browser and change the network settings on your computer back to DHCP. Refer to steps 3a through 3b.
- Use the included RJ-45 Ethernet cable to connect the WiFi adapter with your phone.