Manually Provisioning a Poly Phone (WebGUI Method Only)
Objective
Manually provisioning a Poly phone via the web GUI.
Applies To
- Poly Phones
- Web GUI
- Factory Reset
Procedure
Reset Phone to Factory Defaults Through the Phone's Web GUI
The device web interface (GUI) allows you to make changes to the phone's settings via a web browser on your computer, which can often be more convenient than on the phone screen itself. You must ensure that:
- The phone is plugged into the network
- The computer is on the same network as the phone
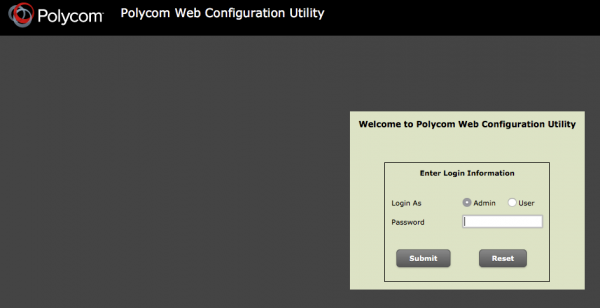
- In a web browser on a computer on the same network as the phone, browse to the phone's IP address (https://<IP address of phone).
- Log in as Admin and enter the phone's MAC password.
Device information and MAC password can be found in 8x8 Admin Console.
- Navigate to Utilities > Phone Backup & Restore.
- Click the small + to open the Global Settings options.
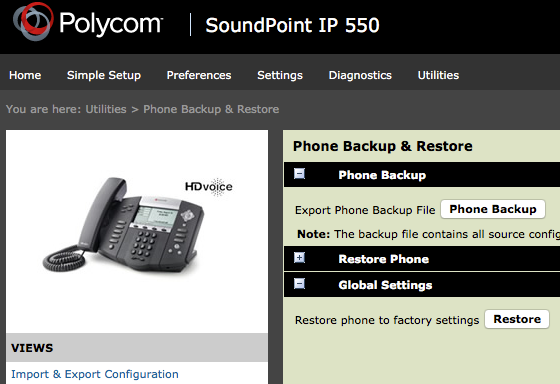
- Click Restore to reset the phone to factory default settings.
- Wait for phone to reboot.
- Note: After the phone has been reset to factory default settings, the administrator password will have changed to 456.
Update the Phone's Firmware
Attention! It is not recommended to use the firmware update drop down inside the Poly WebGUI. If this option is used, the phone will no longer receive updates from 8x8 without using the "Clear Upgrade Server" option.
Note: The process is complete after the phone stops rebooting after firmware upgrade. This may take up to 10 to 15 minutes total time, depending on what version the phone is upgrading from.
- Obtain your phone's administrator password.
- Reboot the phone (from Home/Menu, select Settings > Basic > Restart).
- While the phone is booting up, press the Setup soft key. It may take some time for the key to appear.
- Enter your phone's password, then press OK.
- Scroll down to and select Provisioning Server Menu.
- On Server Type, press Edit.
- Scroll left arrow key until HTTP is selected, then press OK.
- On Server Address, press Edit.
- Enter the appropriate server address for your phone model.
- SoundPoint IP models: voipt2.polycom.com/4015
- SoundPoint IP Speaker phones: voipt2.polycom.com/4015
- VVX models: voipt2.polycom.com/594

Note: If you are working with the phone's physical number pad and not an onscreen keyboard, use the following:
- Lower case letters: a->1A
- Period (.): *
- Slash (/): #
- Expand DHCP Menu, change Boot Server to Static.
- Press OK.
- Press Exit twice (IP 335 users: Left arrow key), then Save & Reboot.
- The phone will reboot twice and update.
Manually Provision Phone into Production
- In a web browser on a computer on the same network as the phone, browse to the phone's IP address.
- Log in as admin and enter password 456.
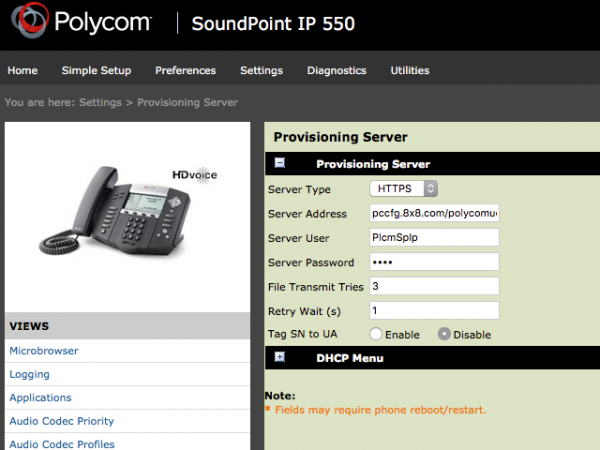
- Navigate to Settings > Provisioning Server.
- From the Server Type drop-down, select HTTPS.
- In the Server Address field, enter the 8x8 Poly Provisioning Server address:
- pccfg.8x8.com/polycomuc/ -- SoundPoint, VVX (excluding D230) Edge E, and CCX devices
- https://obicfg.8x8.com/polyrove -- Poly Rove (for more details see Manually Provisioning a Poly Rove )
- https://obicfg.8x8.com/polyedge/serv...{mac}-cust.cfg -- Poly Edge B (for more detail see Manually Provision a Poly Edge B Series Phone )
- Click Save.
- Navigate to Preferences.
- Click Date and time > SNTP Server
- Select the pool.ntp.org address from the dropdown menu.
- Click Save.
- Allow several minutes for the phone to reboot and connect to the 8x8 servers. When rebooting is complete, continue on to activate your phone.