How to Set a Static IP on a Poly Phone
Objective
Set a Static IP on your Poly phone.
Applies To
- Poly Phones
- Static IP
Procedure
Setting a static IP can be done through either the phone's web GUI or the phone itself.
Before You Begin
- Find out your phone's password. Poly phones in an unprovisioned, factory default state and NOT running UC4.0+ firmware should be able to utilize 456 or 123. Otherwise, use the MAC password.
- Next, determine the phone's current IP address and a static IP address (along with subnet and gateway) to assign to the phone.
Note: We highly recommend consulting an IT or network professional when configuring advanced network settings. If able, the network administrator should always check the IP address, and assign and log any static IP to avoid conflicts in the future.
Through the Phone's Web GUI
The device web interface (GUI) allows you to make changes to the phone's settings via a web browser on your computer, which can often be more convenient than on the phone screen itself. You must ensure that:
- The phone is plugged into the network.
- The computer is on the same network as the phone.
- In a web browser on a computer on the same network as the phone, browse to the phone's IP address.
- Log in as Admin and enter password.
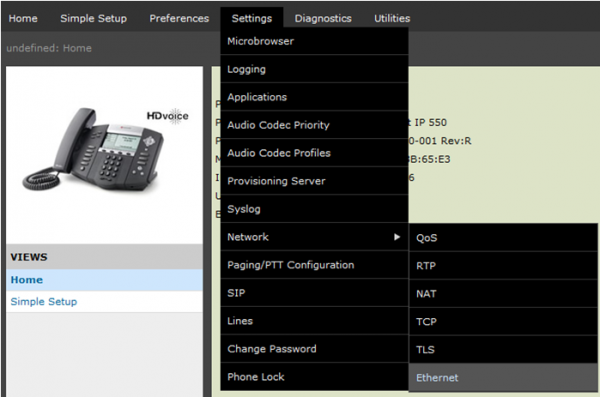
- Click Settings > Network > Ethernet.
- Set DHCP to Disable.
- Enter all of the following:
- IP Address
- Subnet Mask
- IP Gateway
- For DNS Server, enter your Internet Service Provider (ISP's) DNS.
- For DNS Alt, enter your Internet Service Provider (ISP's) alternate DNS or 208.67.222.222
- On the bottom right, click Save.
Wait for your phone to reboot. If it does not reboot, verify the information, then manually power cycle the phone (unplug it from the power source, wait a full minute, then plug it back in and let it power on).
Through The Phone
- Disable DHCP:
- Go to Menu > Settings > Advanced.
- Enter the phone password.
- Go to Admin Settings > Network Config > Ethernet Menu (DHCP Client on some phone models).
- Set static IP:
- Go to Menu > Settings > Advanced.
- Enter the phone password.
- Go to Admin Settings > Network Config.
- Set the following:
- IP address
- Subnet Mask
- Gateway
- DNS 1: Use your Internet Service Provider (ISP's) DNS
- DNS 2: Use your Internet Service Provider (ISP's) DNS or 208.67.222.222
- Back out of menus to the home screen.
- Reboot your phone.
Additional Information
Switching a phone from DHCP to a static IP can be a useful way to address connectivity issues like URL call is disabled errors. It may also alleviate some (but not all) call quality issues.