Creating a Callback Option in 8x8 Contact Center
Objective
Create a callback option for your queue in the IVR script.
Applies To
- 8x8 Contact Center
- Callback Options
Procedure
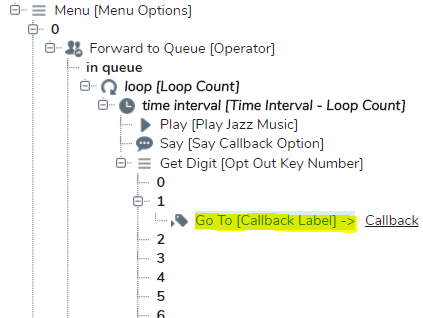
Ensure an Outbound Queue is already created as the Outbound Queue will need to be selected in the script steps below.
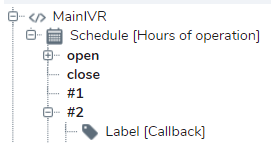
- Add a Label object outside of the Forward to Queue object.
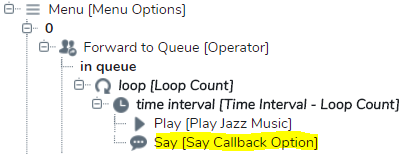
- In your desired location in your Forward to Queue script, Add a Play or Say object that will inform the customer they have an option to opt out of the queue if they no longer wish to wait. For example, "Thank you for waiting, please continue to hold or press (number selection) to leave a callback number". If a play object (music/audio) exists before your Play or Say object, set the Play object to "interruptible" to allow the caller to bypass the music if desired.
- Add a Get Digit object after your Play or Say object. This will provide a number list that will include 0-9, *, and # that can be used for alternative options.
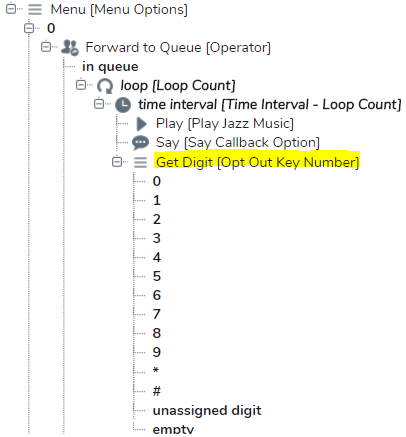
- Select your desired key number and add a Go To object. Choose the Label you first added to send the caller to that label.
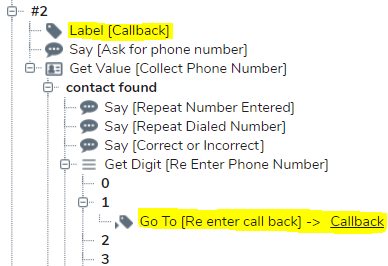
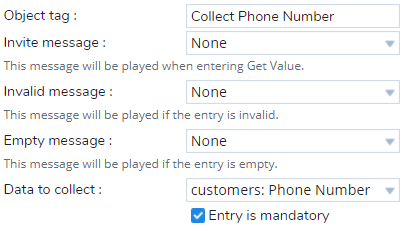
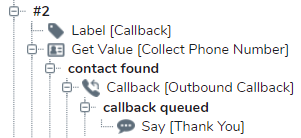
- Go to your Label and Add a Get Value object. The Get Value object will allow you to choose your Invite Message (audio file) that will ask for the customers 10 digits call back number.
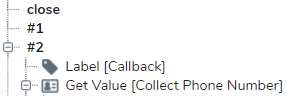
Do not use a Say object before the Get Value object instead of the Invite Message. If the caller presses a digit before the Get Value object is reached in the script it is not recorded as part of the Value.
This can cause the callback to fail as the number is missing the first digit.

The Data to collect field should be selected to customers: Phone Number and make sure Entry is mandatory is checked.
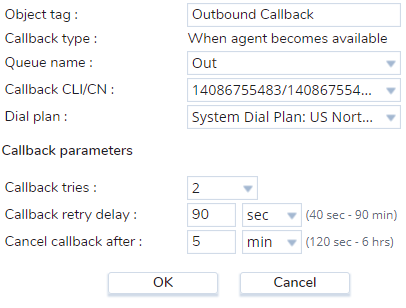
- Select Contact Found and add a Callback object. Select your Outbound Queue, the Channel Number you wish to display, Dial Plan, and Callback parameters.
- Select callback queued and add a Say or Play object to inform the customer they will be called back.
You have now completed a basic callback option in your IVR script.
Additional Information
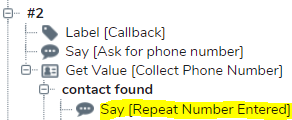
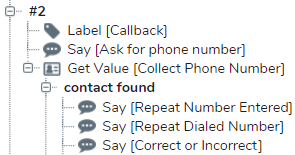
You can allow your caller to hear the number they entered and allow them to re-enter their phone number by following the steps below.
- Select Contact Found under Get Value and add a Say object. This message should say "The number you entered is (number here)". If you have an audio file, you can use a Play object instead.
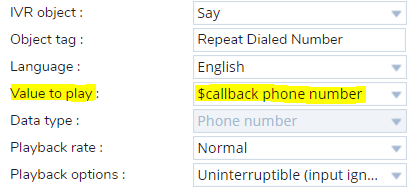
- Add another Say object. Change the Value to play to $callback phone number. This will repeat the number that was entered.
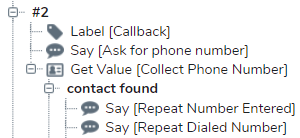
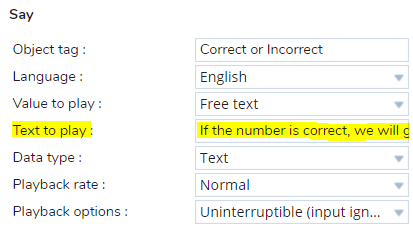
- Add a third Say object. This message should say something like "If the number is correct, we will give you a call shortly. If the number is incorrect, please press (number key desired) to re-enter your 10 digit callback number." You can use a Play object instead of you have an audio file.
- Add a Get Digit object.
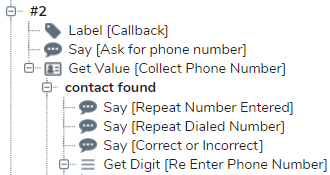
- Select your desired key number and add a Go To object. Choose the Label you first added to send the caller to that label to re-enter their phone number.