How to Install Salesforce Integration v3.2 for 8x8 Work and Contact Center
Objective
This guide will show you how to install Salesforce Integration v3.2 for 8x8 Work and Contact Center for Salesforce Lightning.
There are four primary steps in this process:
- Install the Salesforce Integration Package
- Edit the New Call Center to Enable it for 8x8 Work or Contact Center or Both
- Add Salesforce Users to the New Call Center
- Configure the Salesforce Lightning Utility Bar
If you currently have v3.1 of the integration installed, you can upgrade to v3.2.
Notes:
- The 8x8 Salesforce integration is not a softphone, and so it provides no audio services. It is effectively a control panel and is required to work in conjunction with 8x8 Work for Desktop, 8x8 Work for Mobile, or a desk phone.
- Please disable popup blocking for 8x8 applications in your web browser. This integration will be affected by popup blocking in both Classic and Lightning modes.
- Third-party cookies must be allowed for the 8x8 communication panel to work.
- Google Chrome is the officially recommended and supported web browser for all 8x8 voice integrations.
8x8 integration with Salesforce is currently available in the United States, the United Kingdom, Republic of Ireland, Australia and New Zealand.
Applies To
- 8x8 Work
- 8x8 Contact Center
- Salesforce
Procedure
See the Table on Contents on the left to navigate to specific sections of this article.
Clarification: You'll see reference to two version numbers during the installation process. Note that they are the same thing:
- Version 1.2 refers to the application version as listed in Salesforce Installed Packages.
- Version 3.2 refers only to 8x8's internal version numbering of the integration.
Upgrade
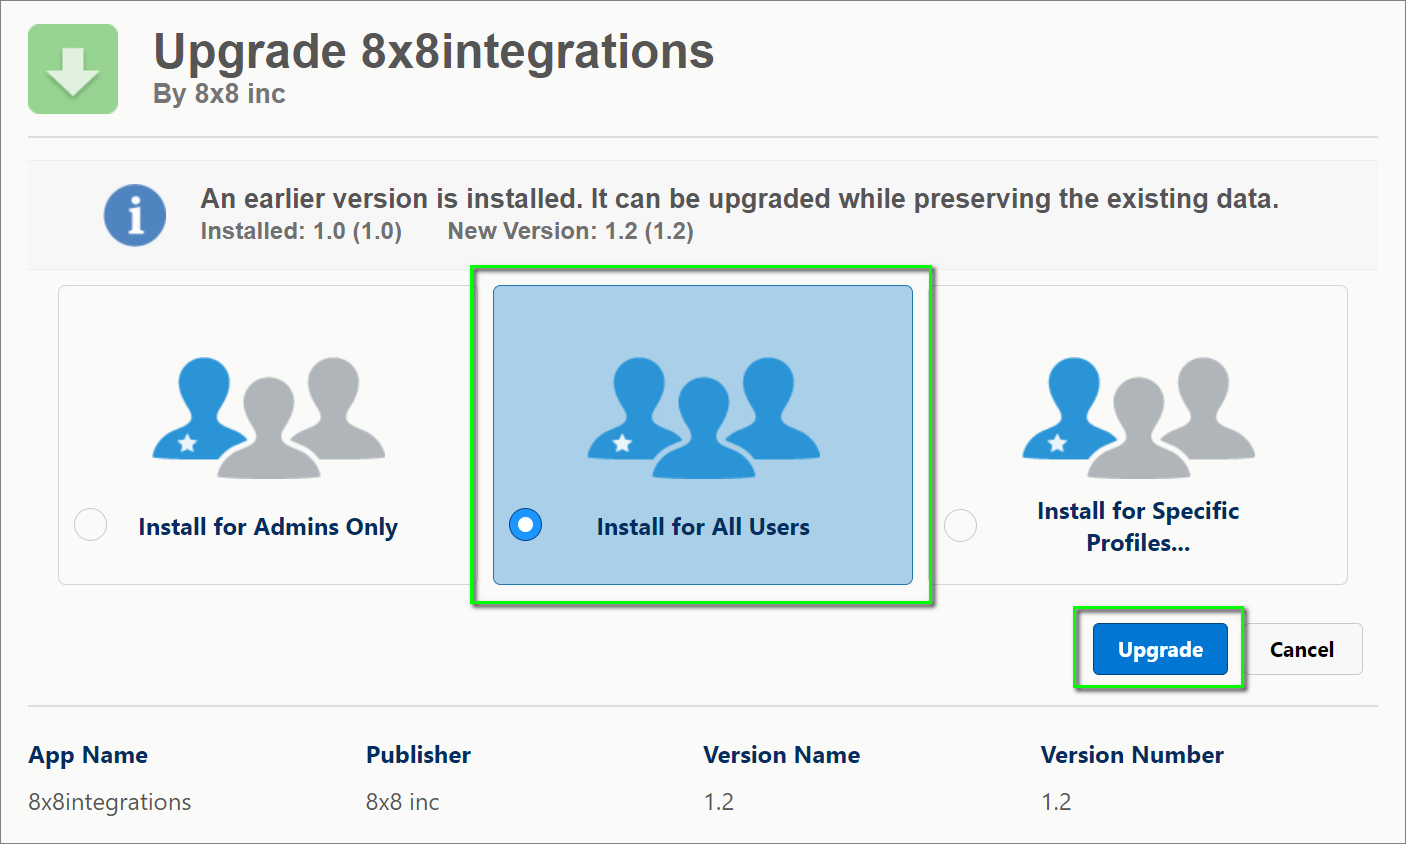
If you currently have v3.1 of the integration installed, you can upgrade to v3.2. You do not need to remove the previous installed package, and your current Call Center configuration will be preserved.
- Simply install the v3.2 package linked below.
- Be sure to select Install for All Users.
- Click Upgrade, and then click Done when the upgrade is complete.
- If your users experience issues at this point:
- Remove the Open CTI Softphone from your Salesforce app's Salesforce Lightning Utility Bar and click Save.
- Re-add the Open CTI Softphone and click Save.
- Have your users close and restart their Salesforce.
Install the 8x8 v3.2 Integration Package into Salesforce
- First, log in to Salesforce as an administrator.
- The integration can be installed from the Salesforce AppExchange. However, you can click the appropriate link below to immediately begin the installation process for your Production or Sandbox environments:
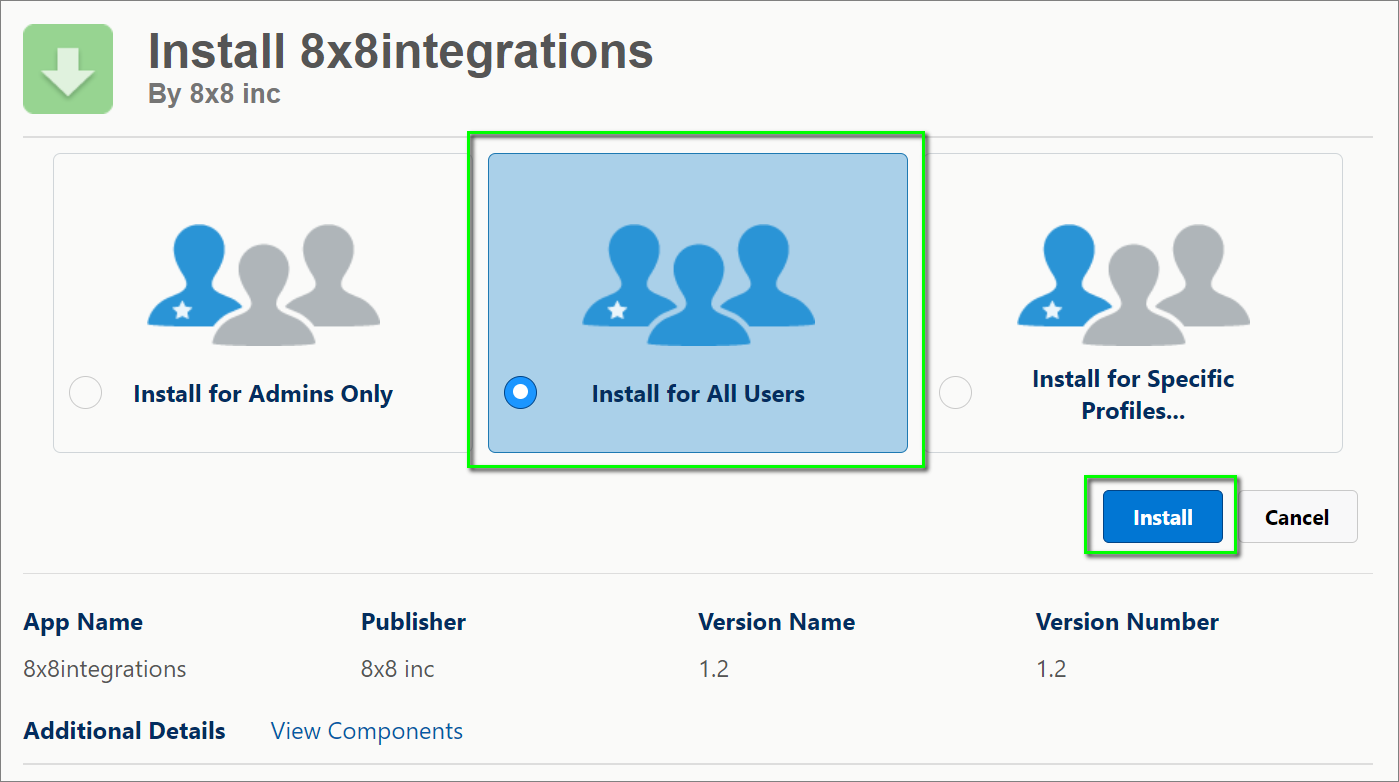
- Select Install for All Users, click the acknowledgement check box, and click Install.
- If instead you choose to Install for Admins Only, you will need to re-install the integration again later for non-administrator users.
- Users will only see the integration communication panel if they have been added to the 8x8 call center in Salesforce, which is installed with the integration. Users must be added to the call center manually, by an admin.
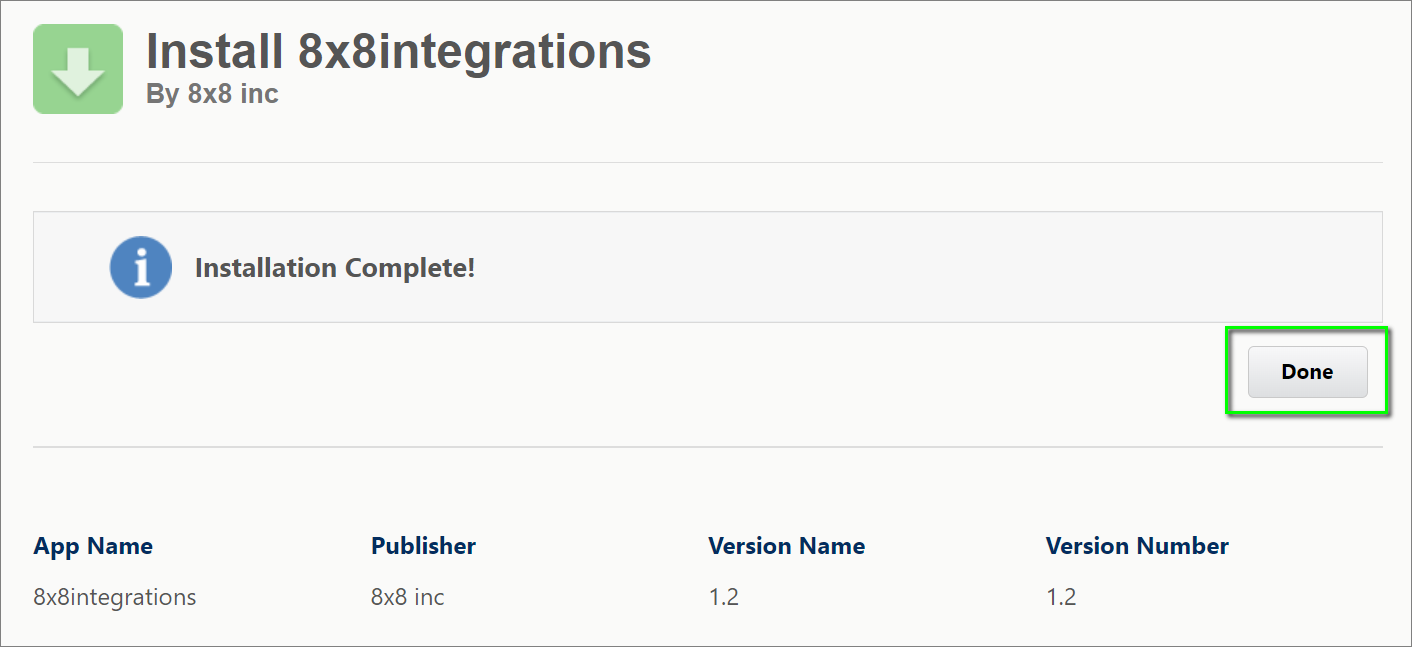
- Click Done to complete the package installation.
- Salesforce should automatically display the installed package. If not, click the Setup
icon at the top-right and select Setup
.
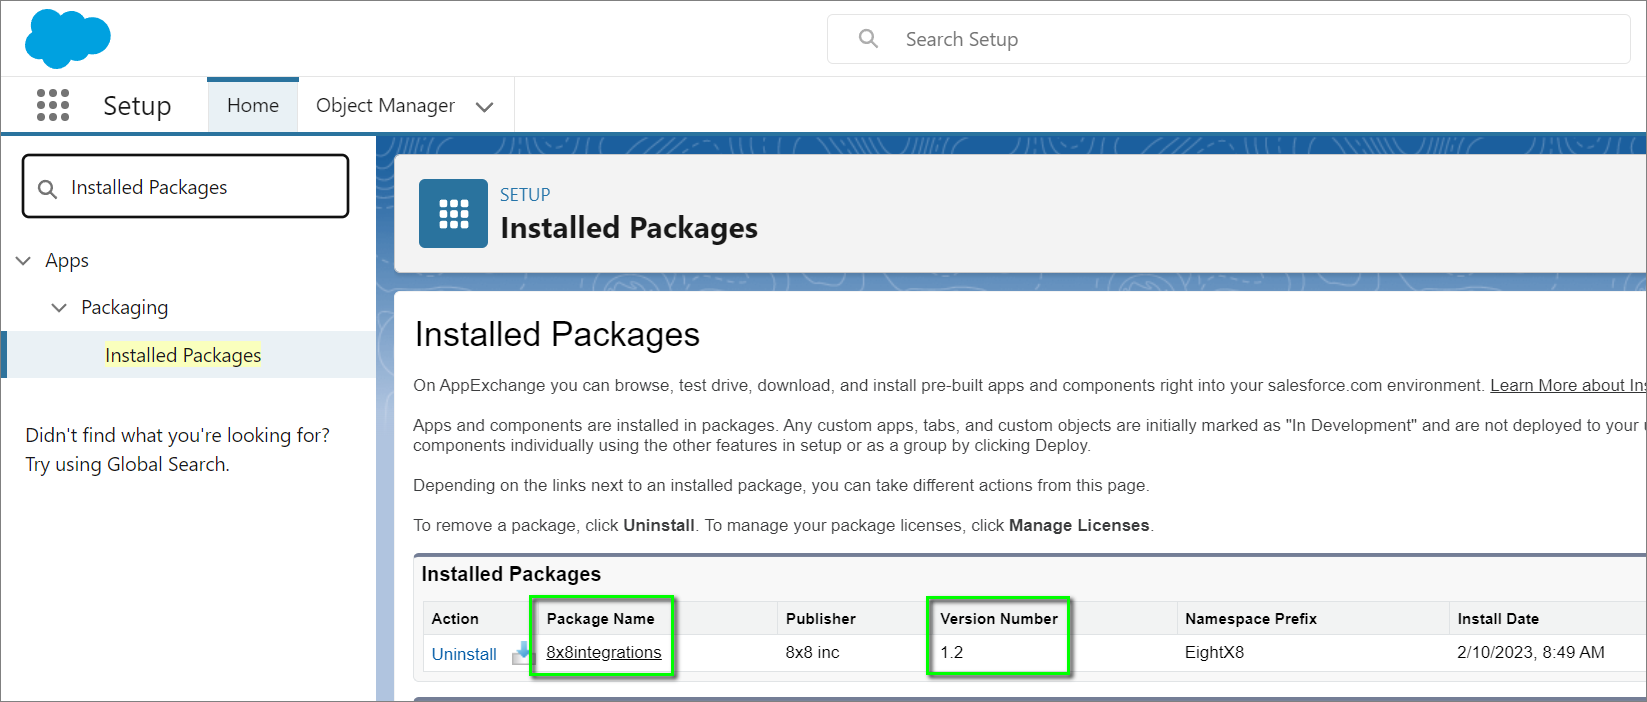
- Then search for and click Installed Packages.
- Verify that package 8x8integrations is installed, and proceed to the next step.
- Note that the Version Number will display 1.2.
Configuring the Call Center for 8x8 Work, Contact Center, or Both
- 8x8 Work Call Center Configuration
- Contact Center Call Center Configuration
- Both 8x8 Work and Contact Center Call Center Configuration
Call Center Configuration for 8x8 Work
To configure your call center only for 8x8 Work:
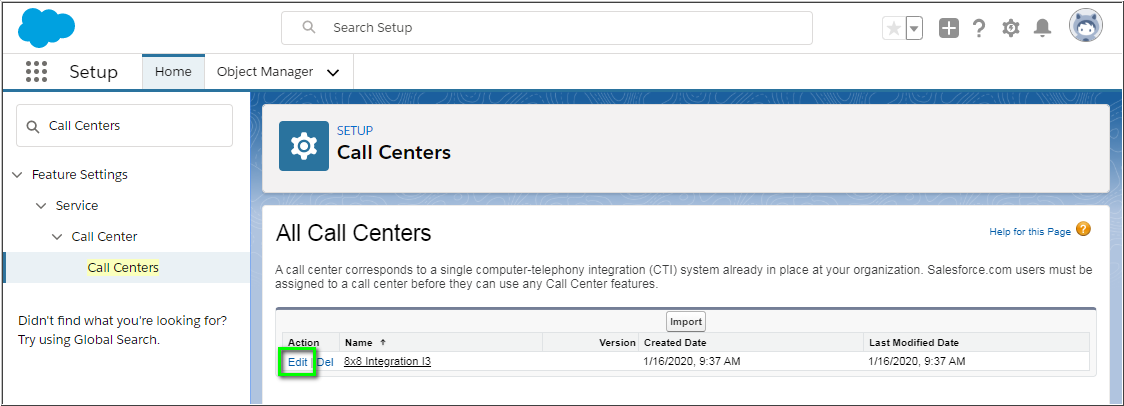
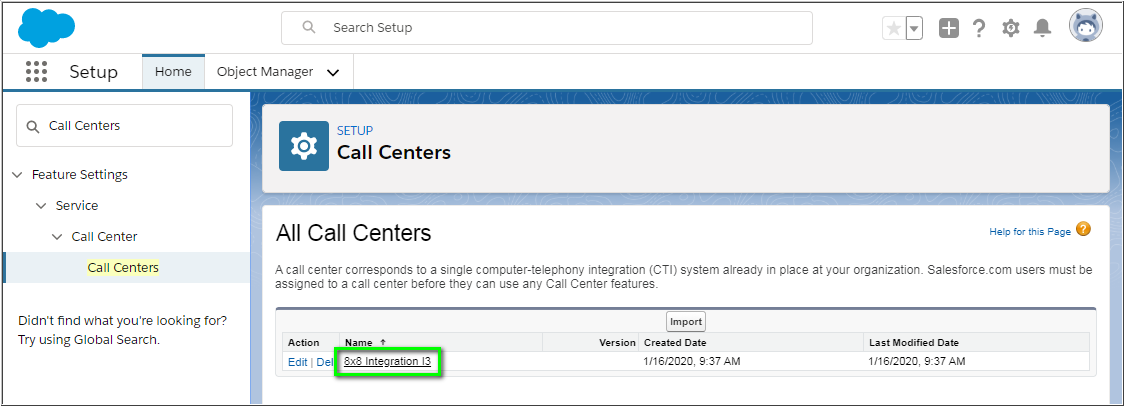
- After installing the 8x8 integration package, navigate to Setup > Call Centers.
- Click on Edit to the left of the name 8x8 Integration I3.
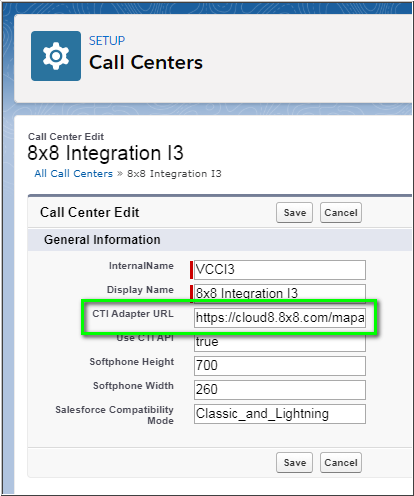
- Clear the CTI Adapter URL field of any text, and add the appropriate URL from the table below.
CTI Adapter URL (for 8x8 Work)
| 8x8 Login | CTI Adapter URL |
|---|---|
| SSO Enabled Production |
Apply this URL if you do want your users in this specific Salesforce call center to be automatically logged into the 8x8 communication panel when they log into Salesforce.
See the note below for further required steps to implement this option. |
| SSO Disabled Production |
Apply this URL if you do not want your users in this specific Salesforce call center to be automatically logged into the 8x8 communication panel when they log into Salesforce.
|
| Sandbox | Apply this URL if you are testing the integration in your Salesforce sandbox environment.
|
- Click Save to complete your changes.
- Continue to Add Salesforce Users to the Call Center.
8x8 SSO Login
Enabling 8x8 SSO login requires additional per-agent setup in 8x8 Admin Console, or 8x8 Account Manager (if your service is still on that legacy platform).
When properly enabled, 8x8 SSO automatically logs all members of a configured Salesforce call center into the 8x8 communication panel when they log into Salesforce.
If 8x8 SSO is disabled, then all members of a configured Salesforce call center must log in to the communication panel using their 8x8 credentials.
Instructions for configuring 8x8 Single Sign On for the 8x8 Work and Contact Center integration for Salesforce can be found here:
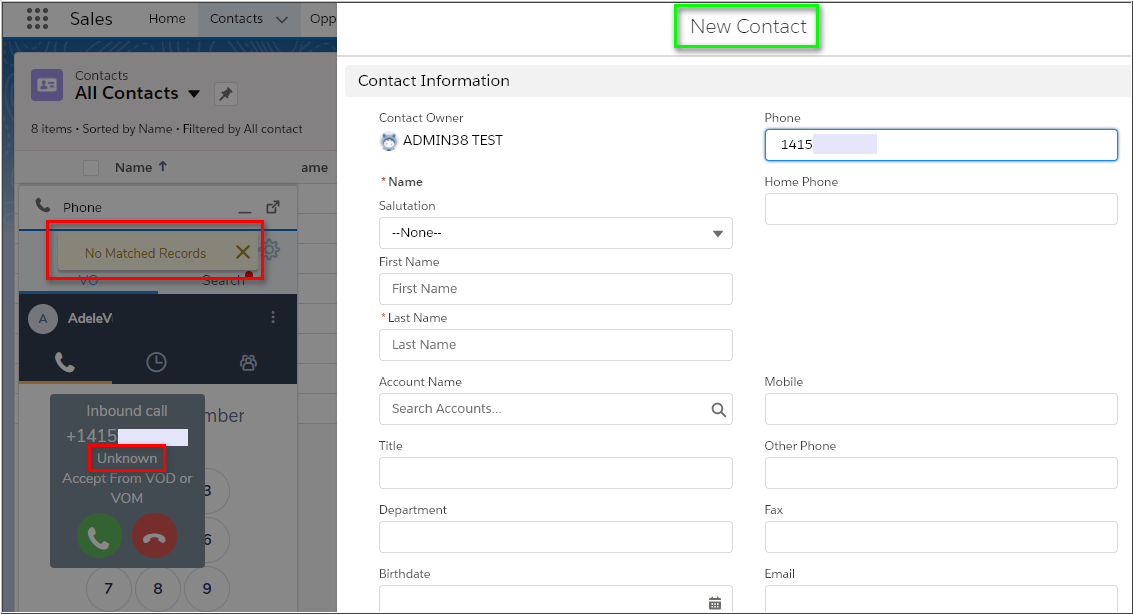
CTI Adapter URL suffix to alter No Matched Records object pop behavior
By default, calls to and from phone numbers that do not match a supported object in Salesforce will pop a new Salesforce Case template.
You can change the template pop type for users in your call center by appending one of the following suffixes to the call center CTI Adapter URL:
- Account: &shareableremix=sfaccount
- Contact: &shareableremix=sfcontact
- Lead: &shareableremix=sflead
- Opportunity: &shareableremix=sfopportunity
Note:
- This feature is compatible only with Salesforce Lightning mode.
- 8x8 Contact Center also supports this configuration in the call center.
- Also, the caller ID phone number will be automatically populated into the new object template's Phone field.
- Salesforce users should log out of and back into Salesforce to ensure that the change is effective.
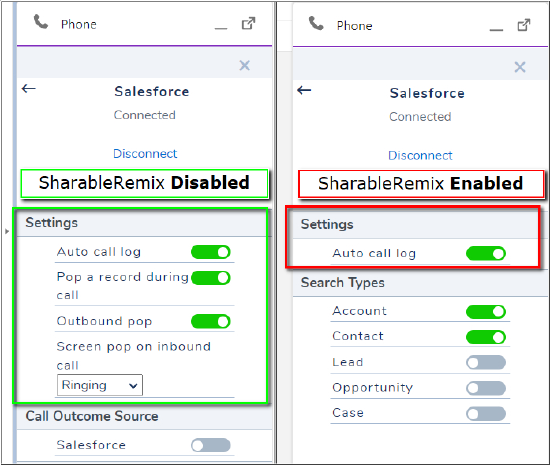
IMPORTANT:
Please note that implementing this feature in your call center CTI Adapter URL will disable the user's ability to change call pop settings in the the communication panel, in the Settings (gear) > Integrations > Salesforce > Settings menu.
To maintain user access to these settings and also pop the desired blank object template (other than New Case) when a caller is not recognized, please contact your 8x8 Sales manager to request a customization to your integration through our Professional Services.
Example:
Here, we've added the Contact suffix to the CTI Adapter URL:
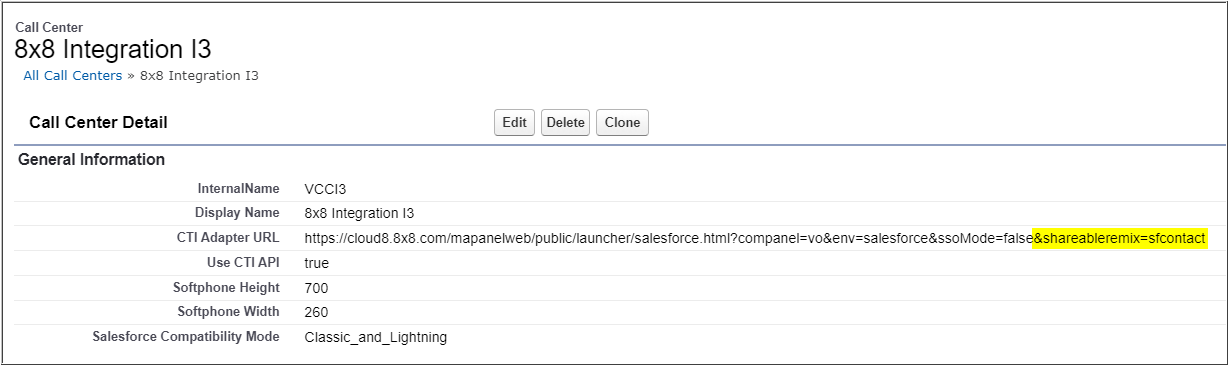
This forces a New Contact template to pop for an unknown called/calling person, instead of a new Case:
Call Center Configuration for 8x8 Contact Center
To configure your call center only for 8x8 Contact Center:
- To begin, navigate to Setup > Call Centers.
- Click on Edit to the left of the 8x8 Integration I3.
- Clear the CTI Adapter URL field of any text.
- For configuring only Contact Center:
- Edit only the CTI Adapter URL, and add the URL format from the table below.
- For configuring Call Center for both 8x8 Work and Contact Center, edit the following:
- InternalName: VCCI3
- DIsplayName: 8x8 Integration I3 VCC
- CTI Adapter URL: Add the appropriate URL from the CTI Adapter URL (Contact Center) table below. Replace the X in naX with the specific tenant cluster number assigned to your service.

Note: You can also get the cluster URL your tenant is hosted on by looking at the browser URL once you log in to Agent Workspace or Configuration Manager, such as “na12” in https://vcc-na12b.8x8.com. If there is a letter following the number in the URL such as na12b, ignore it, and simply use na12.
- Click Save to complete your changes.
- Continue to Add Salesforce Users to the Call Center.
CTI Adapter URL (Contact Center)
| Tenant | CTI Adapter URL | Example |
|---|---|---|
|
8x8 SSO Enabled Salesforce production for 8x8 Unified Login with 8x8 Work tenants |
https://cloud8.8x8.com/mapanelweb/public/launcher/salesforce.html?env=salesforce&companel=vcc&vccmode=3&vccDomain=https://sso.8x8.com/login/vcc-naX&ssoMode=true |
https://cloud8.8x8.com/mapanelweb/public/launcher/salesforce.html?env=salesforce&companel=vcc&vccmode=3&vccDomain=https://sso.8x8.com/login/vcc-na1&ssoMode=true |
|
8x8 SSO Disabled Salesforce production for 8x8 Unified Login with 8x8 Work tenants |
https://cloud8.8x8.com/mapanelweb/public/launcher/salesforce.html?env=salesforce&companel=vcc&vccmode=3&vccDomain=https://sso.8x8.com/login/vcc-naX |
https://cloud8.8x8.com/mapanelweb/public/launcher/salesforce.html?env=salesforce&companel=vcc&vccmode=3&vccDomain=https://sso.8x8.com/login/vcc-na1 |
| Sandbox | https://cloud8.8x8.com/ |
https://cloud8.8x8.com/ |
Please see the following article for instruction on implementing the 8x8 Contact Center App v2.0 CTI URL:
Please see the section linked here for information about:
8x8 SSO Login
Enabling 8x8 SSO login requires additional per-agent setup in 8x8 Admin Console, or 8x8 Account Manager (if your service is still on that legacy platform).
When properly enabled, 8x8 SSO automatically logs in all members of a configured Salesforce call center to the 8x8 communication panel when they log into Salesforce.
If 8x8 SSO is disabled, then all members of a configured Salesforce call center must log in to the communication panel using their 8x8 credentials.
Instructions for configuring 8x8 Single Sign On for the 8x8 Work and Contact Center integration for Salesforce can be found here:
Call Center Configuration for both 8x8 Work and Contact Center
To allow for use of both 8x8 Work and Contact Center in a single Salesforce organization, you must have a separate Salesforce call center for each product.
To copy and configure your original installed call center:
- Navigate to Salesforce Setup > Call Centers.
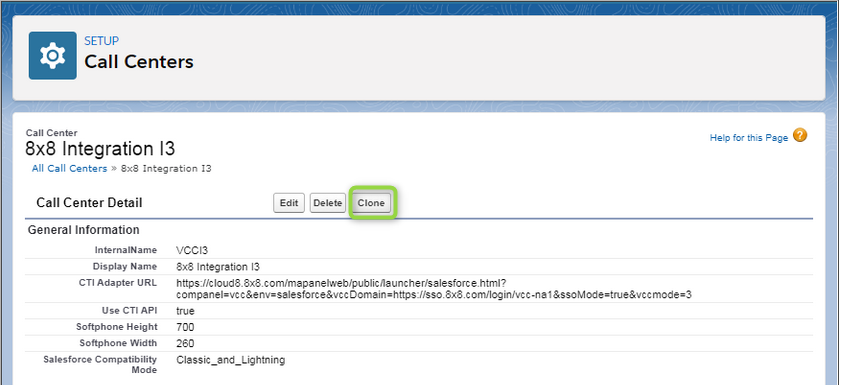
- Click on the name of the 8x8 Integration I3 call center (do not click Edit).
- Click the Clone button.
- Enter the following info to the newly cloned call center:
- InternalName: VOI3
- DIsplayName: 8x8 Integration I3 VO
- CTI Adapter URL: Follow the Call Center for VO setup.
- Click Save to complete your changes.
- Continue to Add Salesforce Users to the Call Center.
Add Salesforce Users to the Call Center
Your Salesforce users must be added to an 8x8 call center for them to see their 8x8 communication panel.
Note: Salesforce limits individual user assignments to one call center at a time.
- To begin, navigate to Setup > Call Centers.
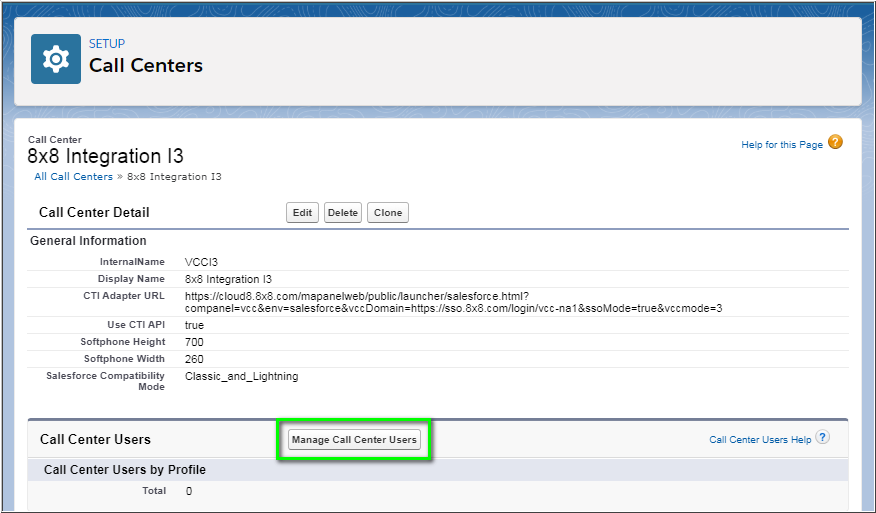
- Click on the Name of the call center you would like to add users to (do not click Edit).
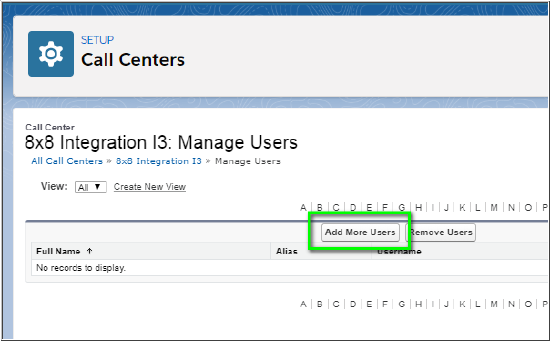
- Scroll down (if needed) and click Manage Call Center Users.
4. Click Add More Users.
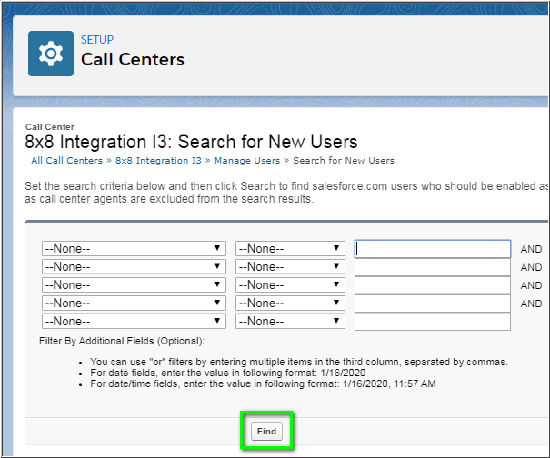
5. In Search for More Users, click Find to see a list of all available/unassigned users. You can also use filters to narrow your search as needed.
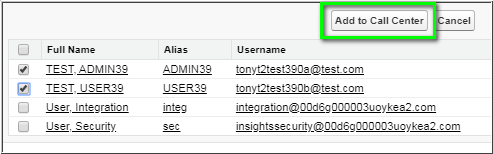
- Select the users who will have access to the 8x8 integration, then click Add to Call Center.
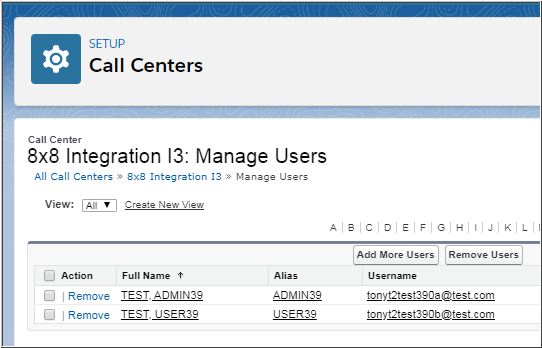
- Your Salesforce users can now click on their Home tab to log into and use the 8x8 Salesforce Integration.
- Continue to Configure the Salesforce Lightning Utility Bar, which is required for use of the integration in Lightning mode.
Configure the Salesforce Lightning Utility Bar
This step is also performed by the Salesforce administrator, and adds a Phone button to the Lightning Utility Bar. This allows users to pop up and use the embedded 8x8 communication panel.
Please note: The integration supports general Salesforce application such as Sales. The Sales Console for Lightning and the Service Console for Lightning are also supported, but must be purchased from Salesforce.
- In Salesforce Lightning at the top-right, click the Setup
icon and select Setup
.
- Search for and click App Manager.
- The 8x8 integration supports all of the following Salesforce Lightning applications. Repeat the configuration steps below to add it to the Utility Bar of these applications, as needed:
- Sales
- Sales Console
- Service Console
- Click the drop-down arrow in the row of the Lightning app you're adding the 8x8 integration to, and select Edit.
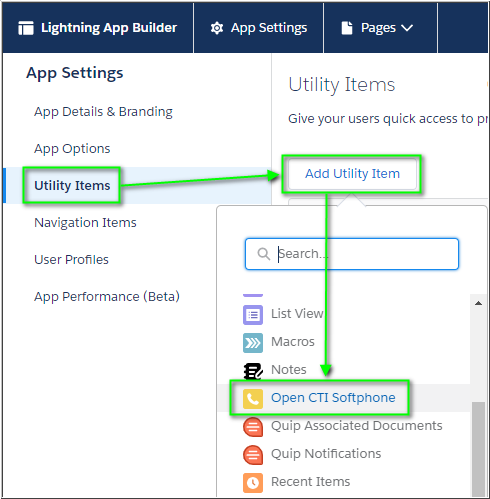
- In the Lightning App Builder, click Utility Items.
- Click Add Utility Item and select Open CTI Softphone.
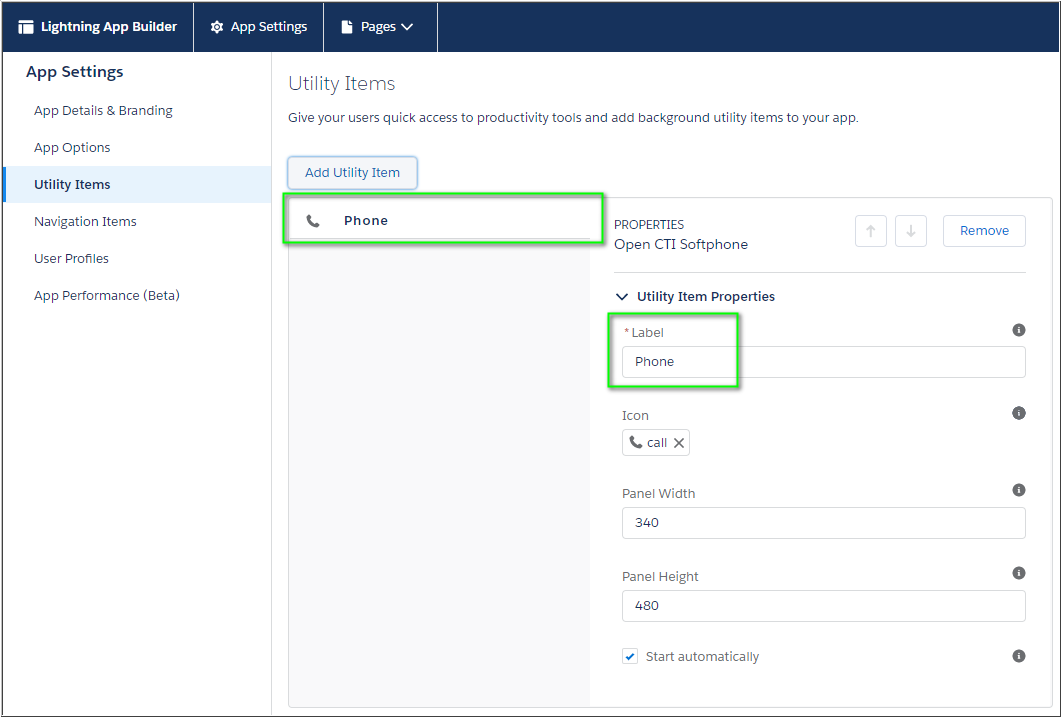
- If desired, you can change the Label of the item as it will appear on the Utility Bar. Leave all other settings as they are.
- Click Save at the bottom of the screen.
- At the top-right of the screen, click the Back
button. This will return you to the Setup Home tab.
- At the top-left of the screen, click the App Launcher
icon.
- Click to launch the Lightning app you've added the 8x8 integration to.
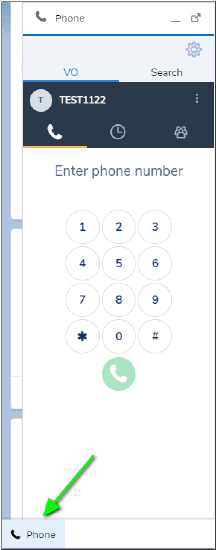
- When users log in to Salesforce, the Phone button
should now appear in the Utility Bar at the bottom-left of the screen.
Note: If the Phone button does not appear for a user, verify that they've been added to the 8x8 call center, and refresh their browser tab for good measure. Clearing of the browser cache and cookies might also be needed.
- All users assigned in the 8x8 call center can now log in to their 8x8 extension:
- Click the Phone button to bring the 8x8 communication panel into view.
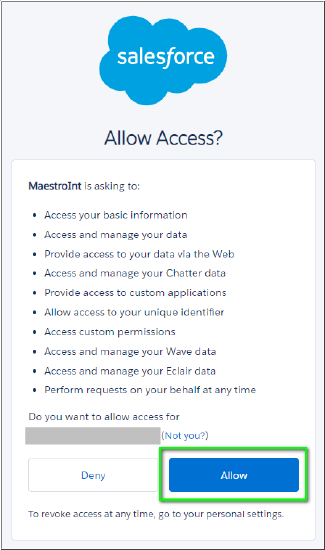
- Users should see an Allow Access? prompt the first time they click on Home or land on another Salesforce page where the integration is available. They must click Allow for the integration to work.
- Users can now log into the communication panel using their 8x8 credentials.
Localization Support
8x8 Integration with Salesforce is currently available in:
- United States
- United Kingdom
- New Zealand (ANZ)
- Australia
- Republic of Ireland
- France
Future Support: Support is planned for the following regions (release dates still to be determined).
- Belgium
- Austria
- Netherlands
- Canada
Customization
While some parameters can be directly configured in the communication panel by agents, the v3.2 integration has no admin-customizable options.
However, if you require specific customizations of the integration, please contact your Sales representative to engage our Professional Services team, who can determine feasibility and potential cost of any requested customization.
Additional Information
Further online documentation is available for installation, configuration, and use of the v3.1 integration: