Poly Rove B4 Multicell Configuration
Objective
Configuring your Poly Rove B4 base station and associated handsets to create a multicell system in order to increase signal coverage and to aid in preventing dropped calls.
Instructions for backing up and restoring your Poly Rove B4 configuration are also covered in this guide, to aid in the event that a base unit fails and a replacement base is needed.
Support Disclaimer: For customers seeking technical support for these devices, 8x8 Support will handle the initial troubleshooting and ensure that telephony and registration are working as expected. For any hardware or DECT issues, customers will need to open a support ticket with Poly/HP directly.
Supported Devices
- Poly Rove B4 Base Station
- Poly Rove B20 Handset
- Poly Rove B30 Handset
- Poly Rove B40 Handset
Supported Features
- When Configured in multicell mode, the Rove B4 system will support up to 200 users/handsets.
- Each base station supports up to 30 handsets (200 handsets requires at least 9 base units).
- The Rove B4 supports the B20, B30 and B40 handsets.
- High Availability:
- If a primary or secondary base station fails, the system will recover (see below for more detail and exceptions).
High Availability
The Rove B4 supports failover if the primary or one of the secondary bases is no longer detected on the network:
- If the primary base station loses connection, one of the secondary base stations will be promoted as the new primary. Once promoted, service will be restored in 2-4 minutes.
- If the original primary base is recovered, it will become a secondary base station, until the DECT chain is restored (see below in Primary Recovery section).
- If the original primary base cannot be recovered, some elements of the system will need to be reconfigured (see below in the Primary Replacement section).
- If any of the secondary base stations become unreachable, the other base stations will take over, assuming that there is overlapping coverage.
Configuration Procedure
Provisioning the Rove B4 multicell system is initially the same as the Rove B1 and B2.
One base station is designated as the primary, and all handsets will be associated with it.
- After site surveys, the primary and secondary base stations will be connected to the network
- The primary and all secondary MUST be on the same firmware before the multicell feature is enabled, otherwise the devices will not sync. Currently 8x8 supports the 8.006 build 0002 firmware for the B4 base stations and all handsets.
Primary Base Station
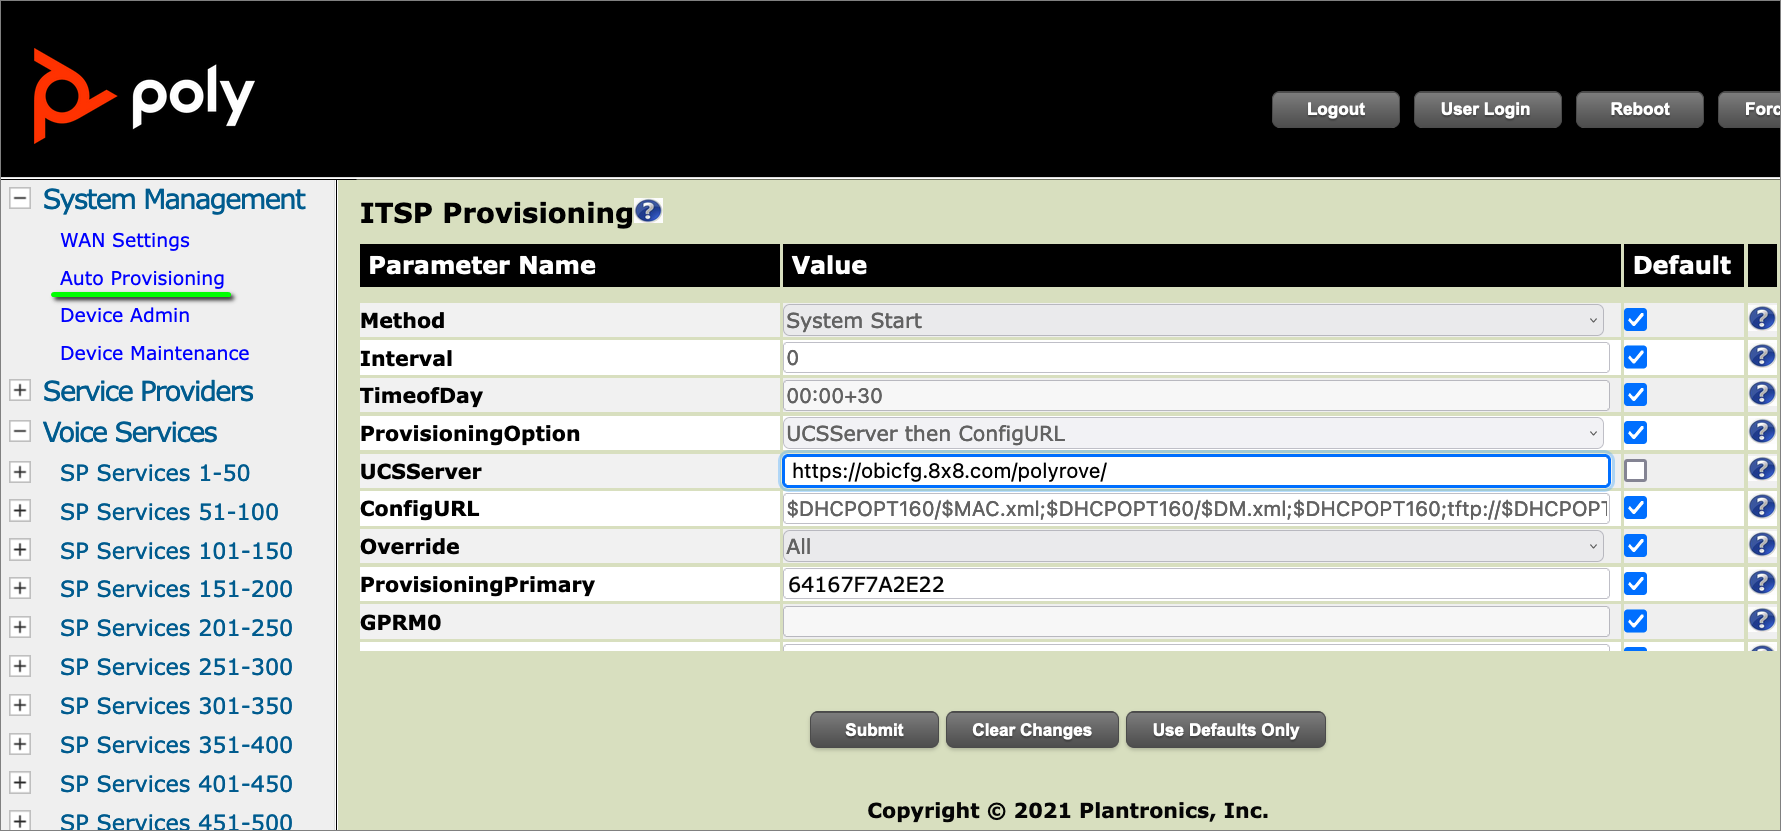
The Primary Base Station must be pointed to the 8x8 provisioning server, as follows:
- Navigate to System Management > Auto Provisioning in the phone's web interface.
- In ITSP Provisioning, add https://obicfg.8x8.com/polyrove/ to the UCSServer field.
- Click the Submit button.
- Once the changes are applied, click the Reboot button.
Secondary Base Stations
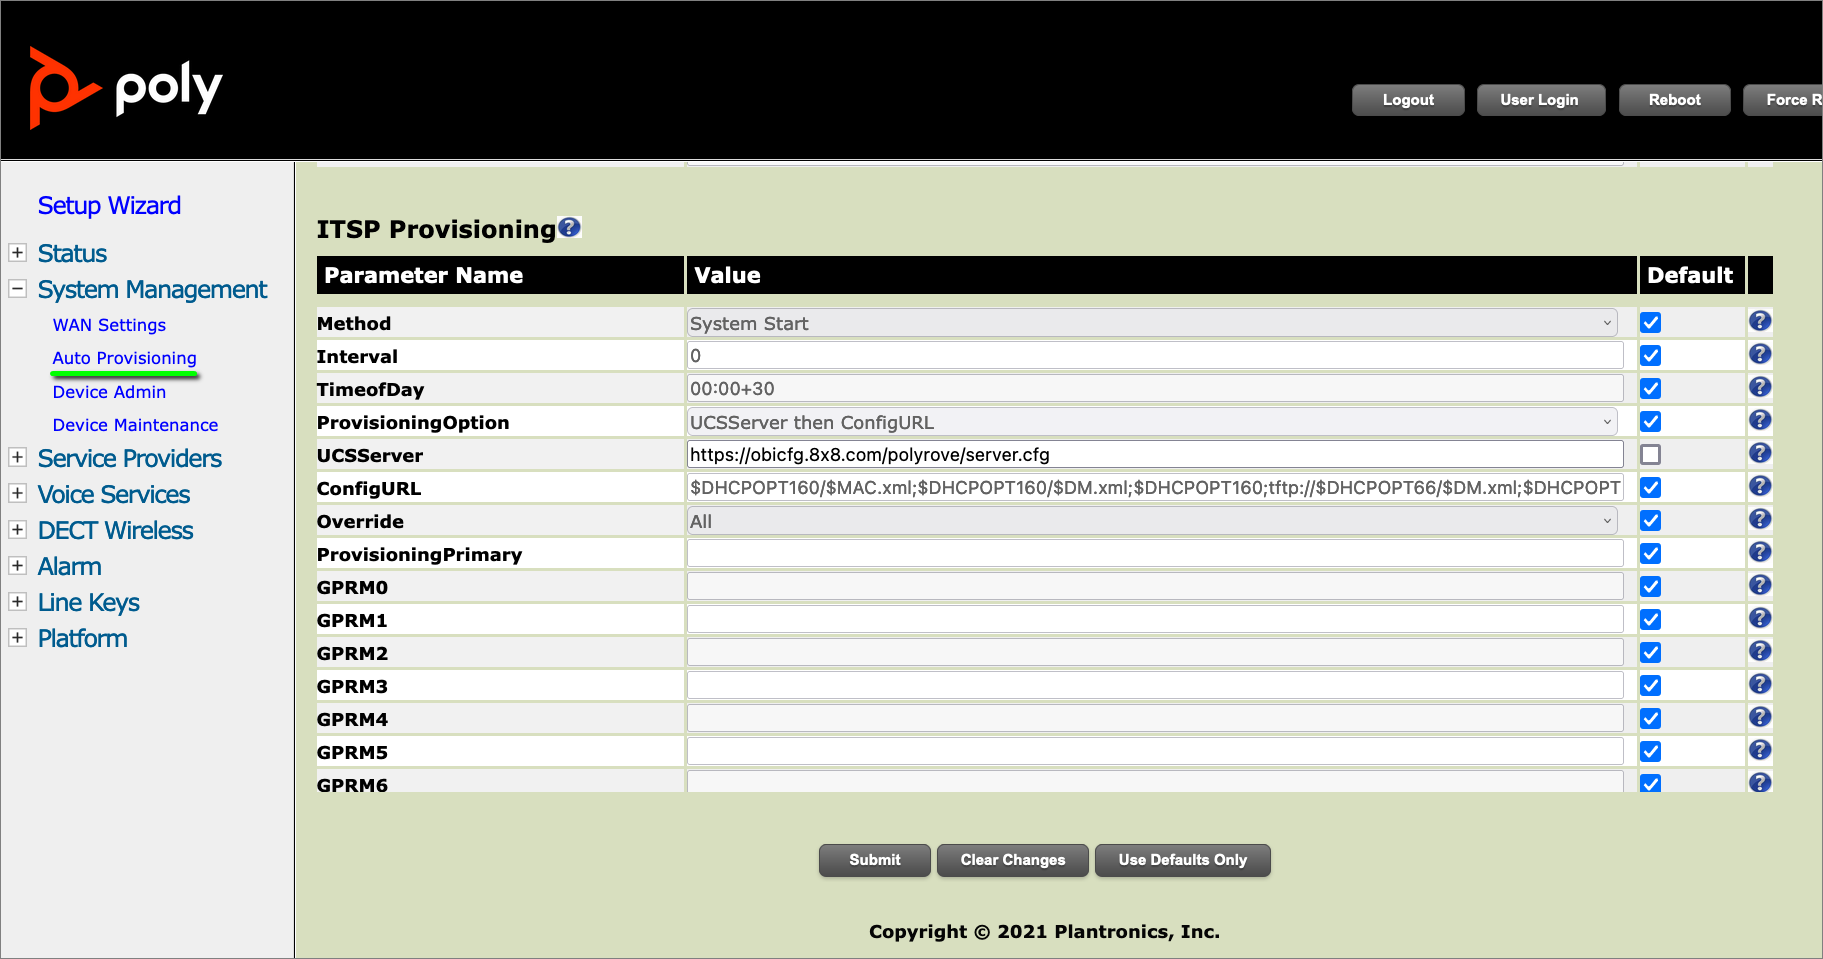
The Secondary Base Stations must be pointed to 8x8 Provisioning as follows:
- Navigate to System Management > Auto Provisioning in the phone's web interface.
- In the ITSP Provisioning section, add https://obicfg.8x8.com/polyrove/server.cfg into the UCSServer field.
- Click the Submit button.
- Once the changes are applied, click the Reboot button.
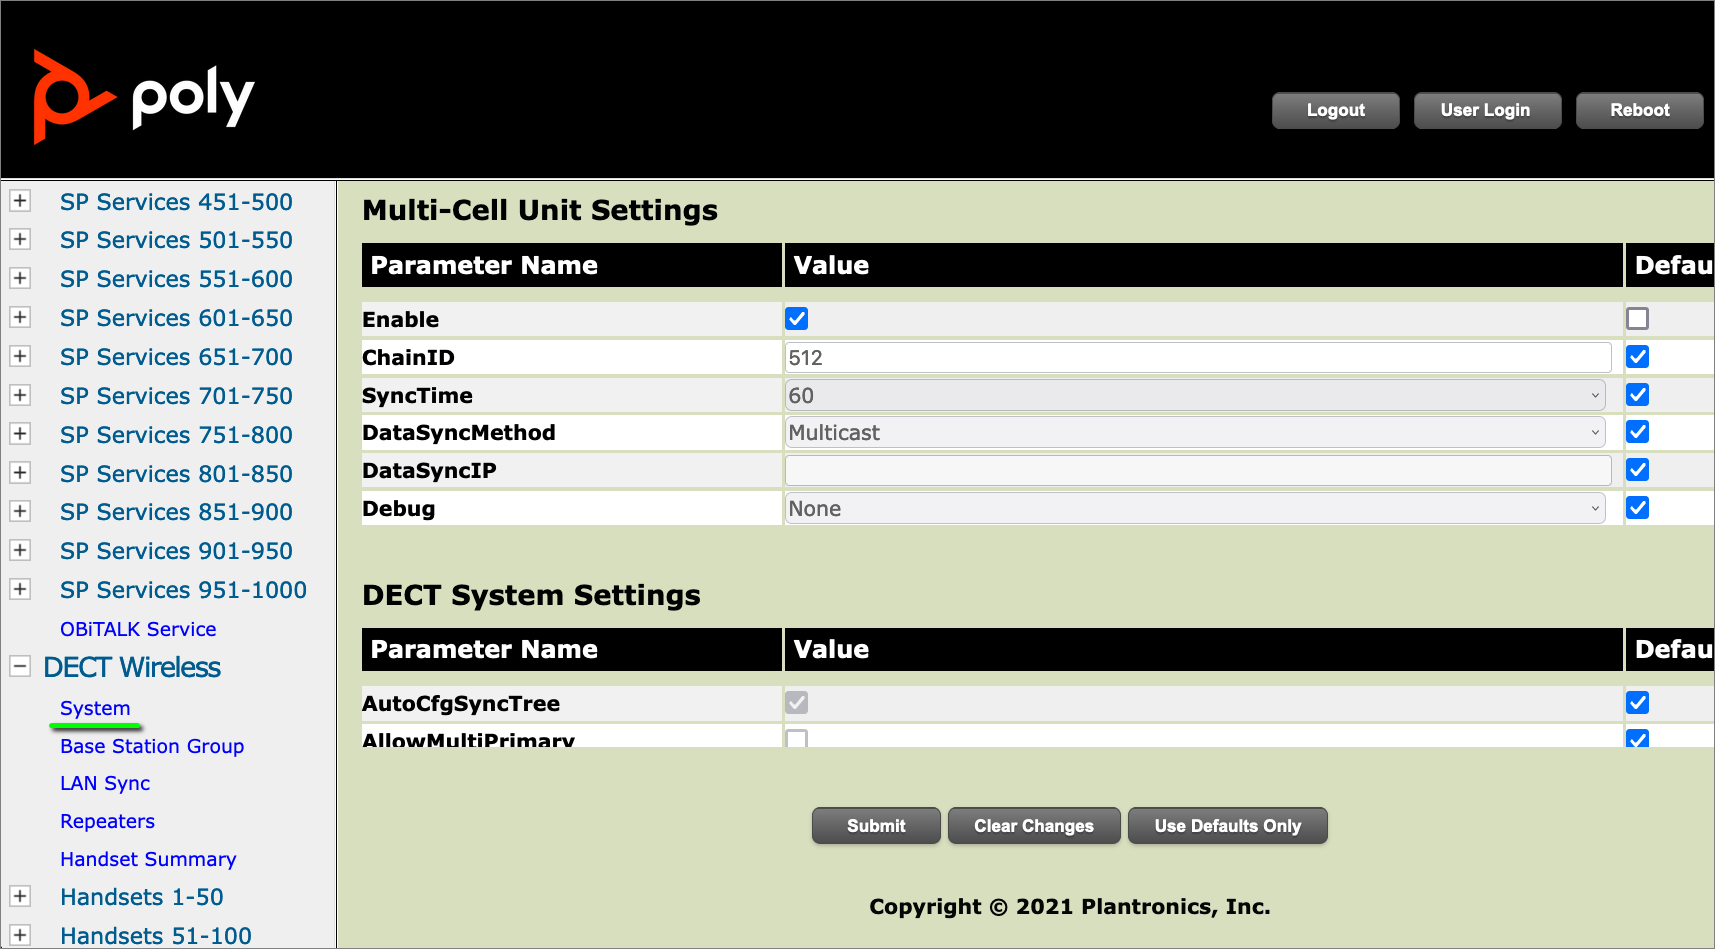
- Once the base stations all have the same firmware, enable multicell by accessing the web interface of each base station, starting with the Primary.
- Navigate to DECT WIRELESS > System.
- Under Multi-Cell Settings, uncheck the Default check box for Enable and ChainID in the Default column.
- Check the Enable checkbox.
- The ChainID can be left at 512, or another can be entered.
- The ChainID must be the same for all base stations.
- Click the Submit button, and when the changes are applied, click the Reboot button.
- Once all base stations are enabled for multicell, each device should be rebooted to expedite the linking process.
IMPORTANT: Once the multicell network is synchronized, the web interface password for all of the devices will be the same.
The password will be generated from the MAC address of the primary base, and will be viewable in the 8x8 Admin Console under Home > Devices > View Device Report > Device Admin Password.
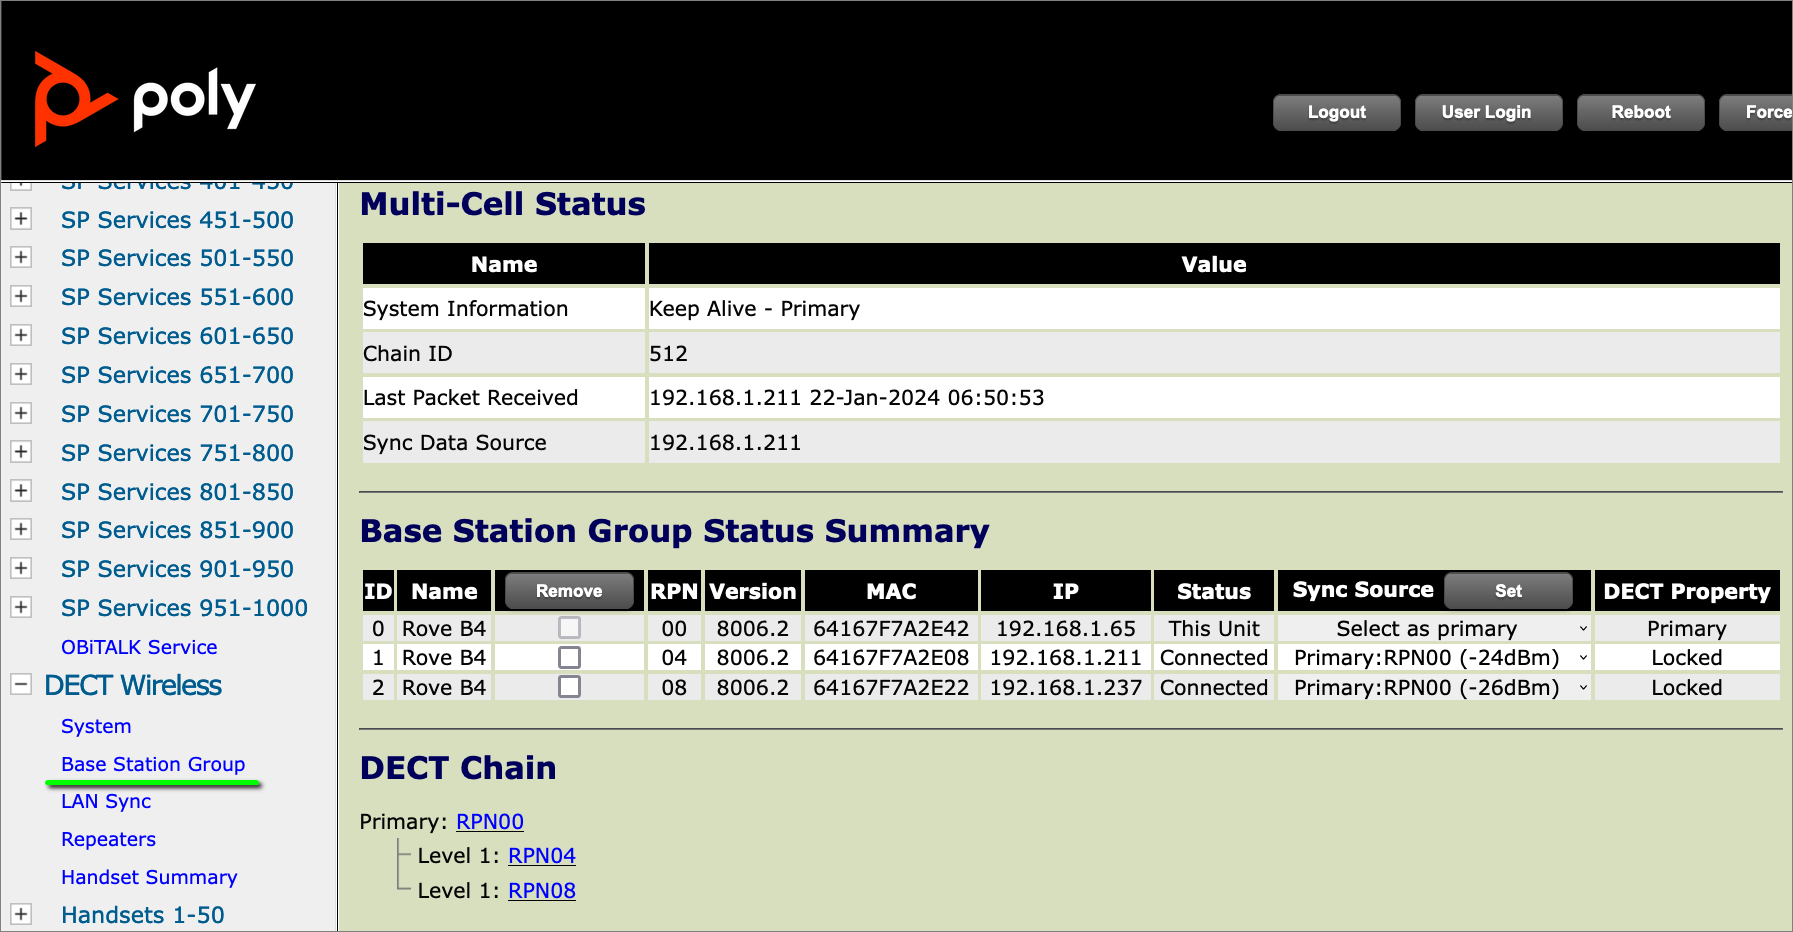
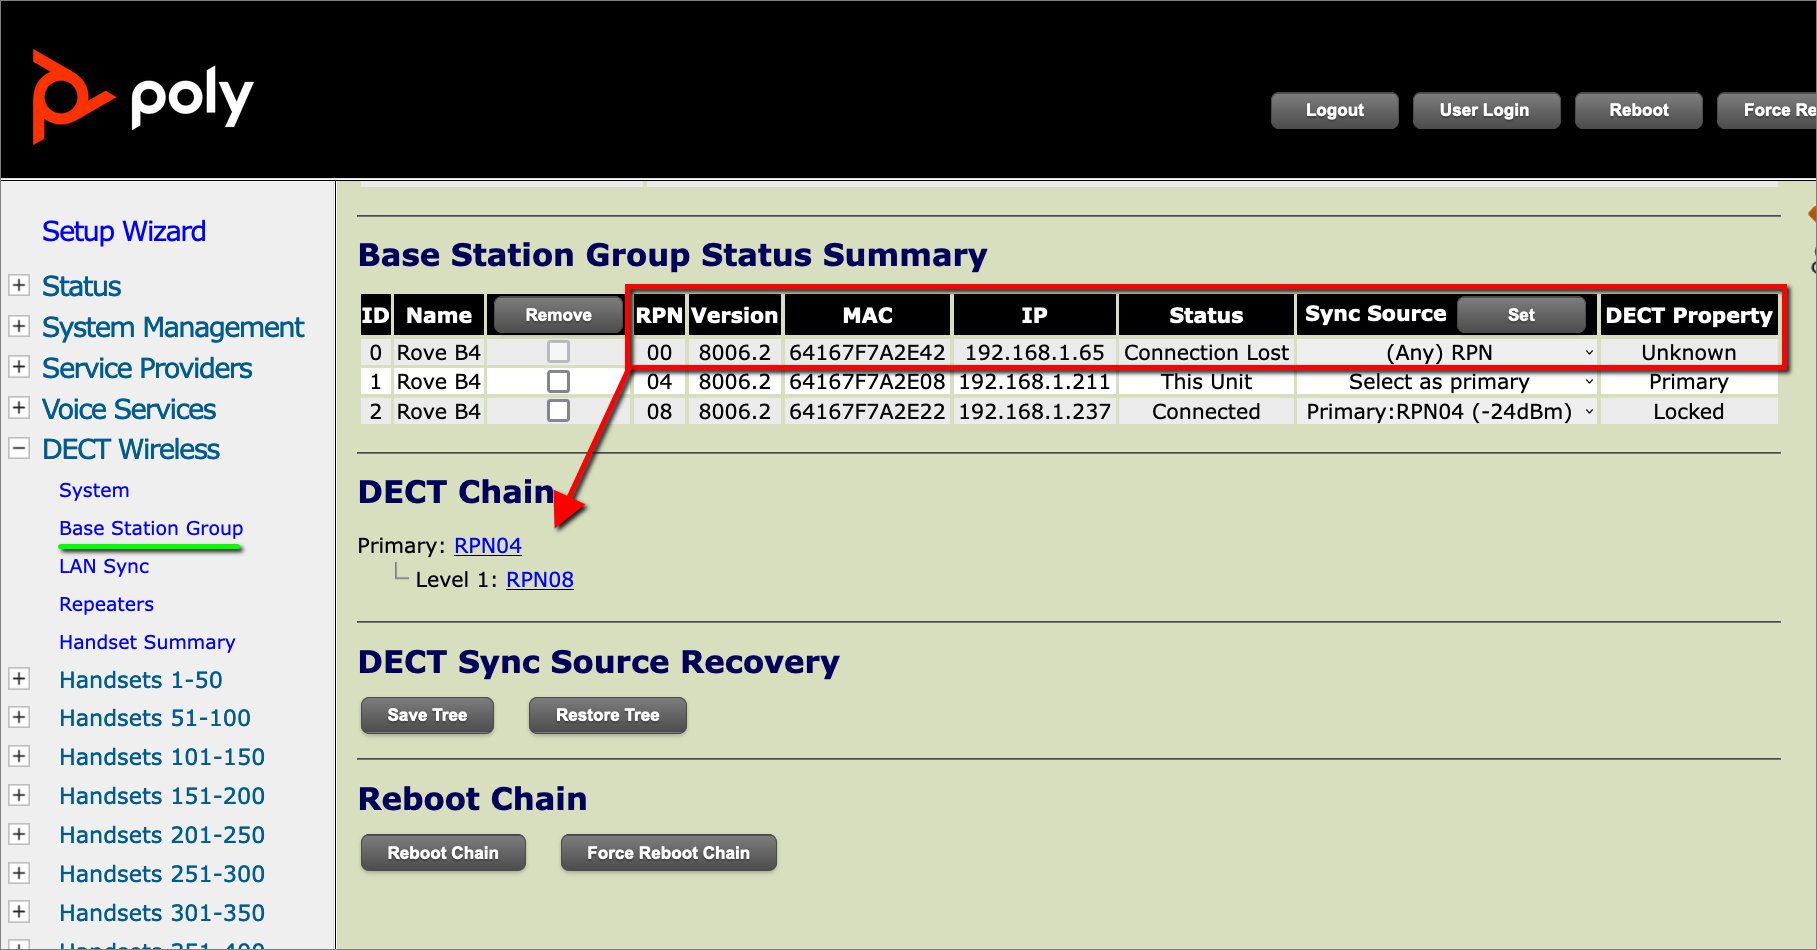
- After approximately five minutes, log into the web interface of the primary station and check the status of the multicell group under DECT Wireless > Base Station Group.
- Under Base Station Group Status Summary, the multicell group will be fully synced when the primary base displays Primary and the secondary bases display Locked in the DECT Property column.
- After the multicell network has been set up and synced, the handsets can be registered in the same way as with the Rove B1 and Rove B2 devices.
System Backup
After your initial setup, both the DECT chain and the handset information should be backed up.
Backing Up the DECT Chain
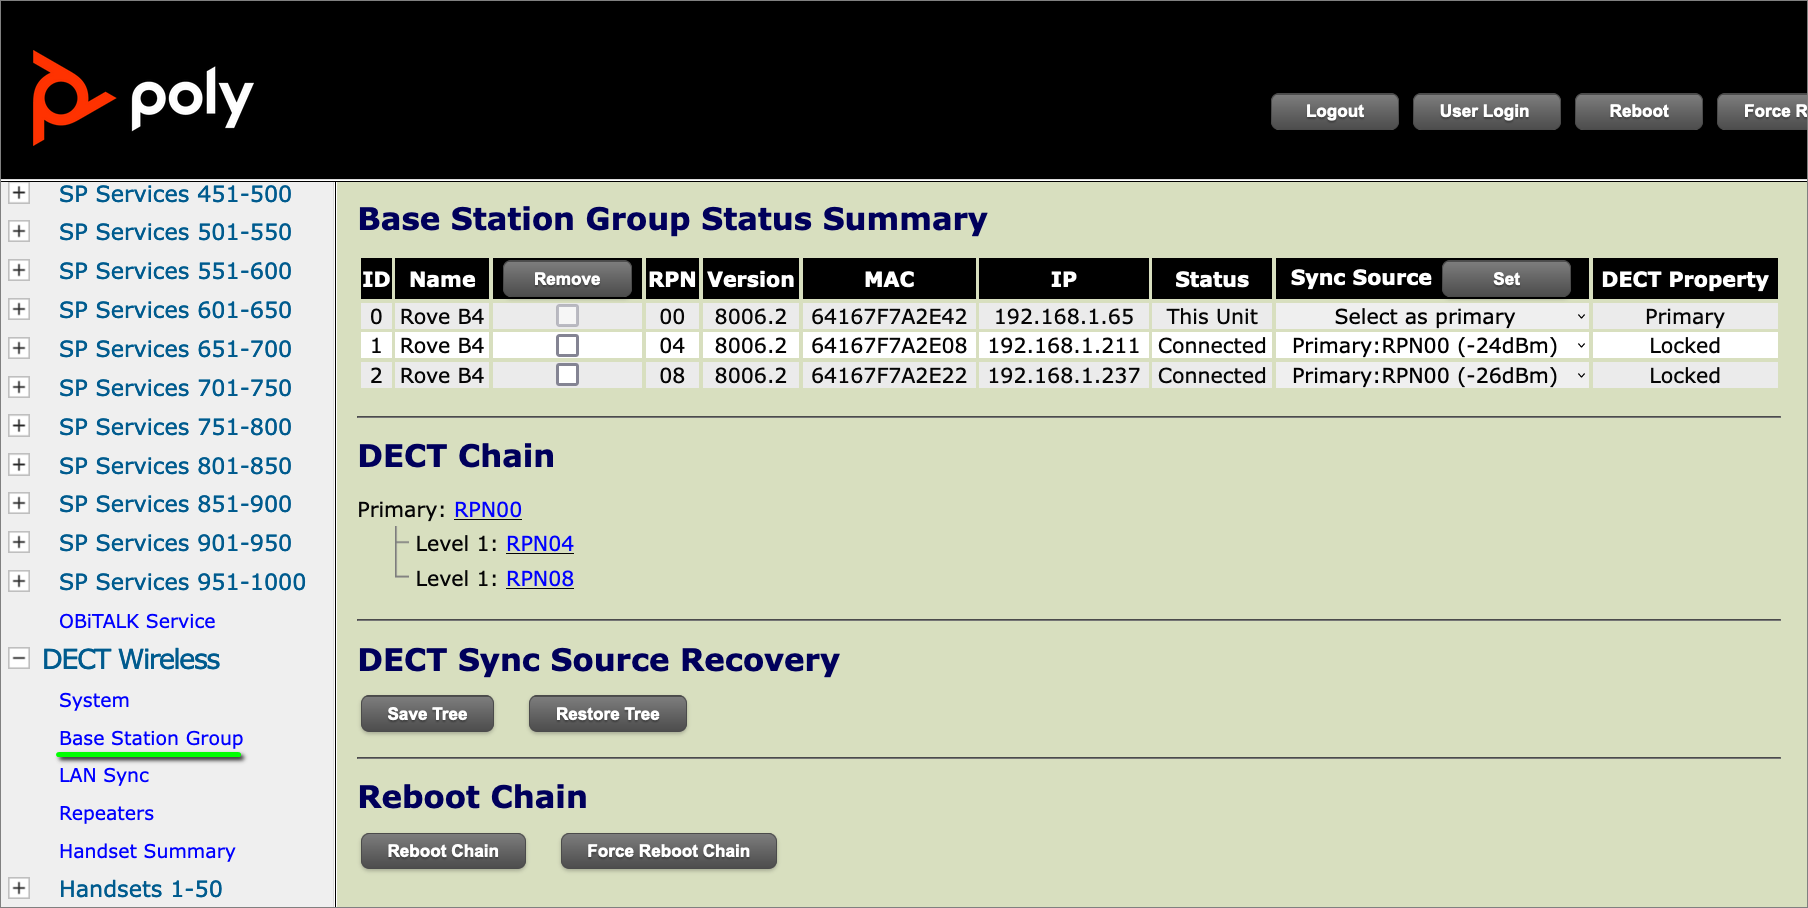
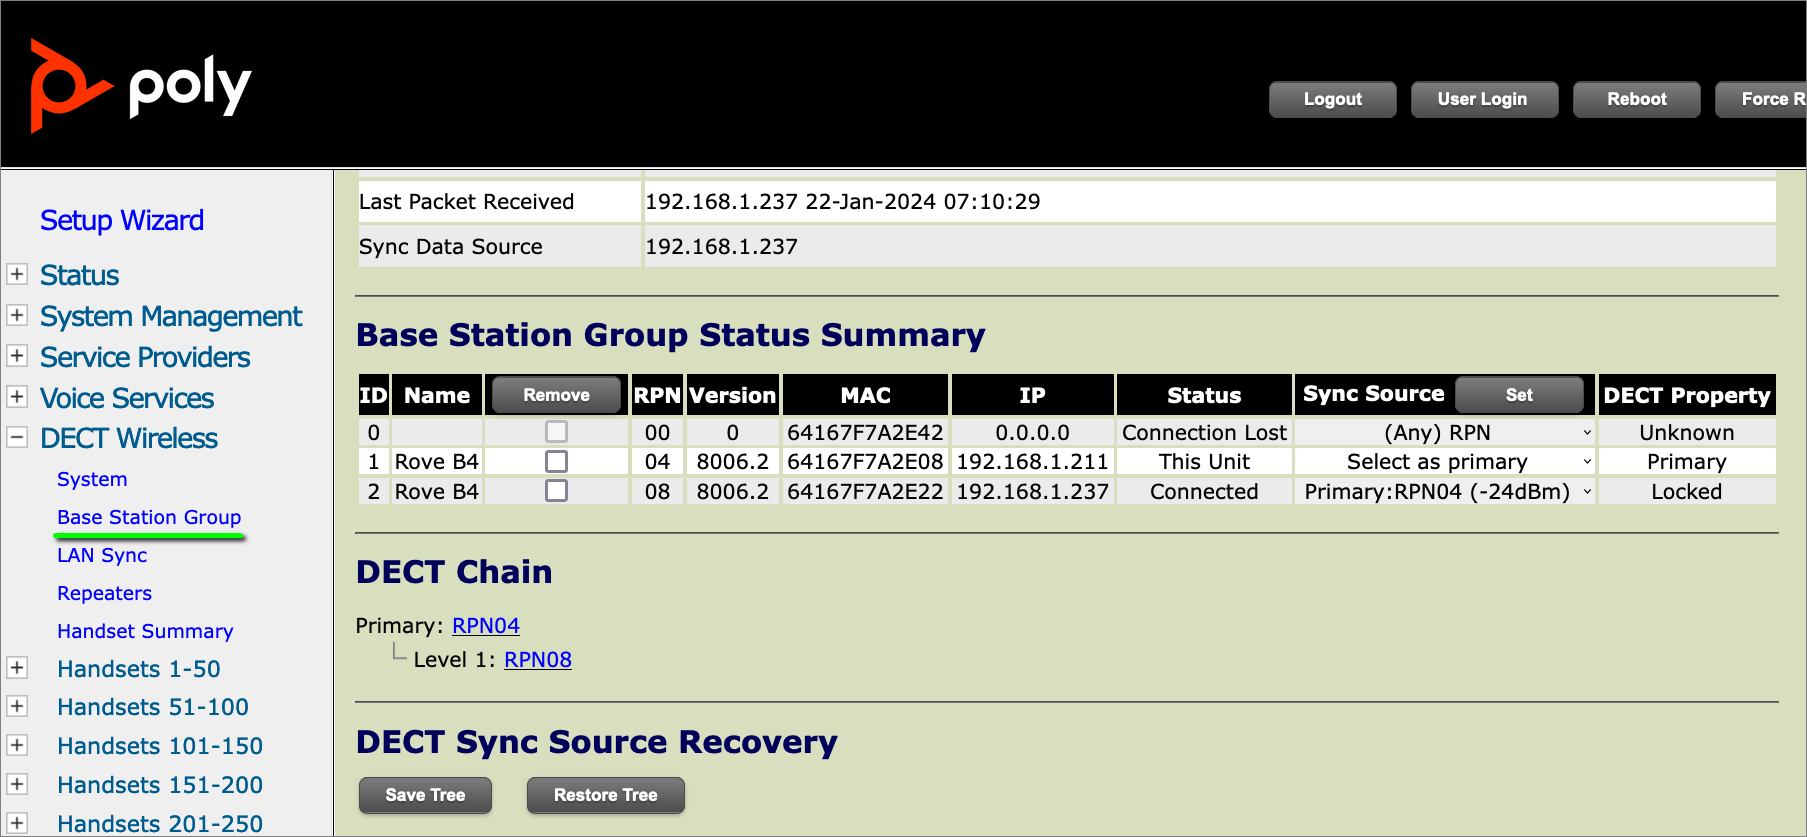
- Log into the web interface of any of the devices and navigate to DECT Wireless > Base Station Group.
- In the Base Station Group Status Summary section, ensure the primary base station is listed as Primary in the DECT Property column. Ensure all the secondary base stations are listed as Locked in the Dect Property Column.
- In the DECT Synch Source Recovery section, click the Save Tree button.
- The tree information is saved locally on the base stations. An external file is not generated.
Backing Up Handset Information
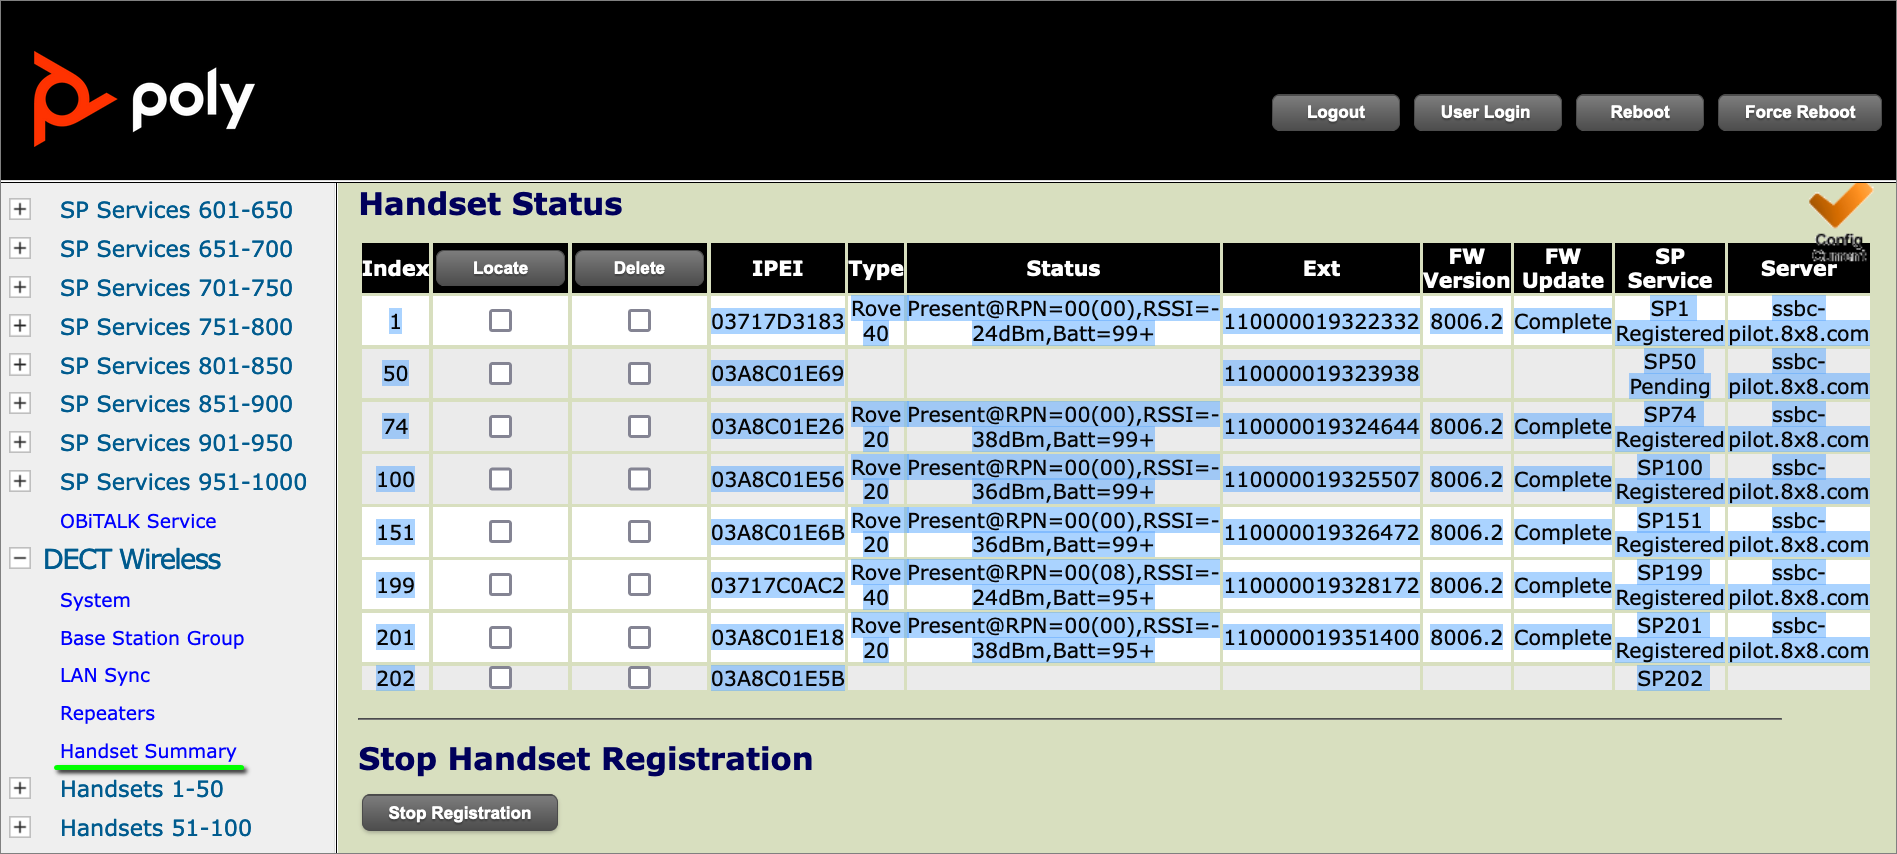
- Log into the web interface of any of the base stations and navigate to Dect Wireless > Handset Summary.
- In the Handset Status section, highlight and copy all of the handset information and paste in into a spreadsheet or other document.
System Restore: Primary Recovery
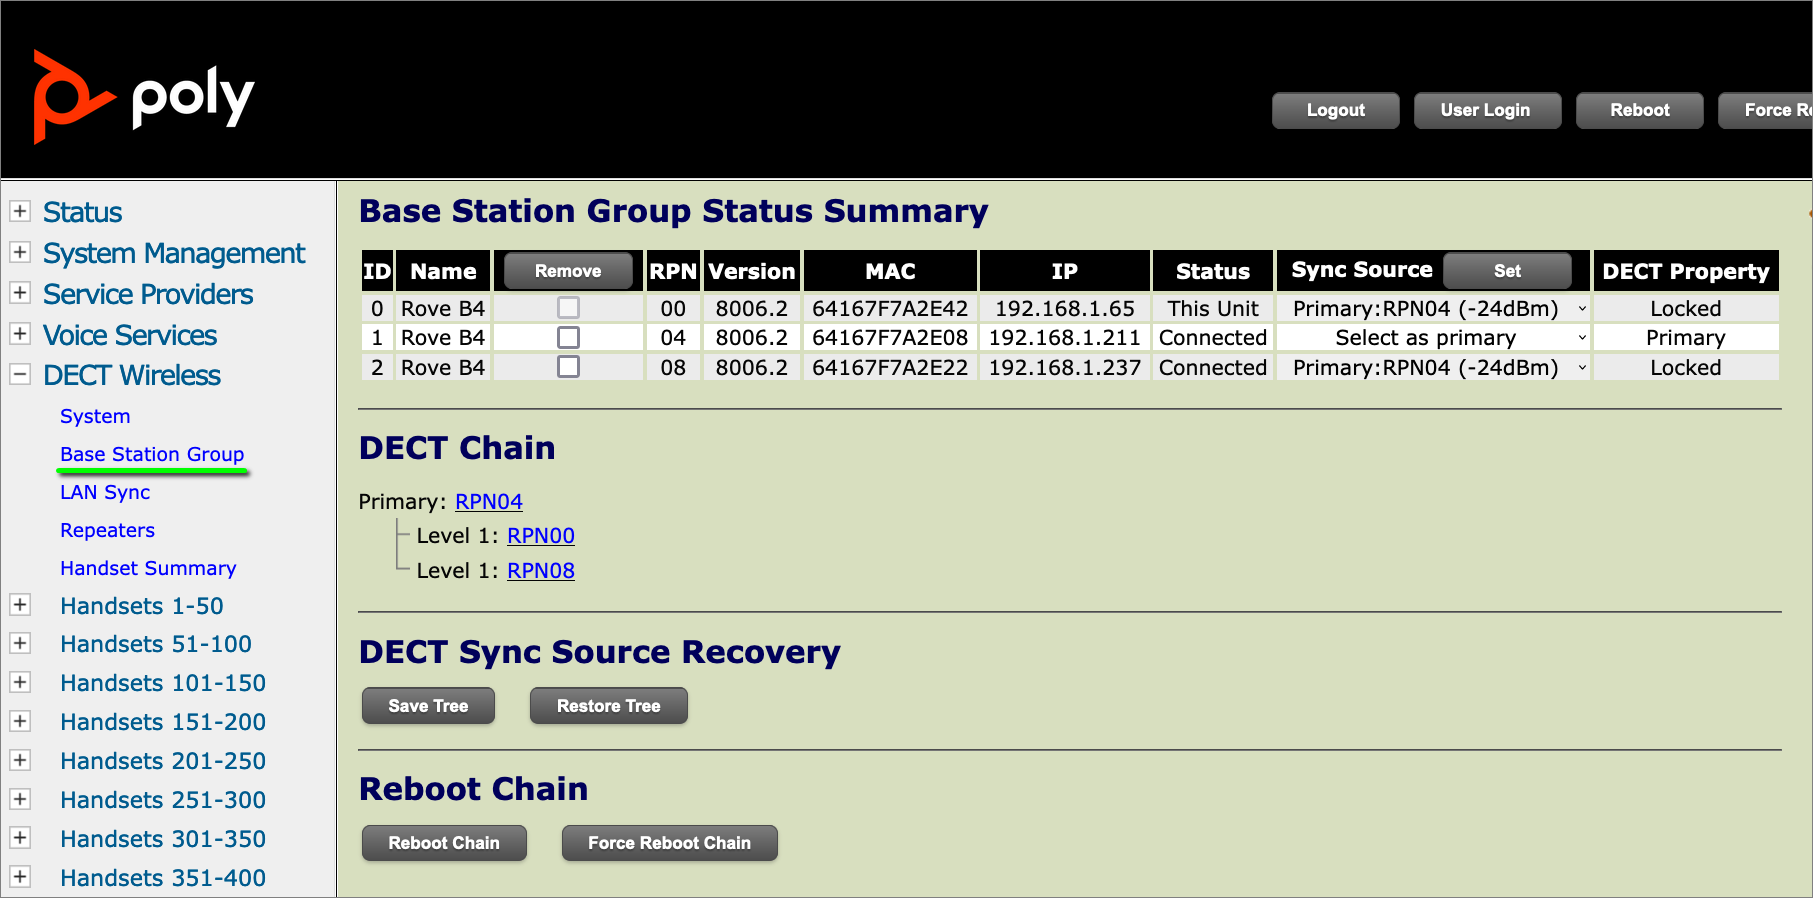
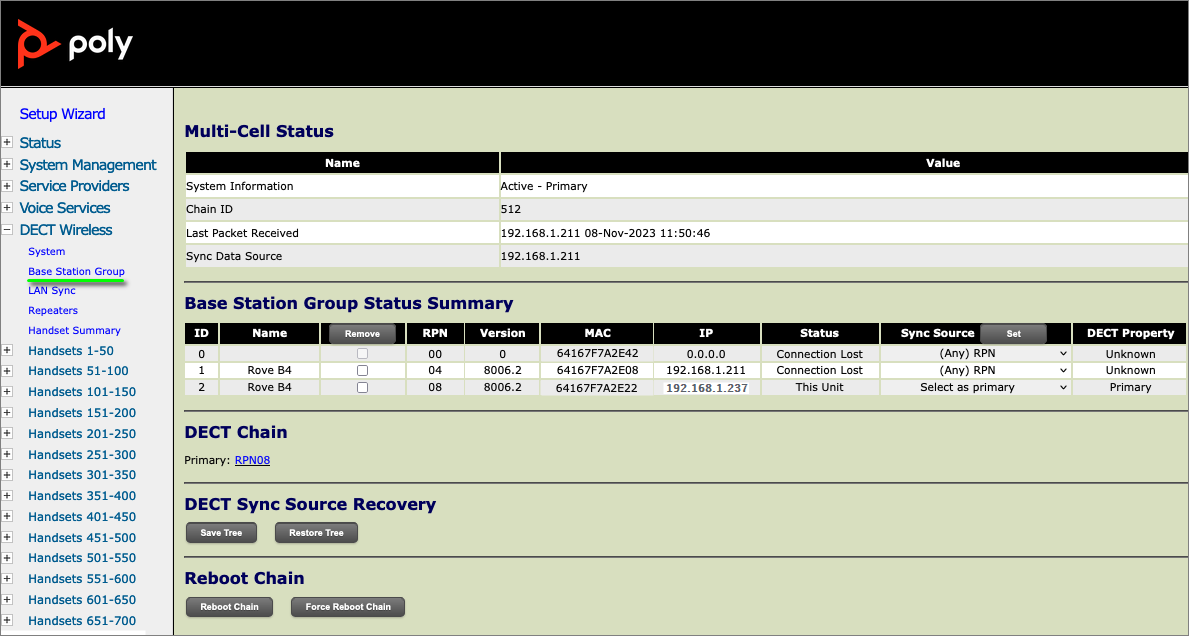
In the event that primary goes offline temporarily and then later recovers it will appear as a locked secondary station in the Base Station Group Status Summary (see the screenshot below).
In the DECT Chain, its RPN (RPN00) will show up in the tree under the newly promoted secondary (RPNxx).
Important:
- Until the original primary is restored, it is important to note that the mutlicell system will not request any configuration information from 8x8 provisioning. This means that any changes in 8x8 Admin Console will not take effect until the original primary is restored.
- If the Dect Chain was not initially backed up, the original primary base can be restored by powering down all base stations and then powering up only the original primary. Then log in to the web interface, and when its status is displayed as the new primary, you can power up the remaining stations.
To restore the original primary, follow these steps:
- Log into the web interface of any of the base stations and navigate to Base Station Group > DECT Chain.
- Click on the Restore Tree button.
- Note that the original primary (RPN00) will now appear at the top of the tree.
- Once the original primary base is restored, it will automatically request its configuration file from 8x8 provisioning again after it is rebooted.
System Restore: Primary Replacement
In the event of a primary base failure that cannot be recovered, a new primary must be configured. Due to the effort required, it is recommended that this be done during a maintenance window.
NOTE: The multicell system will continue to operate with the promoted primary until the maintenance window.
- In the web interface, navigate to DECT Wireless > Base Station Group > DECT Chain.
- A primary that has not recovered will not show up in the DECT Chain and will be set to Unknown in the Base Station Group Status Summary > DECT Property column.
To minimize downtime, follow the steps below to configure the new primary and reset the the multicell network for the new device:
- In 8x8 Admin Console, update the MAC address for each of the users configured to the B4 base to that of the replacement base.
- NOTE: At this point all the handsets will become deregistered, and calls cannot be placed or received.
- Connect the new primary base station to the network and log onto its web interface.
- Follow the instructions above in Configuration Procedure > Secondary Base Stations for adding a secondary base. If the new base has a different firmware version than the existing group, follow the steps to update the firmware and then enable the multicell on the device.
- Once multicell is enabled, the new primary will show up as secondary in the Base Station Group > Base Station Group Status Summary.
The original primary will always show up in the Base Station Group Status Summary with a Connection Lost status. It cannot be removed.
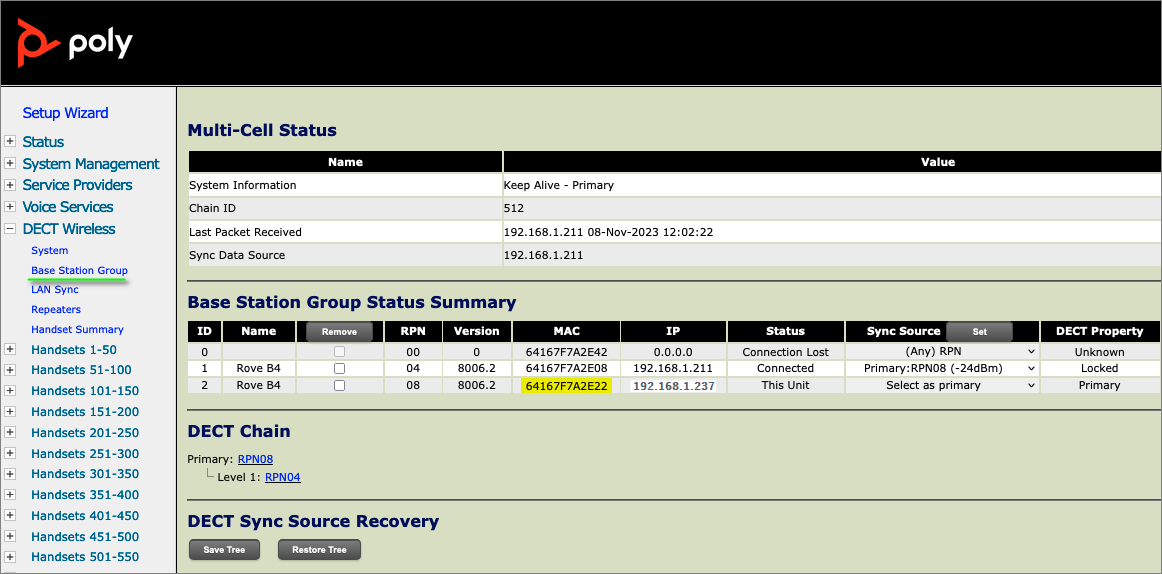
- Once the multicell group shows a locked status (see the screenshot above), unplug all the base stations except the base that will be the new primary. This will result in it being promoted from a secondary to a primary. Log in to the web interface of the new primary and confirm its new status.
- In the Base Station Group Status Summary, it will appear as Primary, and all powered down base stations will display Unknown (see below).
- Power up all the base stations, and after 2-4 minutes, they will show up as locked to the new primary.
Final Replacement Steps
These last steps will set the new primary base as the provisioning primary in the web interface as follows:
- Navigate to System Management > Auto Provisioning.
- Scroll down to the ITSP Provisioning section.
- Update the UCSServer URL to https://obicfg.8x8.com/polyrove/.
- Update the Provisioning Primary field to the MAC address of the new primary.
- Save the changes.
- Reboot all base stations, including the primary.
Once the new primary downloads its configuration, the password for the web interface will change. The new password can be found in 8x8 Admin Console.
All handsets should re-register with the SIP server after the primary downloads its new configuration from the 8x8 provisioning server.