Saving and Editing Looks from an Explore
Objective
Saving and editing Looks from an Explore with Fuze Discover.
Applies To
- Fuze Discover
Procedure
Looks are saved reports consisting of filters, visualizations, fields, sorting, etc. of a query in an Explore. You can add a Look to a dashboard or view and explore the Look in the future.
Saving Looks from an Explore
Save a Look from an Explore when you want to capture Explore results or add the query results to a dashboard.
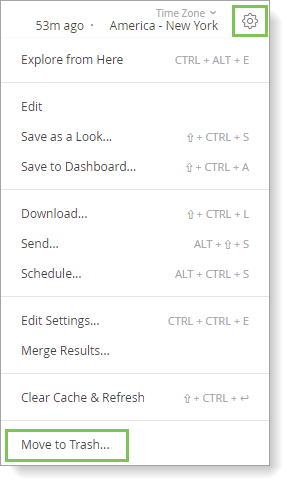
- In the top-right corner of the Explore, click the gear menu.
- Select Save as a Look.
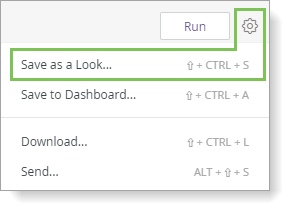
The Save Look window is displayed.

- In the Title field, enter a new title. If you are saving over an existing Look and want to keep the existing title, leave the Title field blank.
- (Optional) In the Description field, enter a description of the Look. If you are saving over an existing Look and want to keep the existing description, leave the Description field blank.
- In the Space pane, select the space where you want to save the Look. In the left pane, select Personal or Group.
- Add a title to the Look.
- (Optional) Add a description for the Look.
- Click Save.
Note: Personal Folders contain Looks and Dashboards that can only be viewed by the user.
Group Folders contain Looks and Dashboards that can be viewed by all users in the organization with access to Fuze Discover.
Shared Folders contain Looks and Dashboards that are managed by Fuze.
Alternatively, you can overwrite an existing Look by selecting it in the right Space pane. The Title and Description fields will be filled with the existing Look’s information. You can search within a Space by using the Filter by title... search box.
Note the following restrictions regarding Spaces:
- Shared Folders contain Looks and Dashboards which have been pre-configured by Fuze, and hence cannot be edited. Created Looks and Dashboards cannot be saved to the Shared Folder.
- Additional Spaces and subfolders cannot be created.
- The Personal, Group, and Shared Spaces cannot be renamed.
Editing Looks
After you create a Look, you can edit the Look’s underlying query, edit the name, and configure the Look to run automatically when loaded.
Editing a Look’s Source Query
After a Look is saved, edit properties such as fields, filters, and visualizations.
- In the top-right corner of the saved Look, click the gear menu.
- Select Edit.
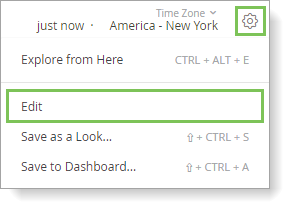
The Edit Look screen is displayed. - Make the desired changes to the dimensions, measures, filters, visualizations, etc.
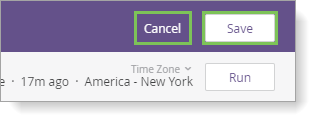
- Click Run to update the Look and confirm the new query displays the desired results.
- Click Save to save the changes, or click Cancel to cancel the changes.
Renaming a Look
- While in the Look, click the gear menu icon.
- Select Edit.

- The name of the Look is displayed in the top-left of the screen and has a dotted underline. Point to the name and click to activate the text cursor.
- Enter the new name.
- In the top-right, click Save to save the changes, or click Cancel to cancel the changes.
Editing a Look's Description
To edit a Look’s description, you must overwrite the existing Look and use the same name.
- While in the Look, click the gear menu icon.
- Select Save as a Look.
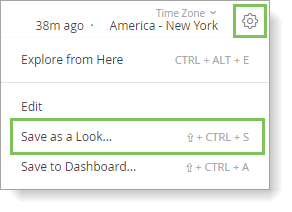
The Save Look window is displayed. - In the Description field, edit the text.
- Click Save & View Look. A confirmation message is displayed in your browser.
- Click OK.
Moving a Look to the Trash
Delete a single Look directly from the Look's gear menu.
- While in the Look, click the gear menu icon.
- Select Move to Trash.
A confirmation message is displayed in your browser. - Click OK.