8x8 Work for Desktop: CALLTO Click to Dial Protocol for Applying Outbound Caller ID to Phone Numbers in Salesforce
Overview
For organizations that have multiple phone numbers representing different local regions, departments, or business entities, it can be critical to call on behalf of that region or entity.
This article describes the process of applying the CALLTO protocol to custom Hyperlink Formula Fields in your Salesforce org. Users clicking on the specific links created in those custom Salesforce fields will present a Caller ID phone number that you've configured into those Salesforce object fields.
EXAMPLE: If your Salesforce users make calls to various regions that have different area codes, and you want them to appear as calling from a specific area, you can configure Salesforce to produce Click to Dial phone links that will:
- Initiate outbound calls through the Salesforce user's 8x8 Work for Desktop application.
- Display a specific phone number to the callee that is different from the Salesforce user's direct phone number, without requiring the user to make changes in 8x8 Work for Desktop.
Applies To
- 8x8 Work for Desktop
- CALLTO Click to Dial Protocol
- Salesforce, only
Requirements
- A Salesforce administrator must perform this configuration.
- 8x8 Work for Desktop version 7.13 and higher must be installed and running on user PCs.
- The callto protocol must be assigned to the 8x8 Work for Desktop application in each user's PC operating system.
- Your desired outbound Caller ID numbers must exist on your 8x8 X Series service, in the 8x8 Admin Console.
- Outbound Caller ID numbers must be shared with users in 8x8 Admin Console.
NOTE: 8x8 Support does not provide scripting configuration or other programming assistance within Salesforce.
The information presented here is provided with the understanding that businesses already have the skills necessary to apply this feature within Salesforce.
For information about Salesforce Hyperlink Formula Fields, please see the following Salesforce article:
Procedure
Completing this process requires that you create two new custom fields for Salesforce objects that your users will initiate outbound click to dial calls from.
If your Salesforce users also use the 8x8 Work for Salesforce integration, we recommend that your custom fields be created for any of the supported Salesforce objects:
- Contacts
- Leads
- Accounts
- Opportunities
- Cases
We'll use the Salesforce Contact object for our example walkthrough, below. If needed, just substitute Contact with the name of the Salesforce object you are creating new fields for.
The following steps are covered:
- Create a FromCallerID field for your desired outbound Caller ID number
- Create a ClickToDial field to appear in your Salesforce object page layout
- Edit your Salesforce Object's Page Layout
- Open and Edit a Contact's FromCallerID Field
Create a FromCallerID field for your desired outbound Caller ID number
When completed, this new field will store an outbound Caller ID phone number that you will add to your specific contacts after this entire process is completed.
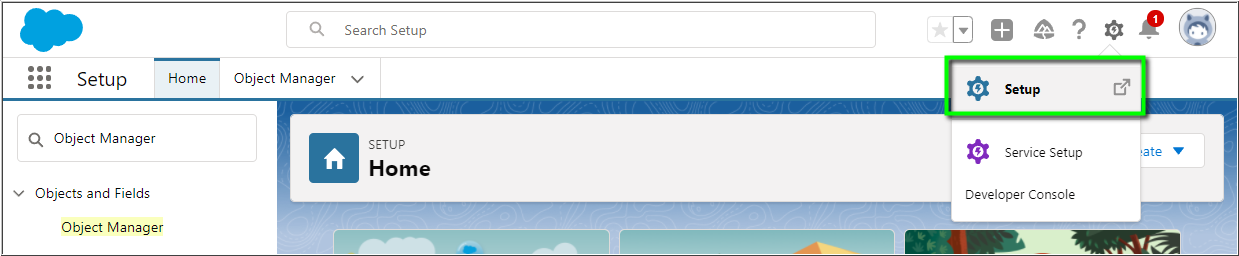
- First, log into Salesforce as an administrator.
- From Setup
 , navigate to Object Manager.
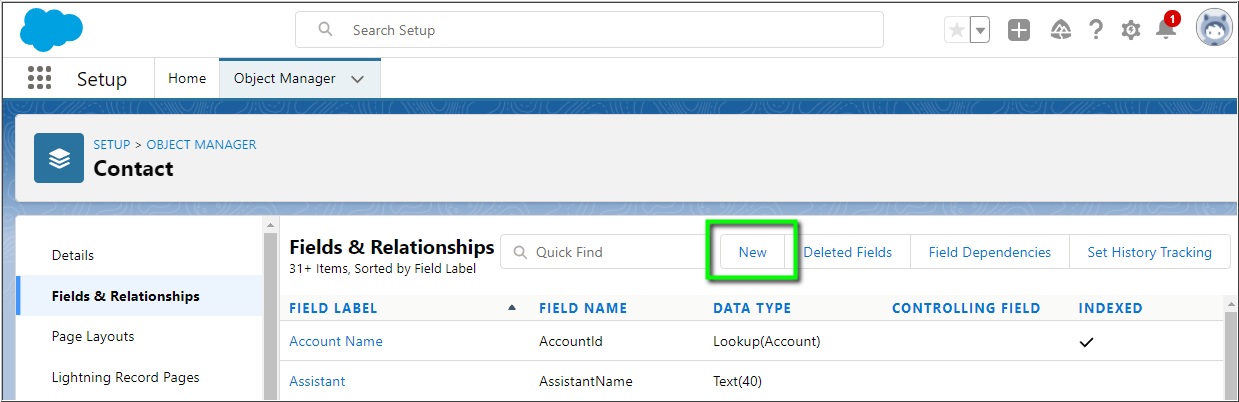
- In the Object Manager, click on Contact and then Fields & Relationships.
- Click New.
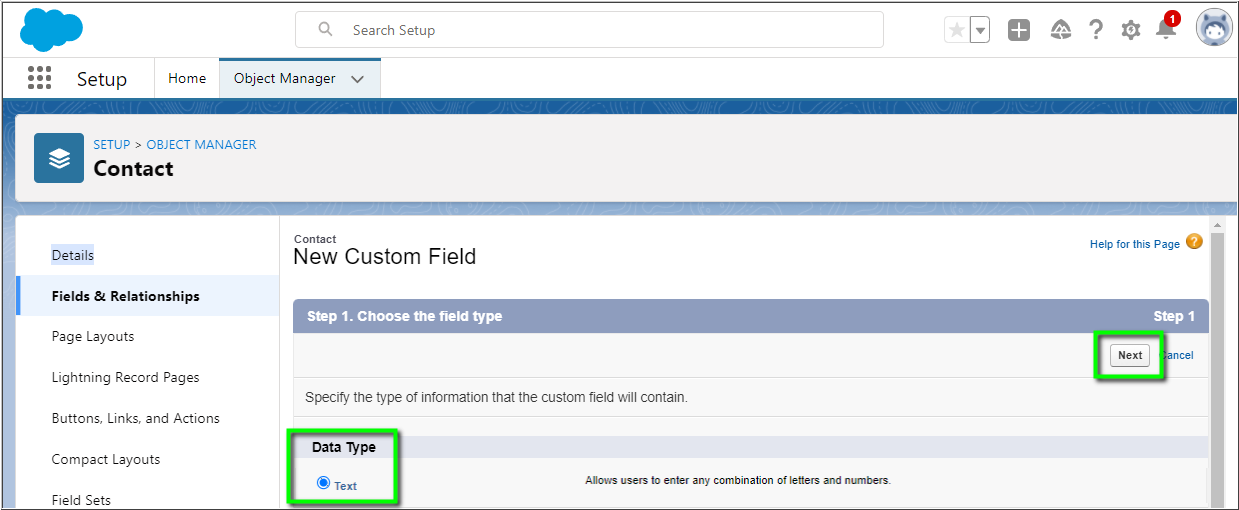
- In New Custom Field > Data Type, select Text.
- Click Next.
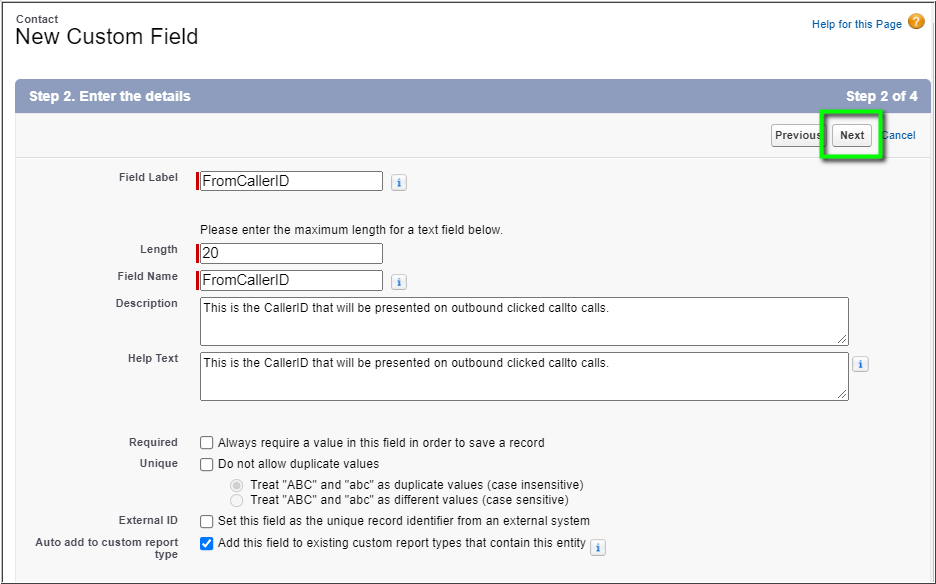
- In New Custom Field Step 2, enter the following data:
- Field Label: FromCallerID
- Length: 20
- Field Name: FromCallerID
- Help Text: This is the CallerID that will be presented on outbound clicked callto calls.
- Click Next.
Note that you can choose any Field name/label (or Help Text) that you wish, as long as they conform to Salesforce's requirements.
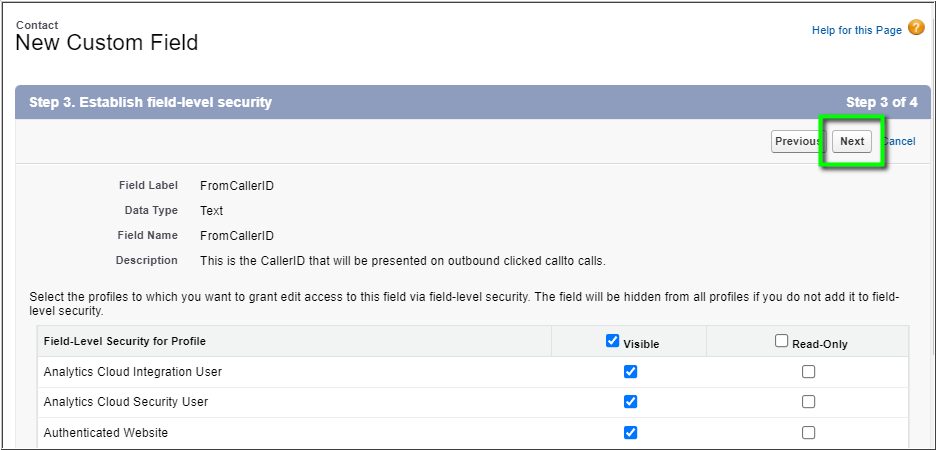
- In New Custom Field Step 3, click the appropriate check-boxes to set the field-level security (visibility) for specific user profiles you will grant access to the new field. If desired, you can check Visible box to select all user profile types.
- Click Next.
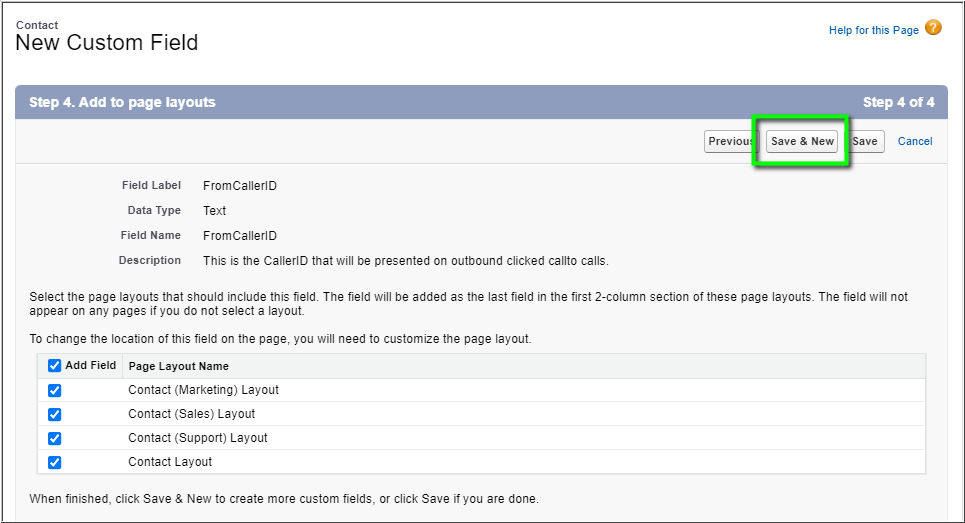
- Confirm that the appropriate Add Field checkboxes are selected for the Page Layouts you want the new field added to.
- Click Save & New to save your new field configuration, and begin creating your next custom field.
Create a ClickToDial field to appear in your Salesforce object page layout
Now you'll create another new field for the same object, which will appear in your chosen Salesforce object's page layout.
For the purpose of our example, we selected the Contact object to work with.
When completed, this second new field will store a click-to-dial hyperlink that will combine the following:
- The callto protocol HTML markup
- The Contact's Phone field phone number
- The Caller ID number that you will have added to the specific contact's FromCallerID field (which you created using the process, above).
- If you clicked Save & New in the last step, above, you'll once again see the New Custom Field template.
- Otherwise, navigate to Setup > Object Manager > Contact > Fields & Relationships, and click New.
- Otherwise, navigate to Setup
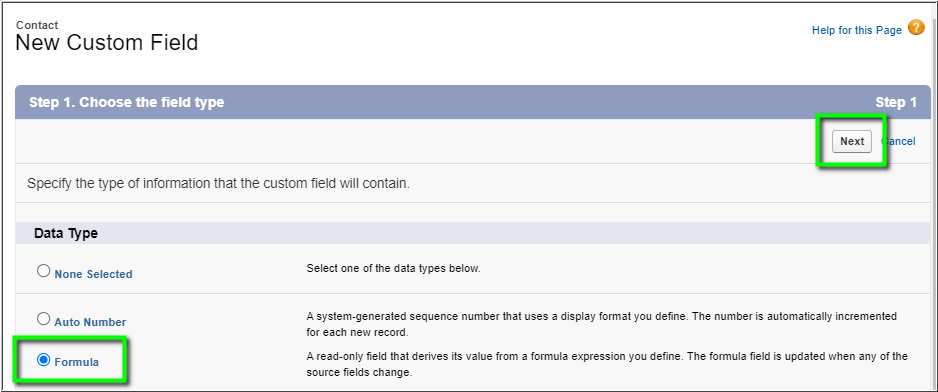
- In New Custom Field > Data Type, select Formula.
- Click Next.
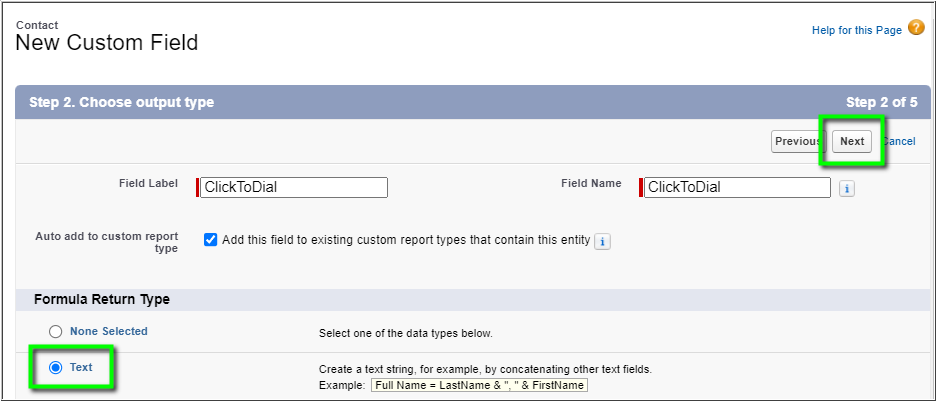
- In New Custom Field Step 2, configure the following data:
- Field Label: ClickToDial
- Field Name: ClickToDial
- Formula Return Type: Text
- Click Next.
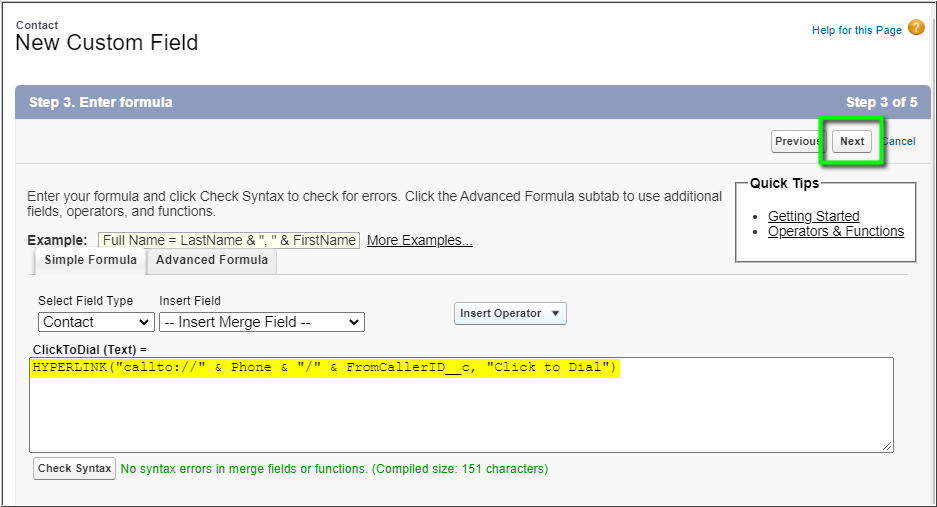
Now you'll add a Salesforce hyperlink formula to the ClickToDial field. Salesforce will use this formula to compile a hyperlink for specific phone numbers that you will add to Salesforce, that will invoke the callto protocol when clicked on.
- Select Field Type should already display your object as selected (Contact, in our example). Select your appropriate object if it isn't selected already.
- Copy the following text and paste it into the ClickToDial (Text) field:
- HYPERLINK("callto://" & Phone & "/" & FromCallerID__c, "Click to Dial")
Note: This formula can be changed to suit your specific needs, but you must supply the knowledge and troubleshooting for different formulas than the one presented, if needed.
- Click Check Syntax to verify that the text you've entered follows Salesforce's hyperlink syntax, and correct your formula if any errors are found.
- Click Next.
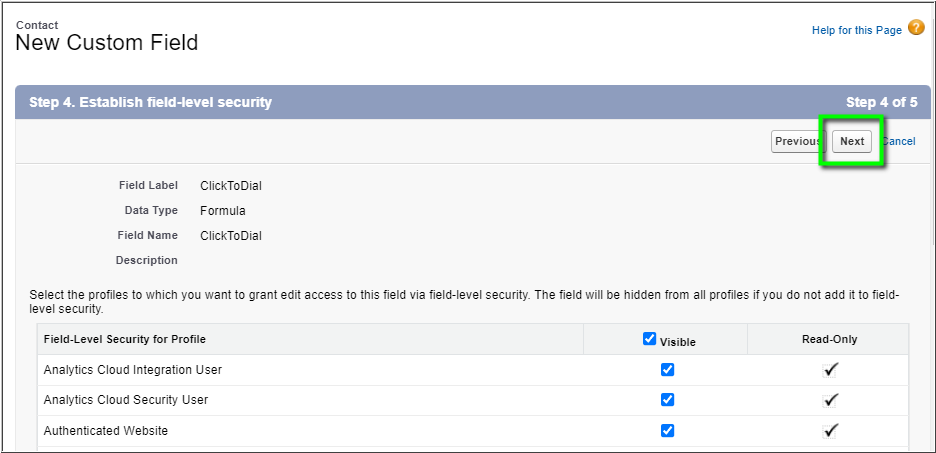
- In New Custom Field Step 4, click the appropriate check-boxes to set the field-level security (visibility) for specific user profiles you will grant access to the new field. If desired, you can check Visible box to select all user profile types.
- Click Next.
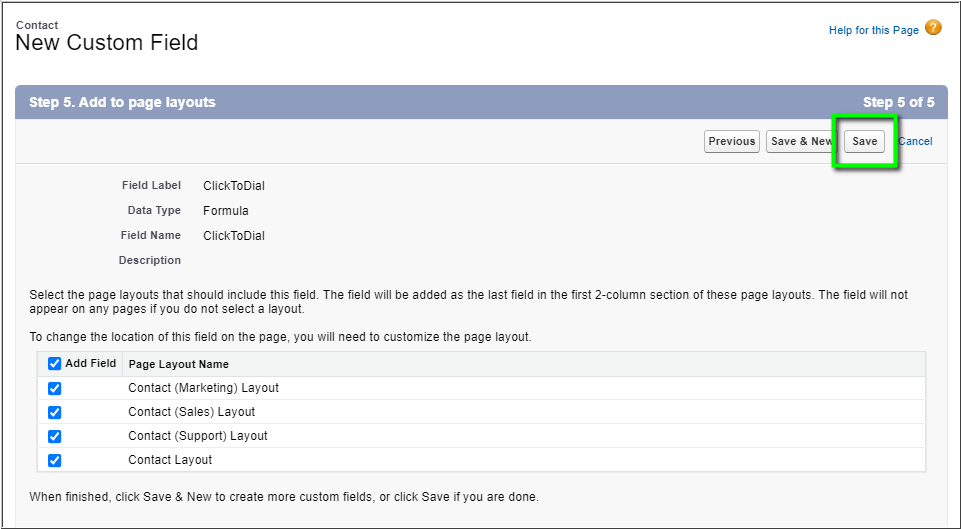
- Confirm that the appropriate Add Field checkboxes are selected for the Page Layouts you want the new field added to.
- Click Save to save your new field configuration, and complete your custom field creation.
- See the next section, below, for brief instructions on editing your object's Page Layout (if required).
Edit your Salesforce Object's Page Layout
Below is the basic process for editing your Salesforce object Page Layout.
For our example, we'll edit the Contact page layout and move our newly-created fields where want them, so that users can easily see and interact with the new objects' field contents.
- Navigate to Setup > Object Manager > Contact > Page Layouts.
- Click Contact Layout.
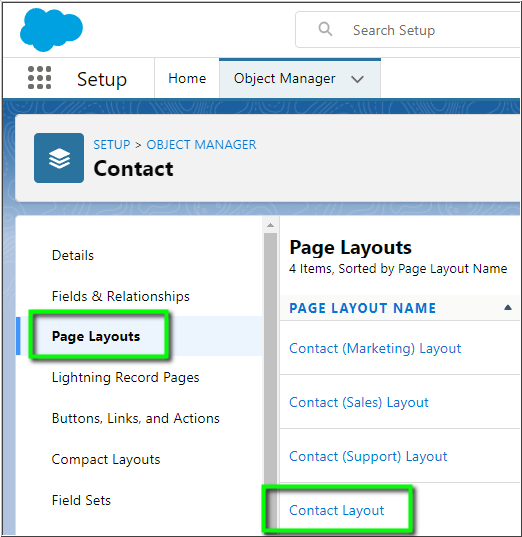
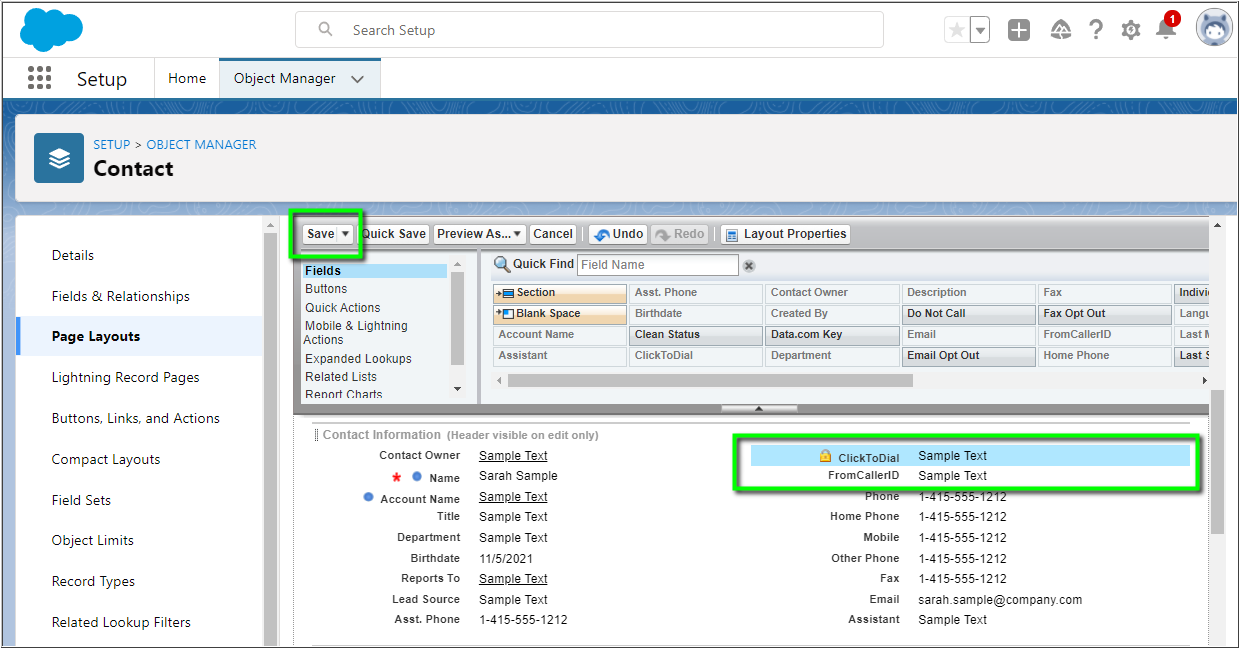
- Scroll down the right-side panel beneath the Contact Layout menu area. You should see both of your new fields listed there:
- ClickToDial
- FromCallerID
- Hover your mouse cursor over each individual field, and click-and-drag them to suitable positions in the layout, as needed. Where you place the fields is entirely up to you!
- Click Save to complete the process.
Note: It may take a few seconds for the change to take effect in Salesforce.
Open and Edit a Contact's FromCallerID Field
You should now see your new custom fields in your object page layout.
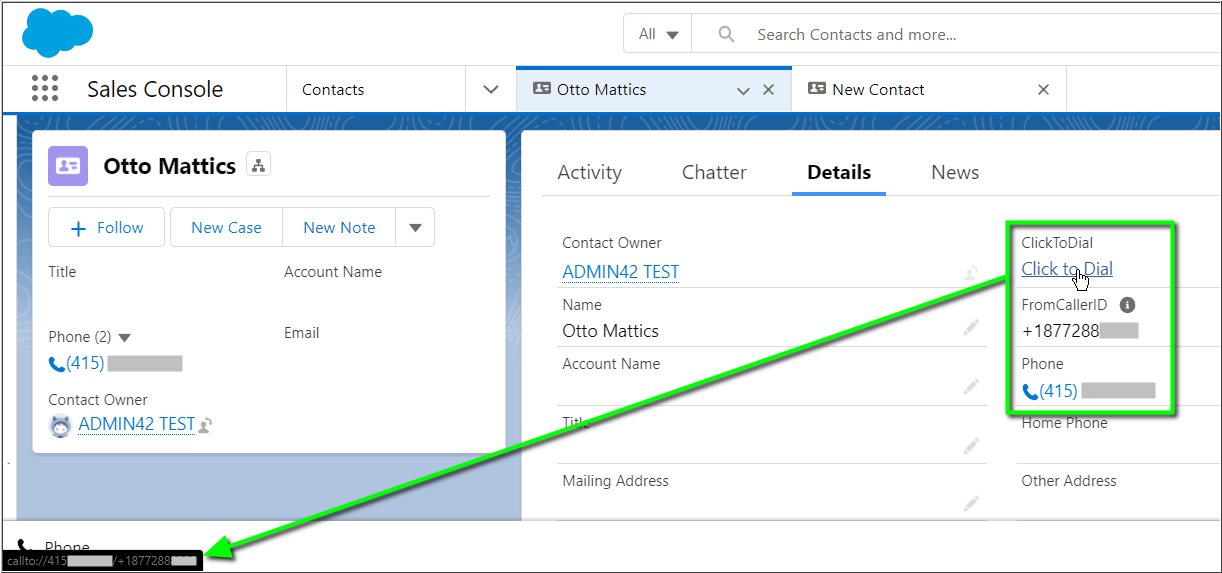
Finally, to see the results of your efforts and to add an outbound caller ID:
- Navigate to the Salesforce object you added your new fields to (in our example, Contacts).
- Navigate to a contact and click on the Details tab. The FromCallerID and ClickToDial fields should appear in your contact's layout.
- Click the FromCallerID field's pencil icon to edit the field, add your desired Caller ID phone number to the field, and Save.
- Now 8x8 Work for Desktop users who have access to the edited Salesforce contact can click on the Click to Dial hyperlink in the ClickToDial field. Their call to the contact will be initiated in 8x8 Work for Desktop, and the phone number in the FromCallerID field will be displayed to the contact.
- Please see the screenshot below for our example.
When you add the FromCallerID phone number to the contact, a hyperlink will be created in your ClickToDial field that should look similar to the following, when you hover your mouse cursor over the Click to Dial hyperlink:
- callto://4155551212/+18880001111
- 4155551212 is your contact's phone number as entered into the contact Phone field.
- +18880001111 is the Caller ID number that your Salesforce users will present to the contact when they click on Click to Dial.
IMPORTANT:
- Phone numbers entered into the FromCallerID field must be in E164 format. This means that a US 10-digit phone number must have a leading +1. So (888) 000-1111 must be formatted as +18880001111.
- Outbound caller ID numbers in the FromCallerID field such as our example +18880001111 above must be shared with your 8x8 Work for Desktop users. If a number in the FromCallerID field is not shared with a user, calls initiated by clicking on the Click to Dial hyperlink will fail.
- Please see this article for Instructions on setting and viewing shared phone numbers on your 8x8 service: